Appetizers are the perfect way to kick off any meal or gathering, setting the stage for delicious things to come.
Whether you’re throwing a party or just looking to spice up your dinner, these quick and easy recipes will impress your guests and satisfy your cravings. Dive into a variety of tasty bites that are sure to hit the spot and get those taste buds tingling!
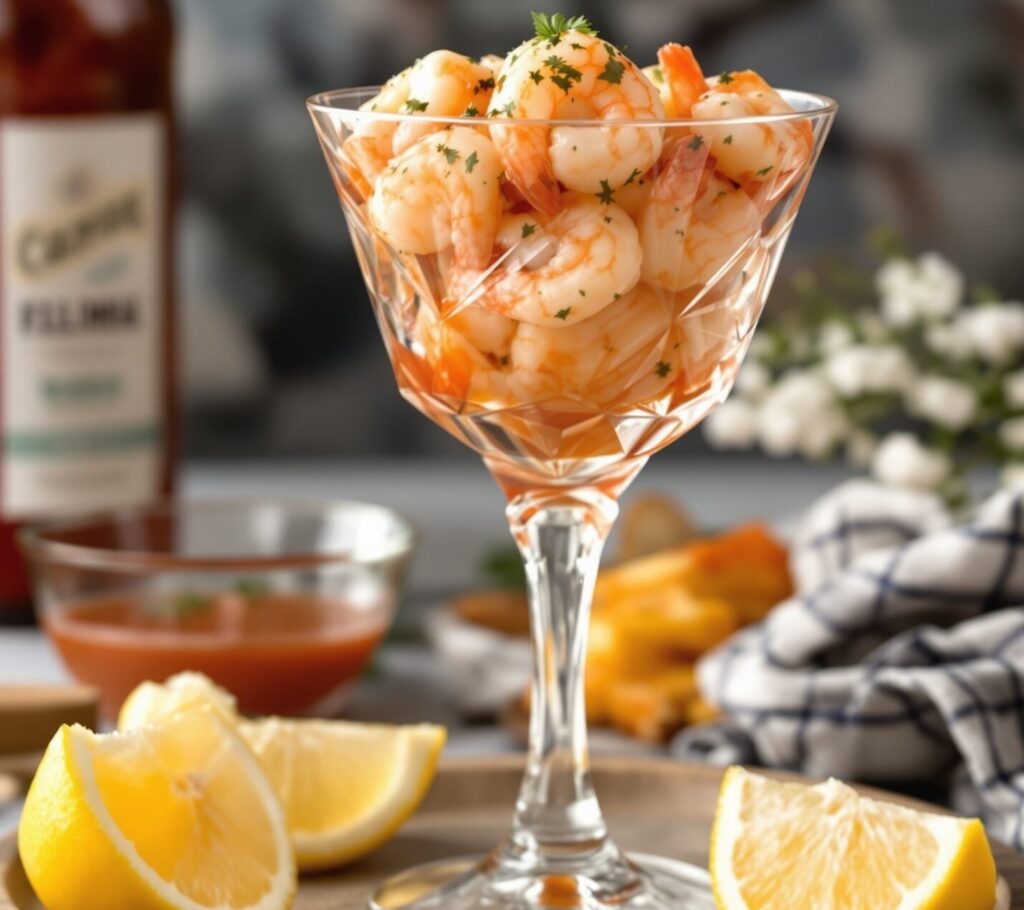
Zesty Shrimp Cocktail with Homemade Sauce
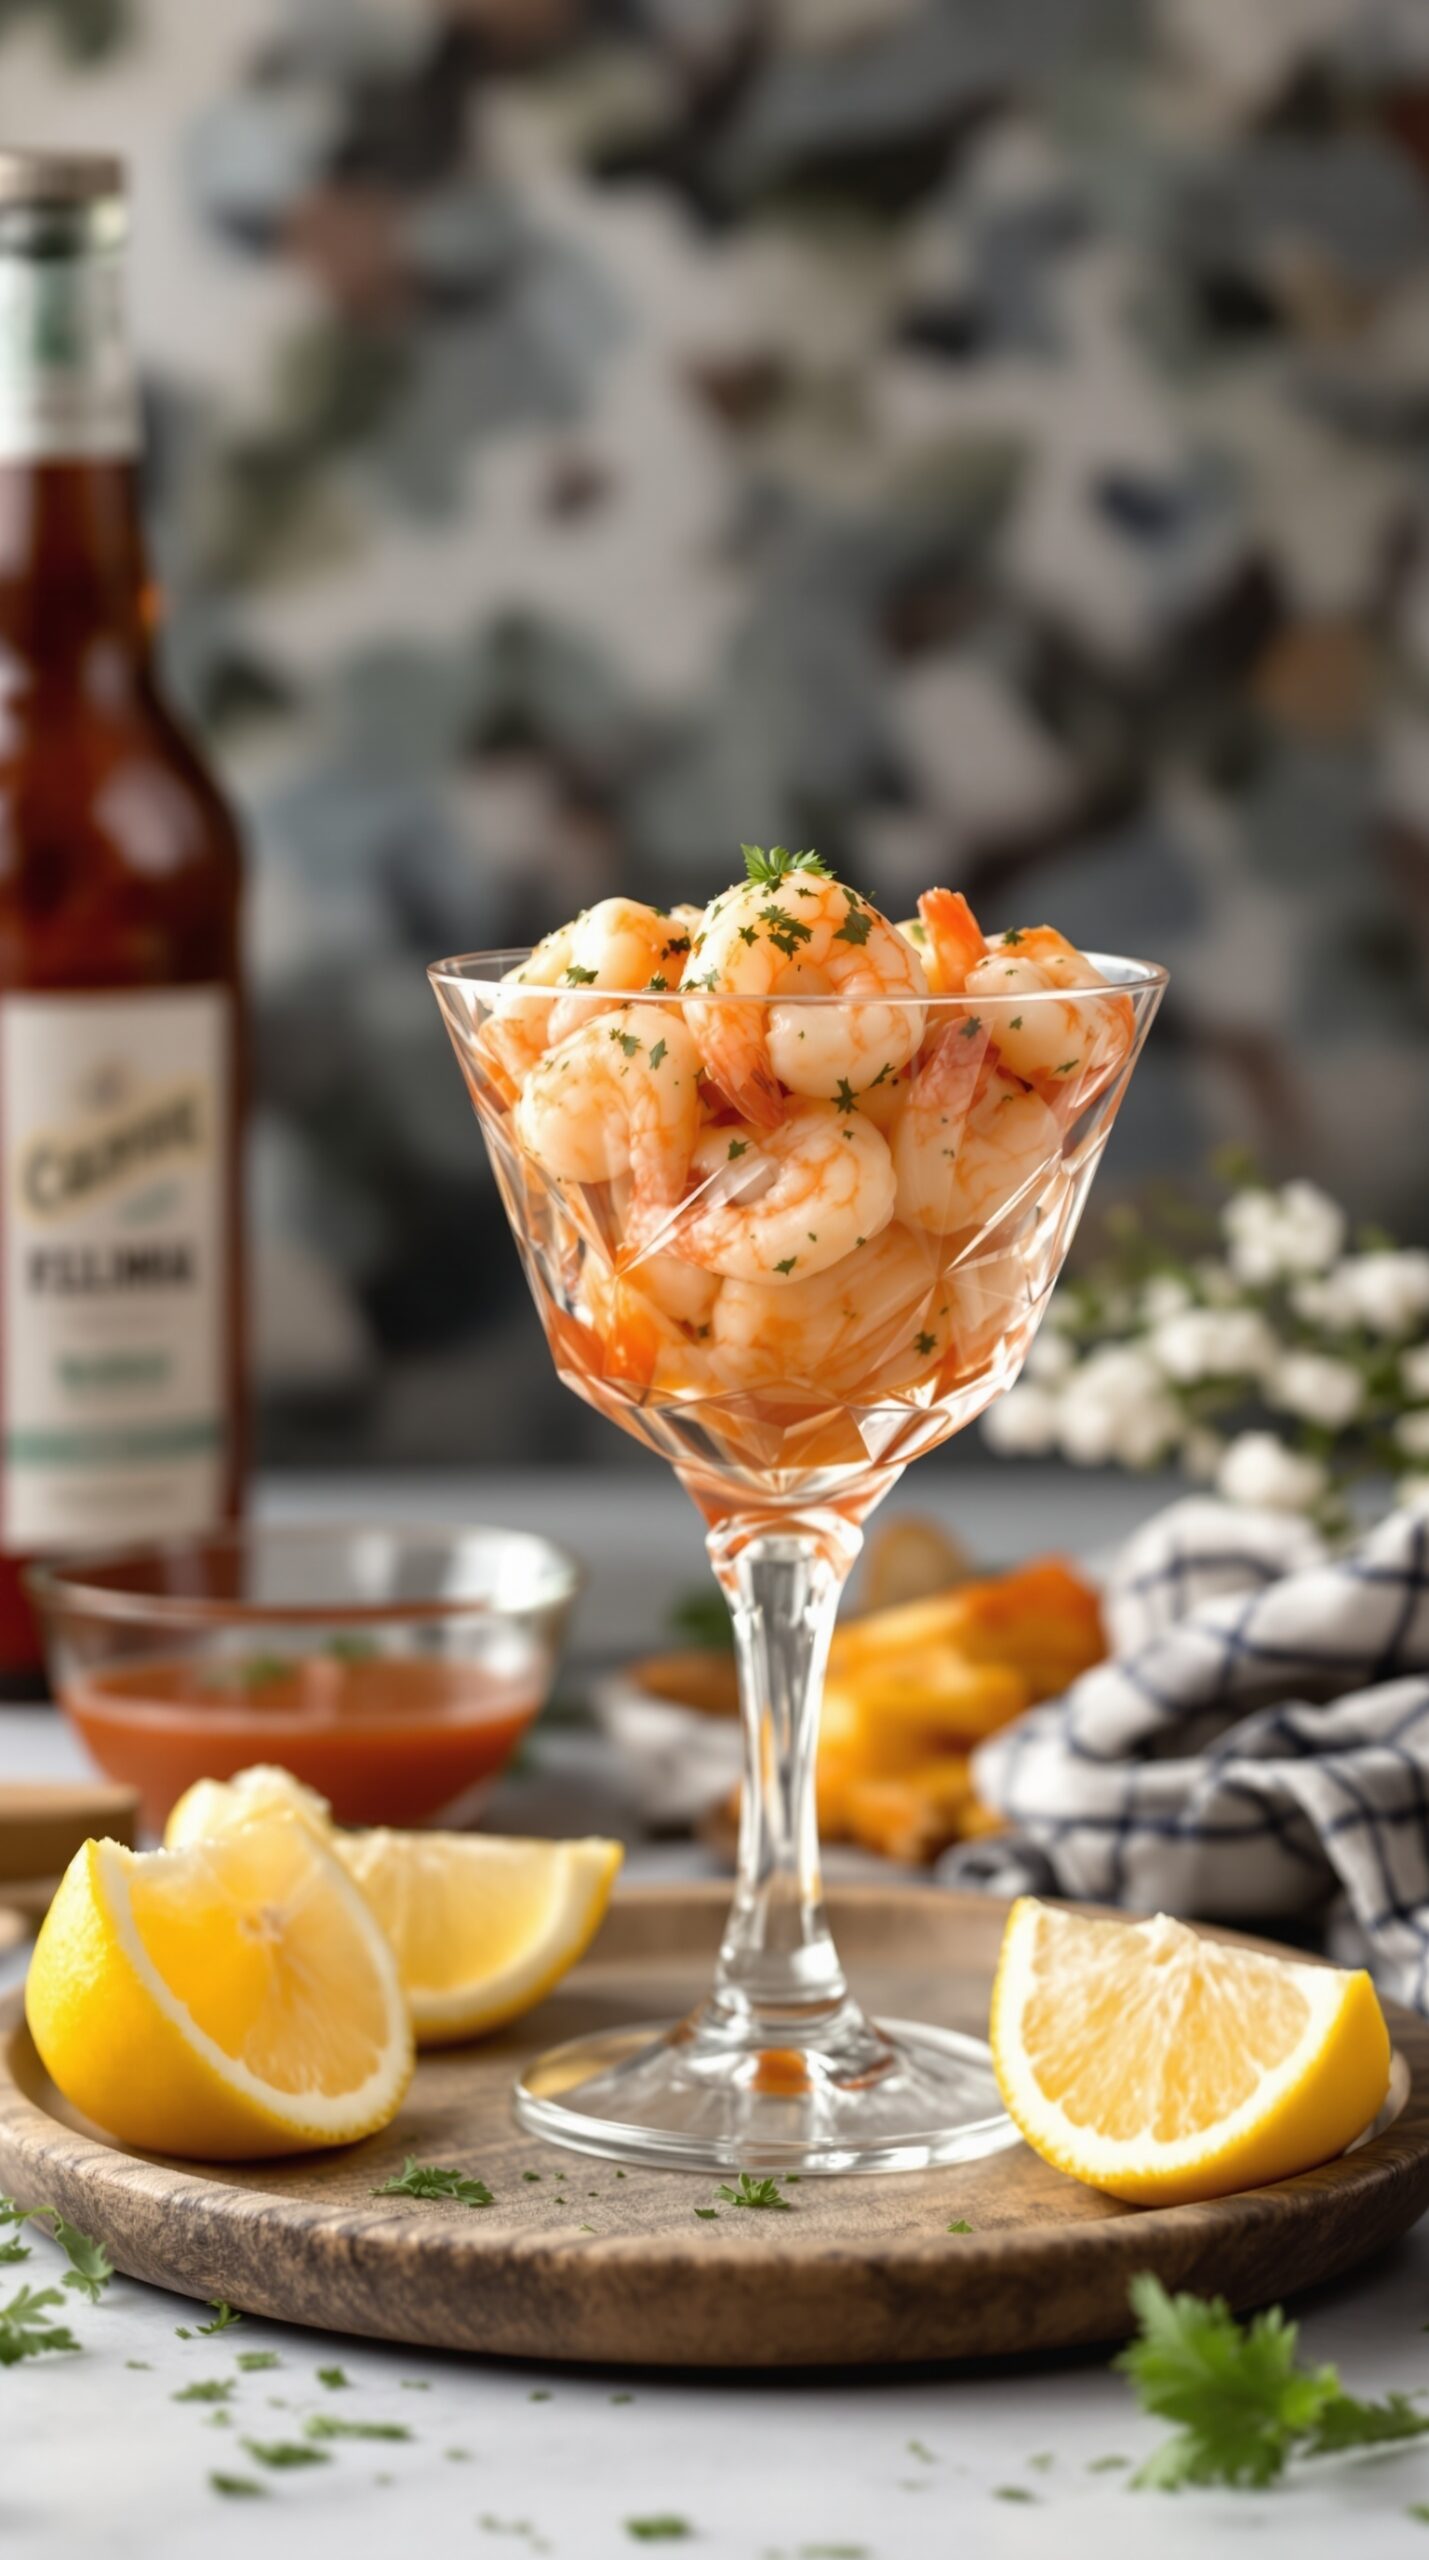
This zesty shrimp cocktail is a classic appetizer that never goes out of style. The image shows a beautiful glass filled with plump, juicy shrimp, garnished with a sprinkle of fresh herbs. It’s served with lemon wedges and a tangy homemade sauce, making it a perfect starter for any gathering.
The shrimp are cooked just right, retaining their tenderness and flavor. The bright colors and fresh ingredients make this dish not only tasty but also visually appealing. Pair it with a chilled drink, and you’re all set for a delightful experience.
Making shrimp cocktail at home is simple and rewarding. You can customize the sauce to suit your taste, whether you prefer it spicy or mild. Let’s get into the ingredients and steps to whip up this delicious appetizer!
Ingredients
- 1 pound large shrimp, peeled and deveined
- 1 cup ketchup
- 2 tablespoons horseradish
- 1 tablespoon lemon juice
- 1 teaspoon Worcestershire sauce
- Salt and pepper to taste
- Lemon wedges for serving
- Fresh parsley for garnish
Instructions
- Cook the Shrimp: In a pot of boiling salted water, add the shrimp and cook for about 2-3 minutes until they turn pink. Drain and cool them in ice water to stop the cooking process.
- Prepare the Sauce: In a bowl, mix together ketchup, horseradish, lemon juice, and Worcestershire sauce. Season with salt and pepper to taste.
- Assemble the Cocktail: In a serving glass, arrange the shrimp and drizzle with the homemade sauce. Garnish with fresh parsley and serve with lemon wedges on the side.
- Enjoy: Serve chilled and enjoy this refreshing appetizer with friends and family!
Mini Caprese Skewers with Balsamic Glaze
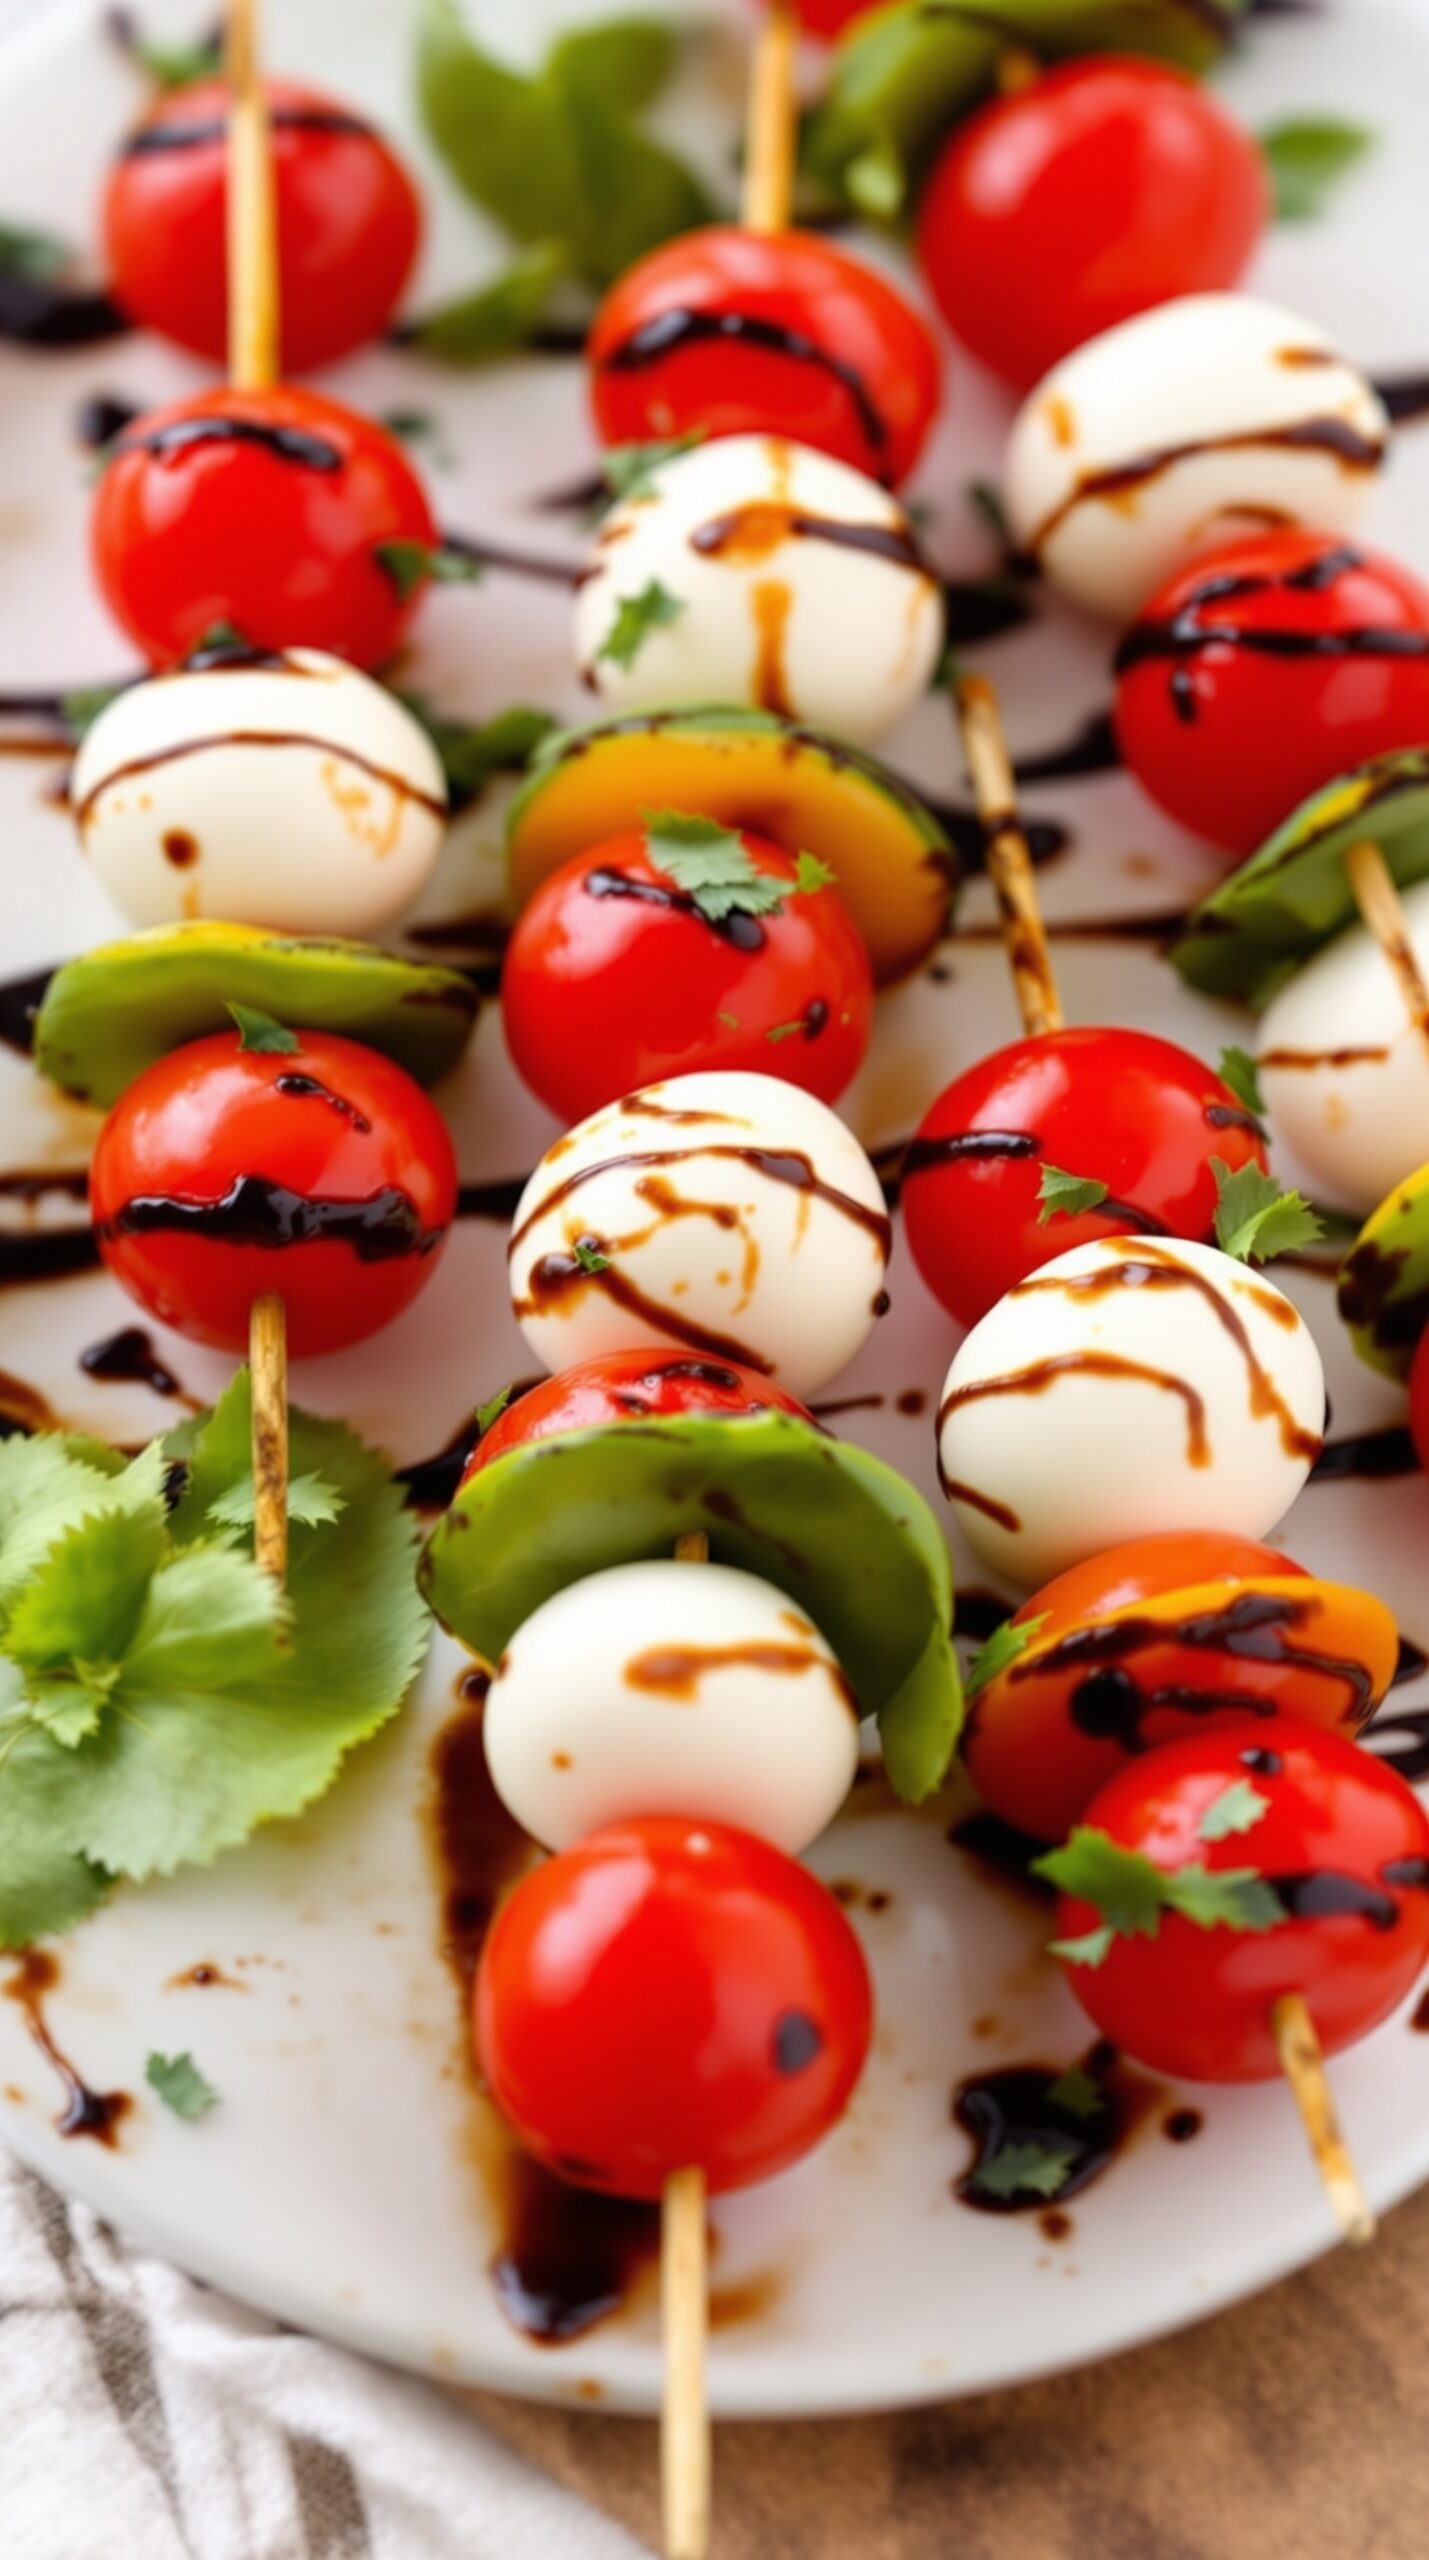
Mini Caprese skewers are a fun and fresh appetizer that brings together the classic flavors of Italy. These bite-sized delights feature juicy cherry tomatoes, creamy mozzarella balls, and vibrant basil leaves, all drizzled with a rich balsamic glaze. They’re perfect for gatherings, picnics, or just a tasty snack at home.
The skewers are not only visually appealing but also incredibly easy to assemble. Just thread the ingredients onto small skewers or toothpicks, and you have a colorful dish that’s sure to impress. The sweet and tangy balsamic glaze adds the finishing touch, enhancing the flavors of the fresh ingredients.
These mini skewers are a great way to enjoy a healthy appetizer without any fuss. They can be made ahead of time and served cold, making them a convenient choice for any occasion.
Ingredients
- 1 pint cherry tomatoes
- 8 ounces fresh mozzarella balls
- 1 cup fresh basil leaves
- 1/2 cup balsamic glaze
- Salt and pepper to taste
- Skewers or toothpicks
Instructions
- Prepare the Skewers: Take a skewer or toothpick and start by threading a cherry tomato onto it.
- Add Mozzarella: Follow the tomato with a mozzarella ball, then a basil leaf. Repeat this process until the skewer is filled, leaving some space at the end.
- Finish with Tomato: Add another cherry tomato at the end of the skewer.
- Season: Drizzle the skewers with balsamic glaze and sprinkle with salt and pepper to taste.
- Serve: Arrange the skewers on a platter and enjoy!
Stuffed Mini Peppers with Cream Cheese and Herbs
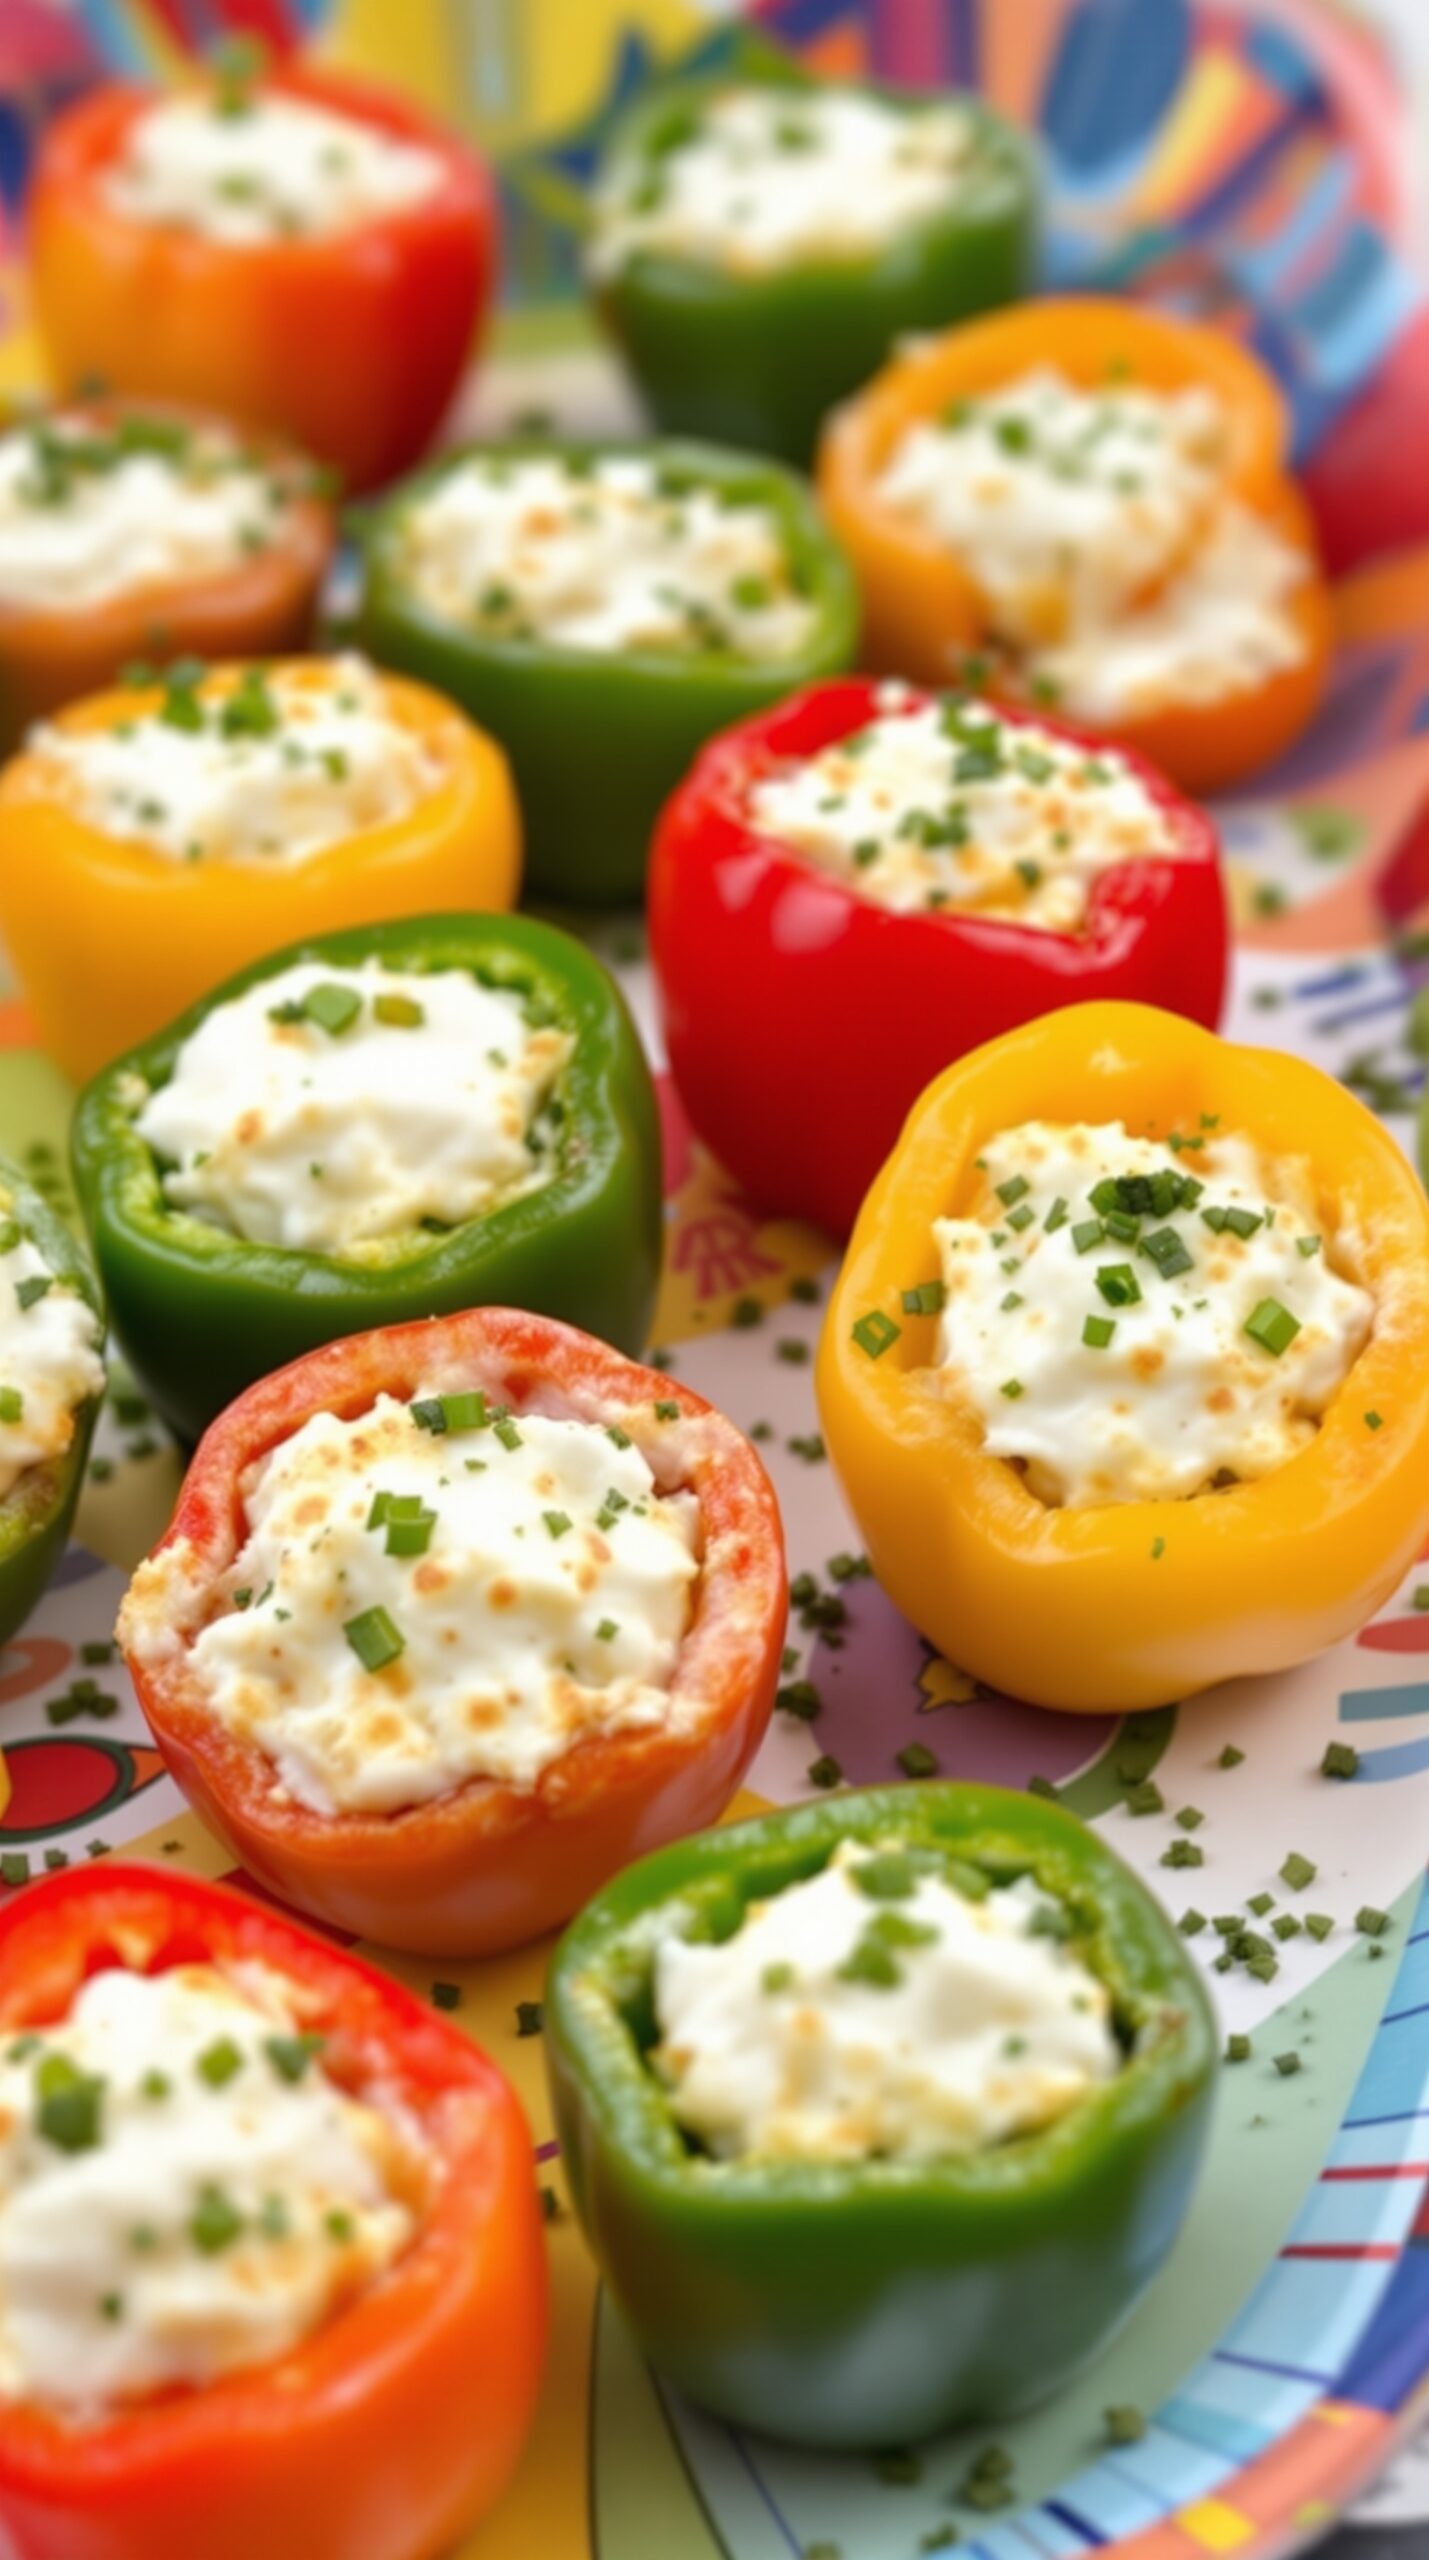
Stuffed mini peppers are a colorful and tasty appetizer that brings a burst of flavor to any gathering. These little bites are not only easy to make but also look fantastic on a platter. The vibrant colors of red, yellow, orange, and green peppers create an inviting presentation that will catch everyone’s eye.
Each pepper is filled with a creamy mixture of cream cheese and fresh herbs, making them rich and satisfying. The combination of flavors is delightful, and the crunch of the peppers adds a nice texture. They are perfect for parties, picnics, or just a fun snack at home.
Making these stuffed mini peppers is simple. You just need to prepare the filling, stuff the peppers, and they’re ready to serve. They can be enjoyed fresh or baked for a warm treat. Either way, they are sure to be a hit!
Ingredients
- 12 mini bell peppers (assorted colors)
- 8 oz cream cheese, softened
- 1/2 cup shredded cheese (cheddar or mozzarella)
- 1/4 cup fresh chives, chopped
- 1/4 cup fresh parsley, chopped
- 1 teaspoon garlic powder
- Salt and pepper to taste
Instructions
- Preheat your oven to 375°F (190°C) if you prefer baked peppers.
- In a mixing bowl, combine the softened cream cheese, shredded cheese, chives, parsley, garlic powder, salt, and pepper. Mix until well combined.
- Cut the mini peppers in half lengthwise and remove the seeds.
- Stuff each pepper half with the cream cheese mixture, filling them generously.
- If baking, place the stuffed peppers on a baking sheet and bake for about 15-20 minutes until the peppers are tender and the cheese is slightly golden.
- If serving fresh, arrange the stuffed peppers on a platter and enjoy!
Savory Spinach and Feta Stuffed Mushrooms
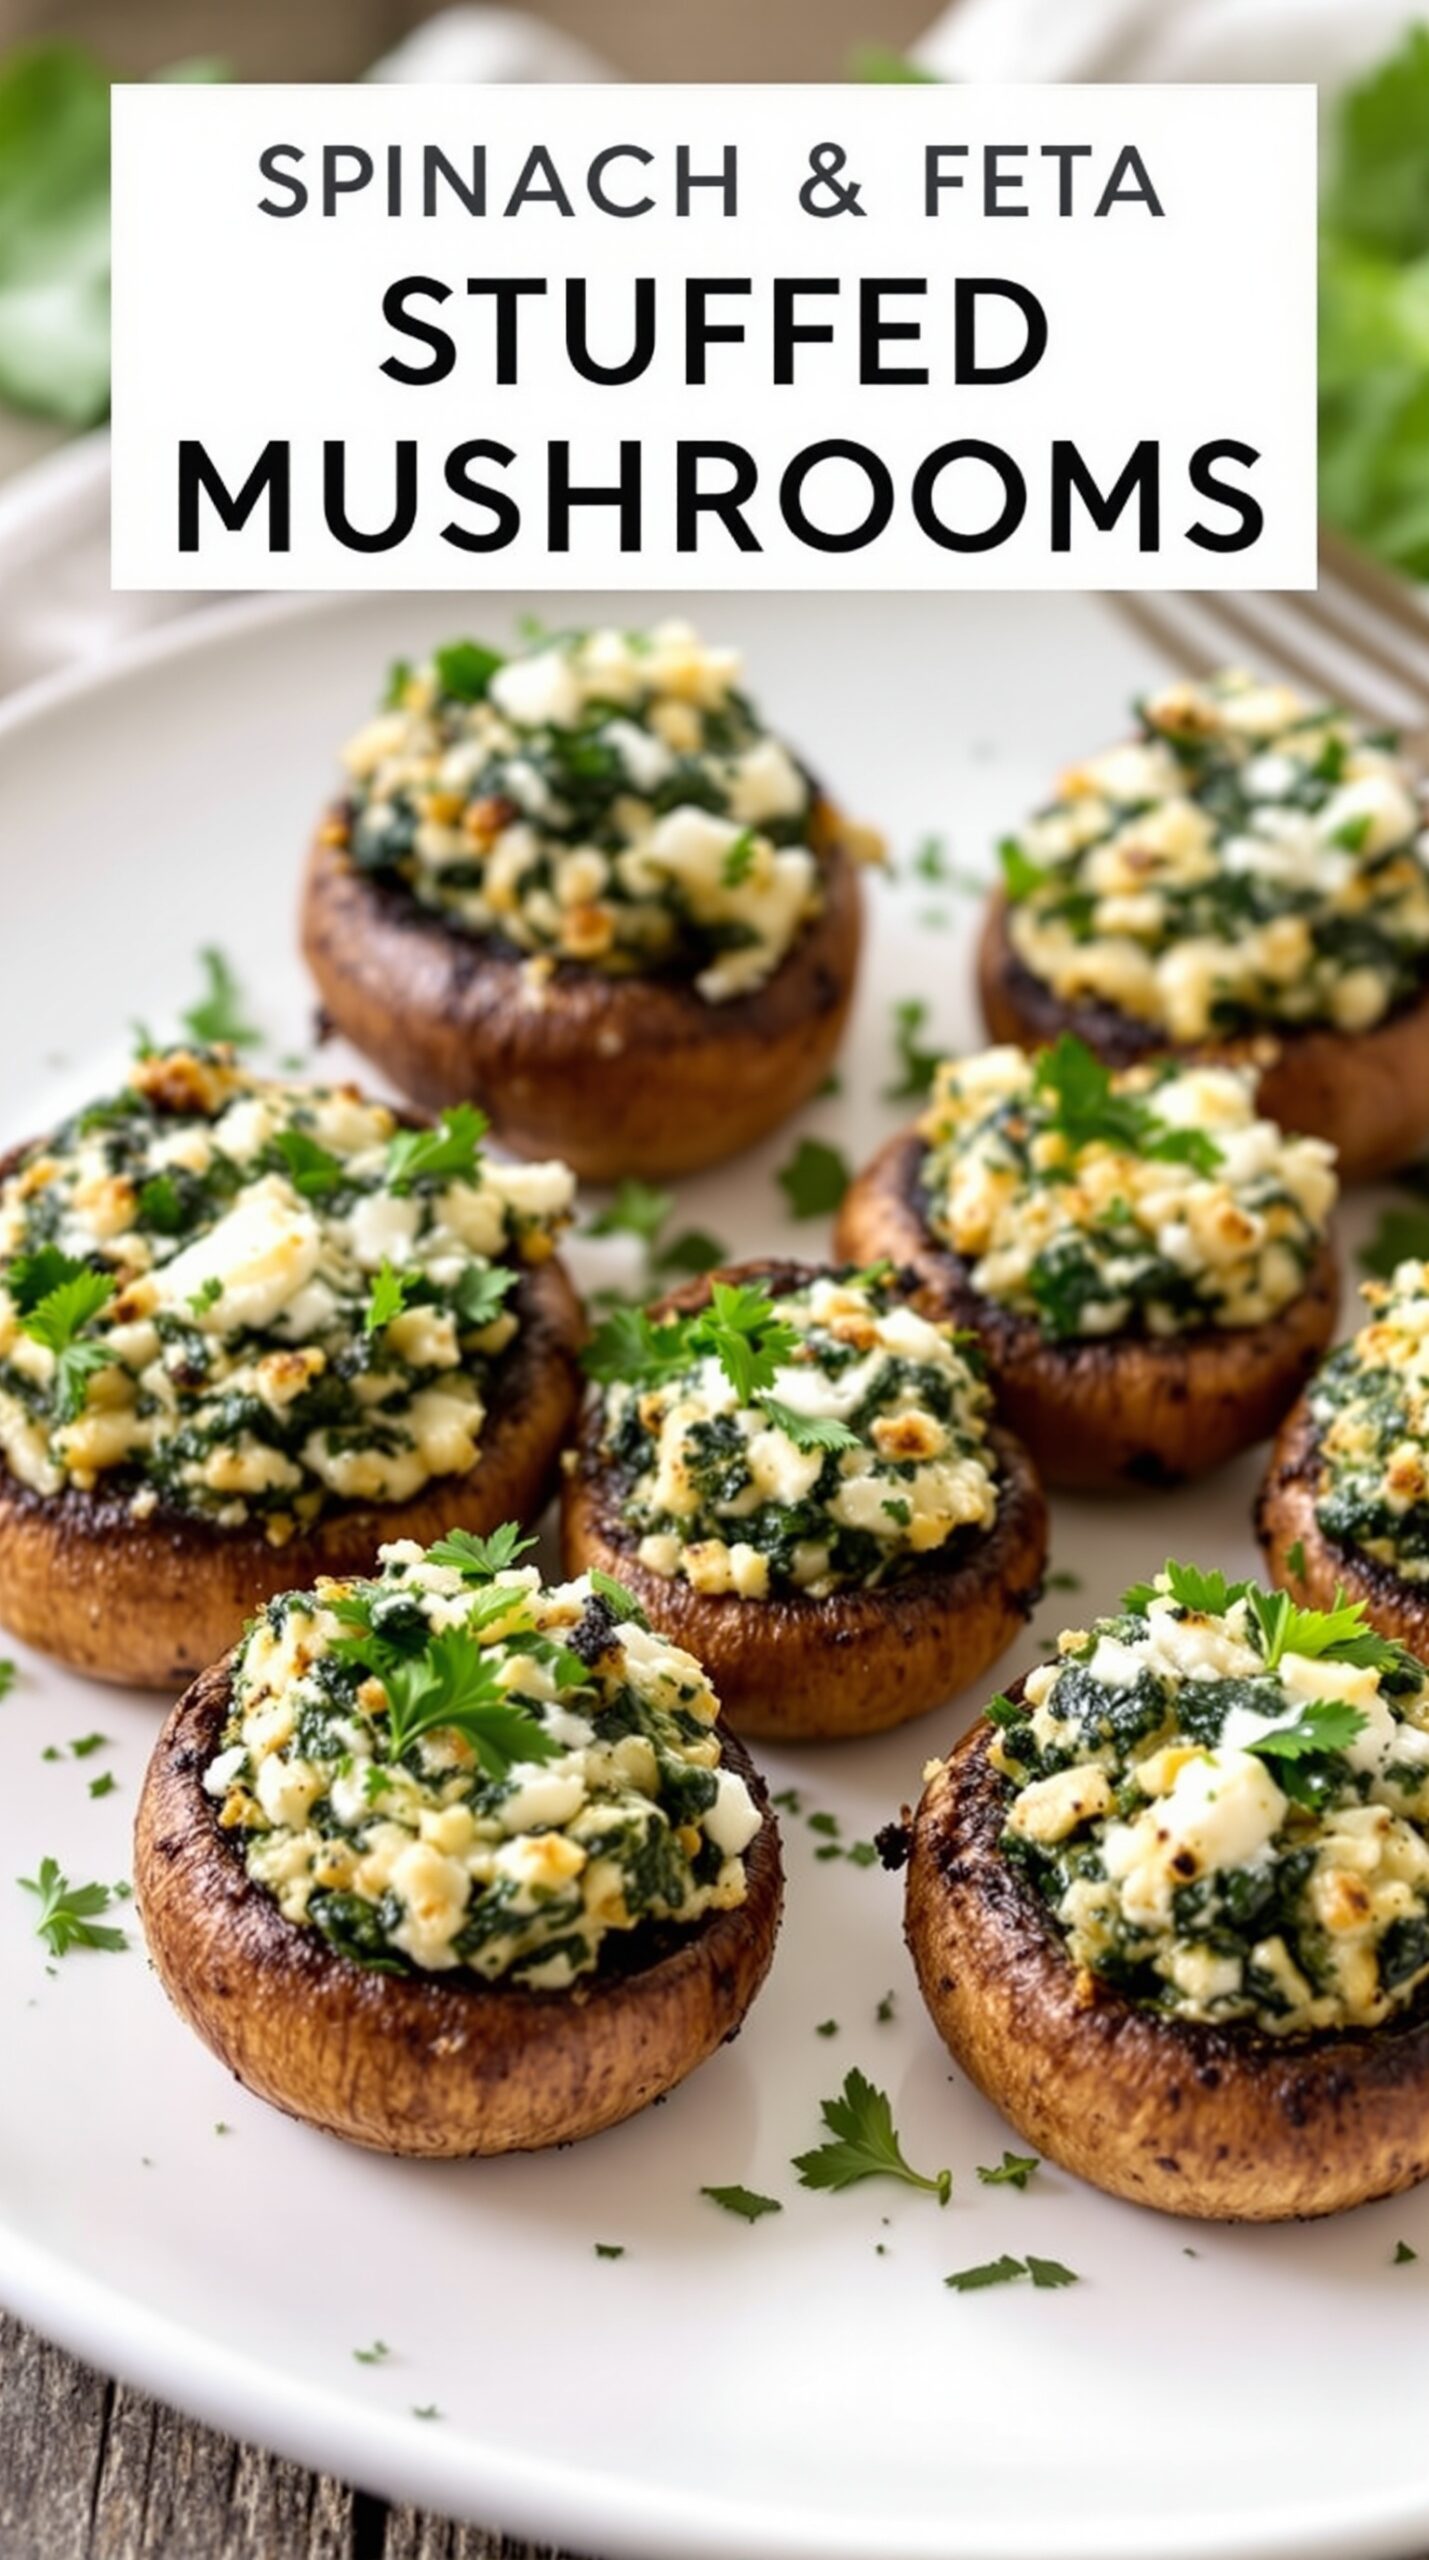
These Spinach and Feta Stuffed Mushrooms are a delightful appetizer that brings together earthy mushrooms and creamy feta cheese. The vibrant green spinach adds a fresh touch, making them perfect for gatherings or a cozy night in. Each mushroom cap is generously filled with a flavorful mixture that’s sure to impress your guests.
To make these stuffed mushrooms, start by selecting large, fresh mushrooms. The caps should be firm and free from blemishes. The filling combines sautéed spinach, crumbled feta, and a hint of garlic for a burst of flavor. Topped with a sprinkle of breadcrumbs, they bake to a golden perfection.
Not only are these mushrooms tasty, but they’re also easy to prepare. They can be made ahead of time and baked just before serving, making them a stress-free option for entertaining. Pair them with a glass of white wine for a delightful experience!
Ingredients
- 12 large mushrooms, stems removed
- 1 cup fresh spinach, chopped
- 1/2 cup feta cheese, crumbled
- 1/4 cup breadcrumbs
- 2 cloves garlic, minced
- 2 tablespoons olive oil
- Salt and pepper to taste
- Fresh parsley for garnish
Instructions
- Preheat the oven to 375°F (190°C).
- In a skillet, heat olive oil over medium heat. Add minced garlic and sauté for about 1 minute.
- Add chopped spinach to the skillet and cook until wilted, about 2-3 minutes. Remove from heat.
- In a bowl, combine the sautéed spinach, feta cheese, and breadcrumbs. Season with salt and pepper.
- Stuff each mushroom cap with the spinach and feta mixture, pressing down gently.
- Place the stuffed mushrooms on a baking sheet and bake for 20-25 minutes, or until the mushrooms are tender and the tops are golden.
- Garnish with fresh parsley before serving.
Savory Cheese and Charcuterie Board
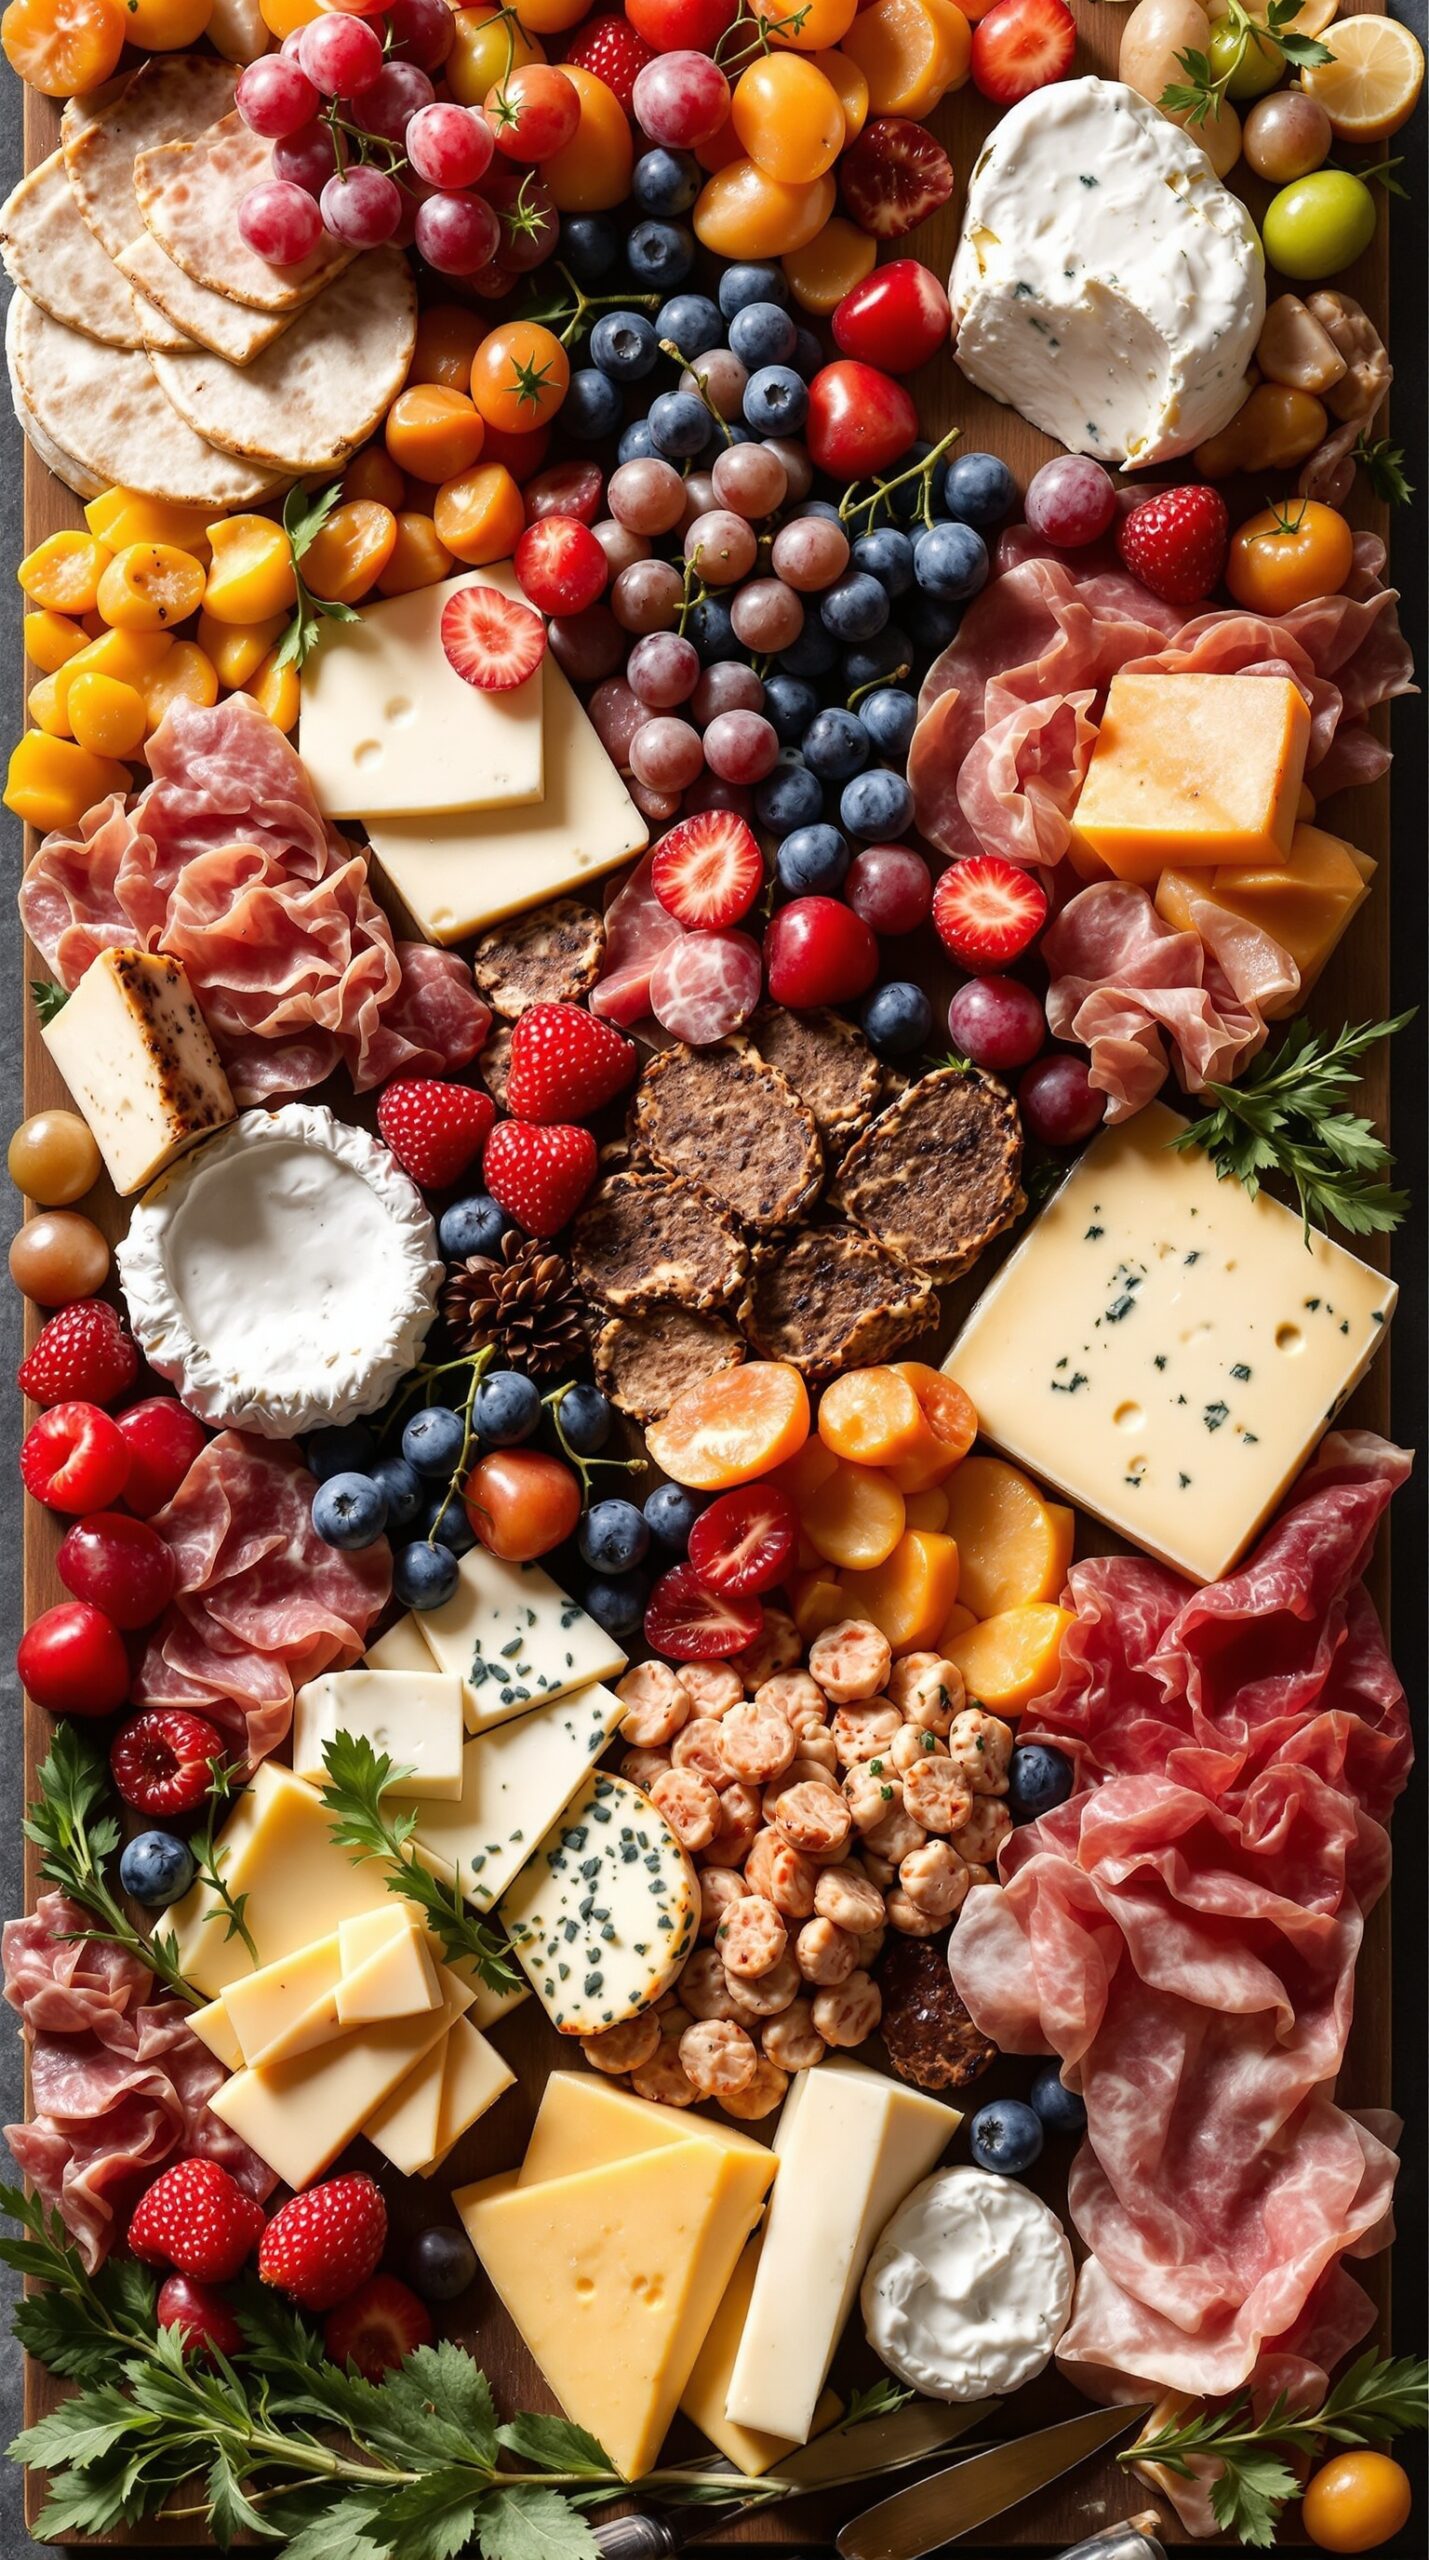
A cheese and charcuterie board is a fantastic way to impress your guests. It’s colorful, inviting, and offers a variety of flavors and textures. This board features an array of cheeses, cured meats, fresh fruits, and crunchy crackers, making it perfect for any gathering.
Start with a selection of cheeses. You can include creamy brie, sharp cheddar, and tangy blue cheese. Pair these with thinly sliced prosciutto and salami for a savory touch. Fresh fruits like strawberries, blueberries, and grapes add a sweet contrast, while crackers provide a satisfying crunch.
Don’t forget to add some dips! A creamy goat cheese spread or a tangy fig jam can elevate the flavors even more. Arrange everything on a wooden board for a rustic look. Use small bowls for dips and scatter fruits and nuts around the board for a beautiful presentation.
Here’s a simple recipe to create your own cheese and charcuterie board:
Ingredients
- 1 wheel of brie cheese
- 1 block of sharp cheddar cheese
- 1 wedge of blue cheese
- 4 ounces of prosciutto
- 4 ounces of salami
- 1 cup of mixed fresh fruits (strawberries, blueberries, grapes)
- 1 cup of assorted crackers
- 1/2 cup of fig jam
- 1/2 cup of honey
- Fresh herbs for garnish (like parsley or rosemary)
Instructions
- Prepare the Board: Start with a large wooden board or platter. Place the cheeses on the board, spacing them out.
- Add Meats: Arrange the prosciutto and salami around the cheeses, folding them for a nice presentation.
- Include Fruits: Scatter the fresh fruits around the board, filling in any gaps.
- Crackers and Dips: Add the crackers in a pile or in small bowls. Place the fig jam and honey in small bowls on the board.
- Garnish: Finish with fresh herbs for a pop of color and freshness.
- Serve: Enjoy your beautiful cheese and charcuterie board with friends and family!
Garlic Parmesan Roasted Chickpeas
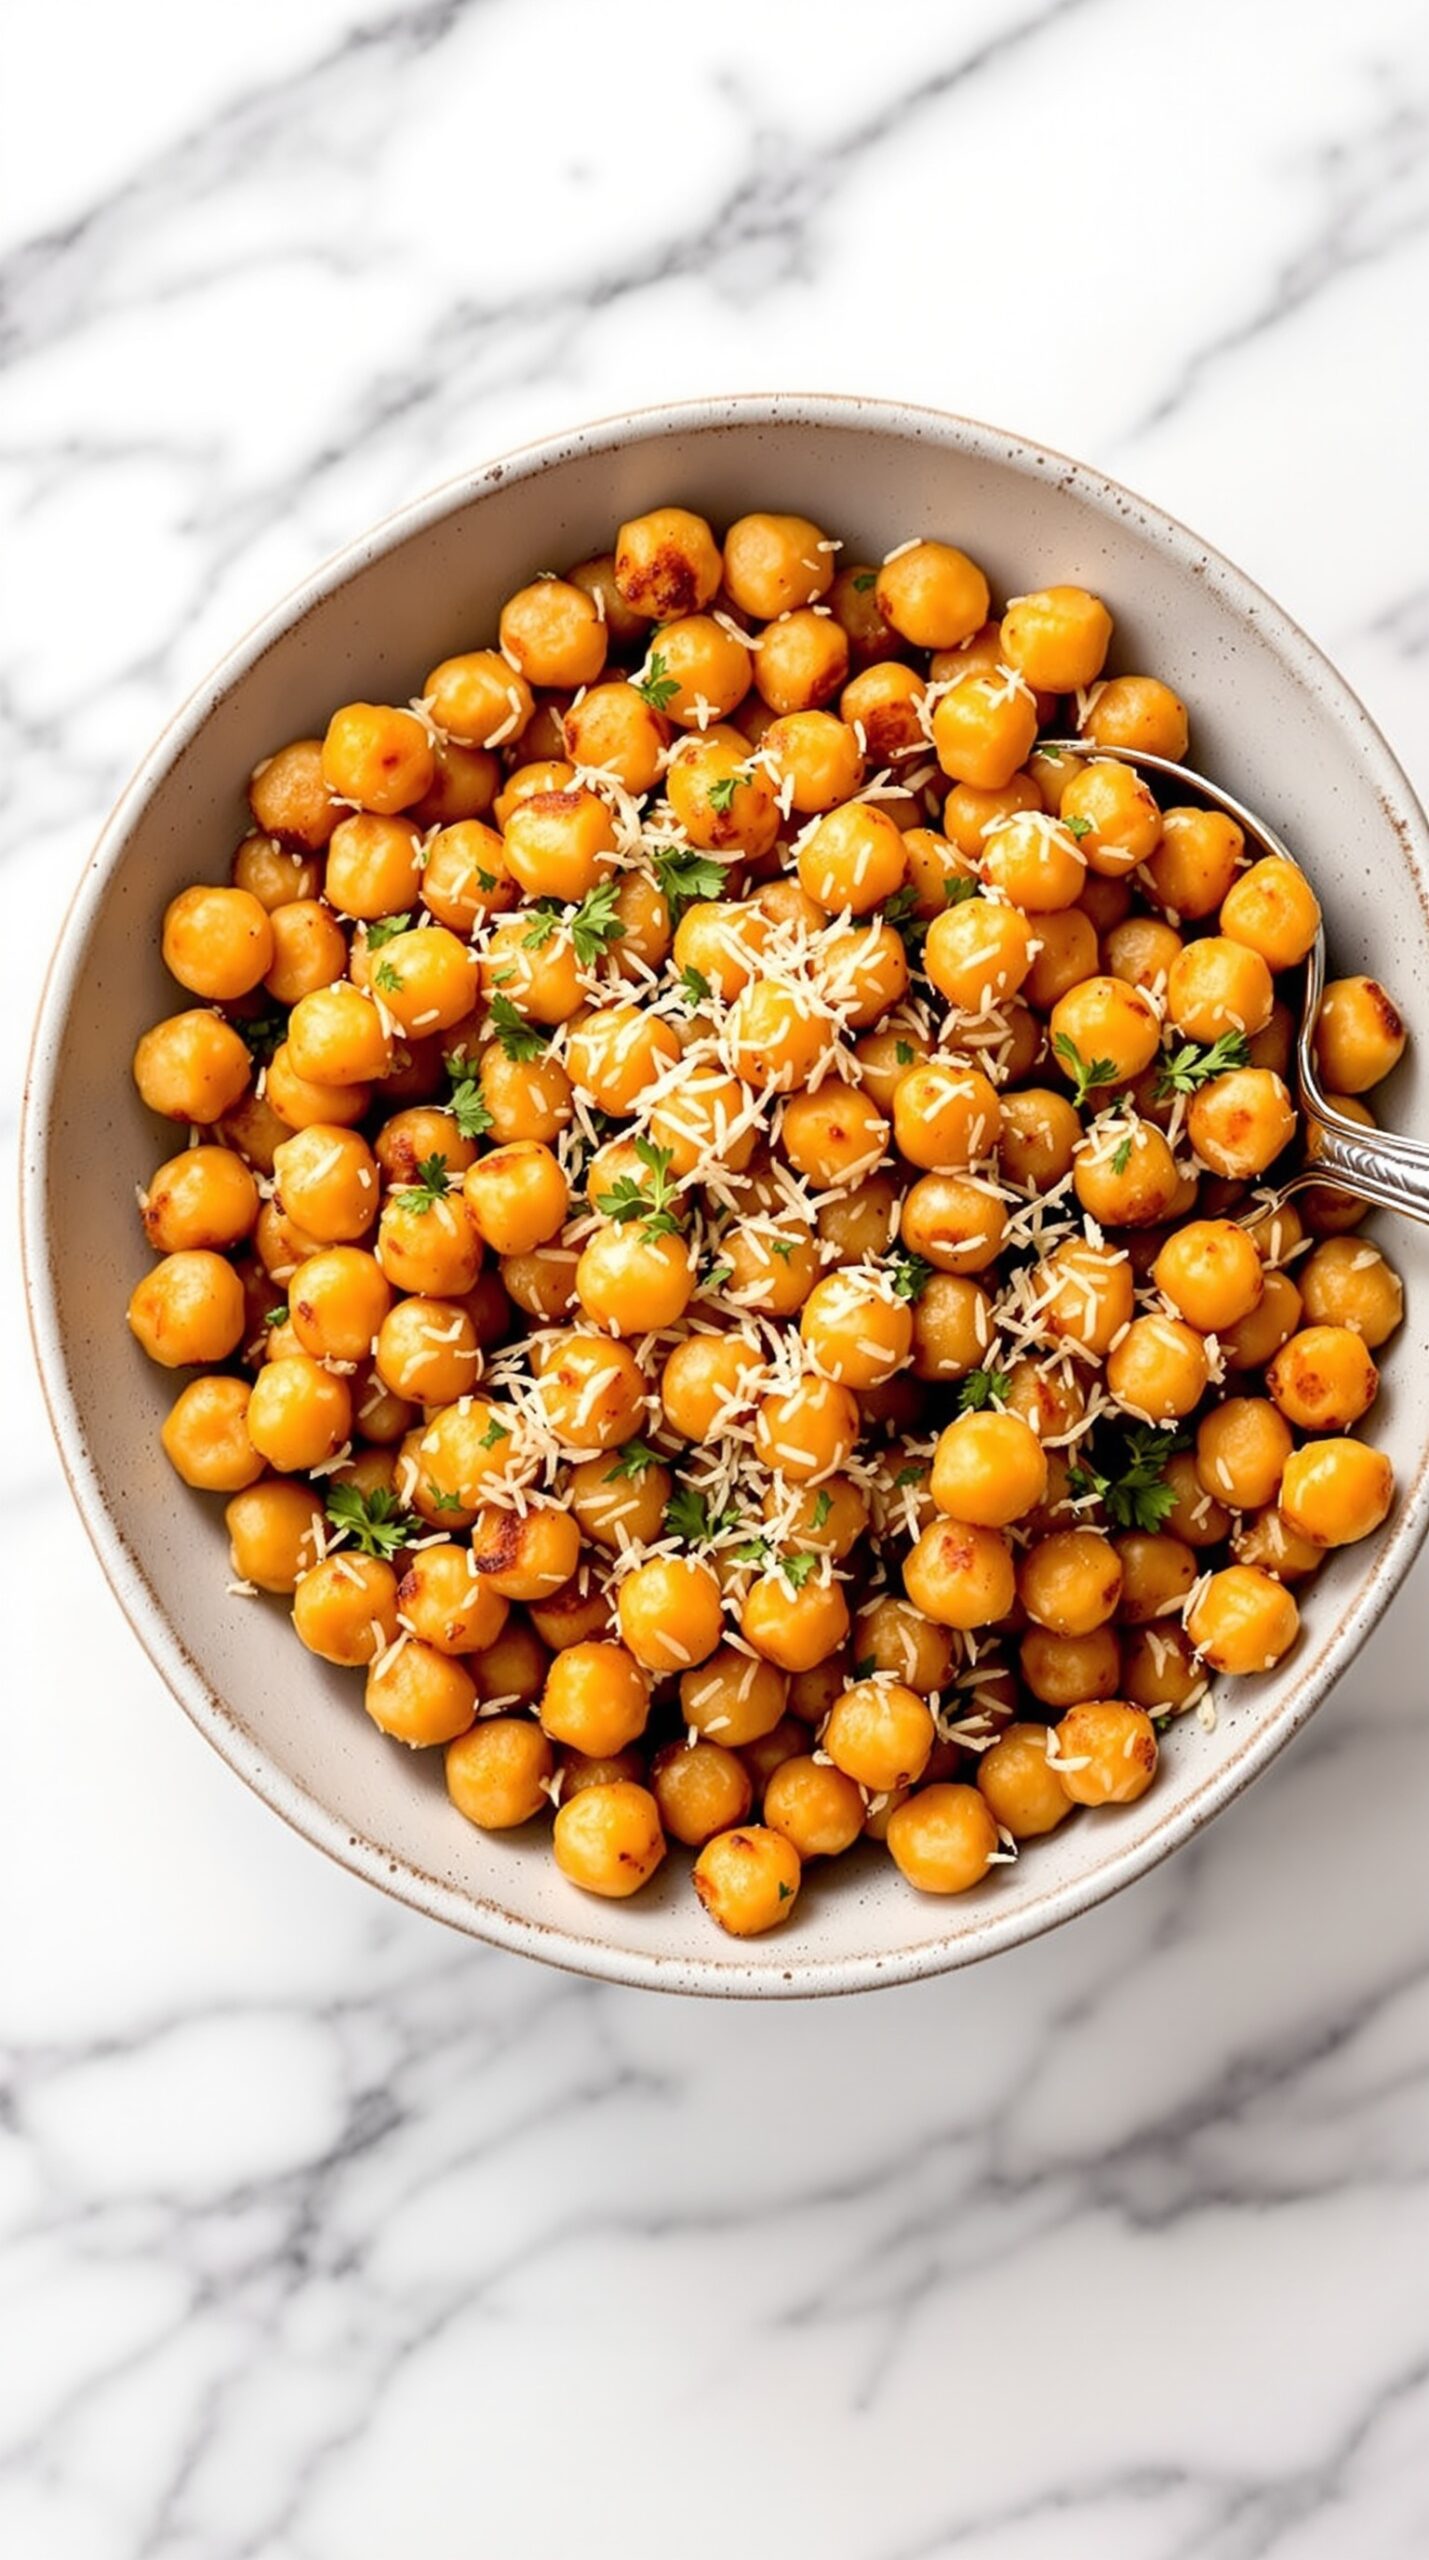
Garlic Parmesan Roasted Chickpeas are a fantastic appetizer that’s both crunchy and satisfying. These little bites pack a punch of flavor, making them perfect for snacking or serving at gatherings. The golden chickpeas are tossed in garlic, olive oil, and Parmesan cheese, then roasted until crispy. They make a great alternative to chips or nuts!
To make these chickpeas, start by rinsing and draining a can of chickpeas. Pat them dry with a towel to ensure they get crispy in the oven. Then, toss them in a bowl with olive oil, minced garlic, grated Parmesan, salt, and pepper. Spread them out on a baking sheet and roast until they’re golden brown. The result is a delicious snack that’s hard to resist!
Ingredients
- 1 can (15 oz) chickpeas, rinsed and drained
- 2 tablespoons olive oil
- 3 cloves garlic, minced
- 1/4 cup grated Parmesan cheese
- 1/2 teaspoon salt
- 1/4 teaspoon black pepper
- 1 tablespoon chopped parsley (optional, for garnish)
Instructions
- Preheat your oven to 400°F (200°C).
- Rinse and drain the chickpeas. Pat them dry with a paper towel.
- In a bowl, combine the chickpeas, olive oil, minced garlic, Parmesan cheese, salt, and pepper. Mix well to coat the chickpeas evenly.
- Spread the chickpeas in a single layer on a baking sheet.
- Roast in the oven for 25-30 minutes, stirring halfway through, until they are golden and crispy.
- Remove from the oven and let them cool slightly. Garnish with chopped parsley if desired.
- Serve warm or at room temperature.
Roasted Red Pepper Hummus with Pita Chips
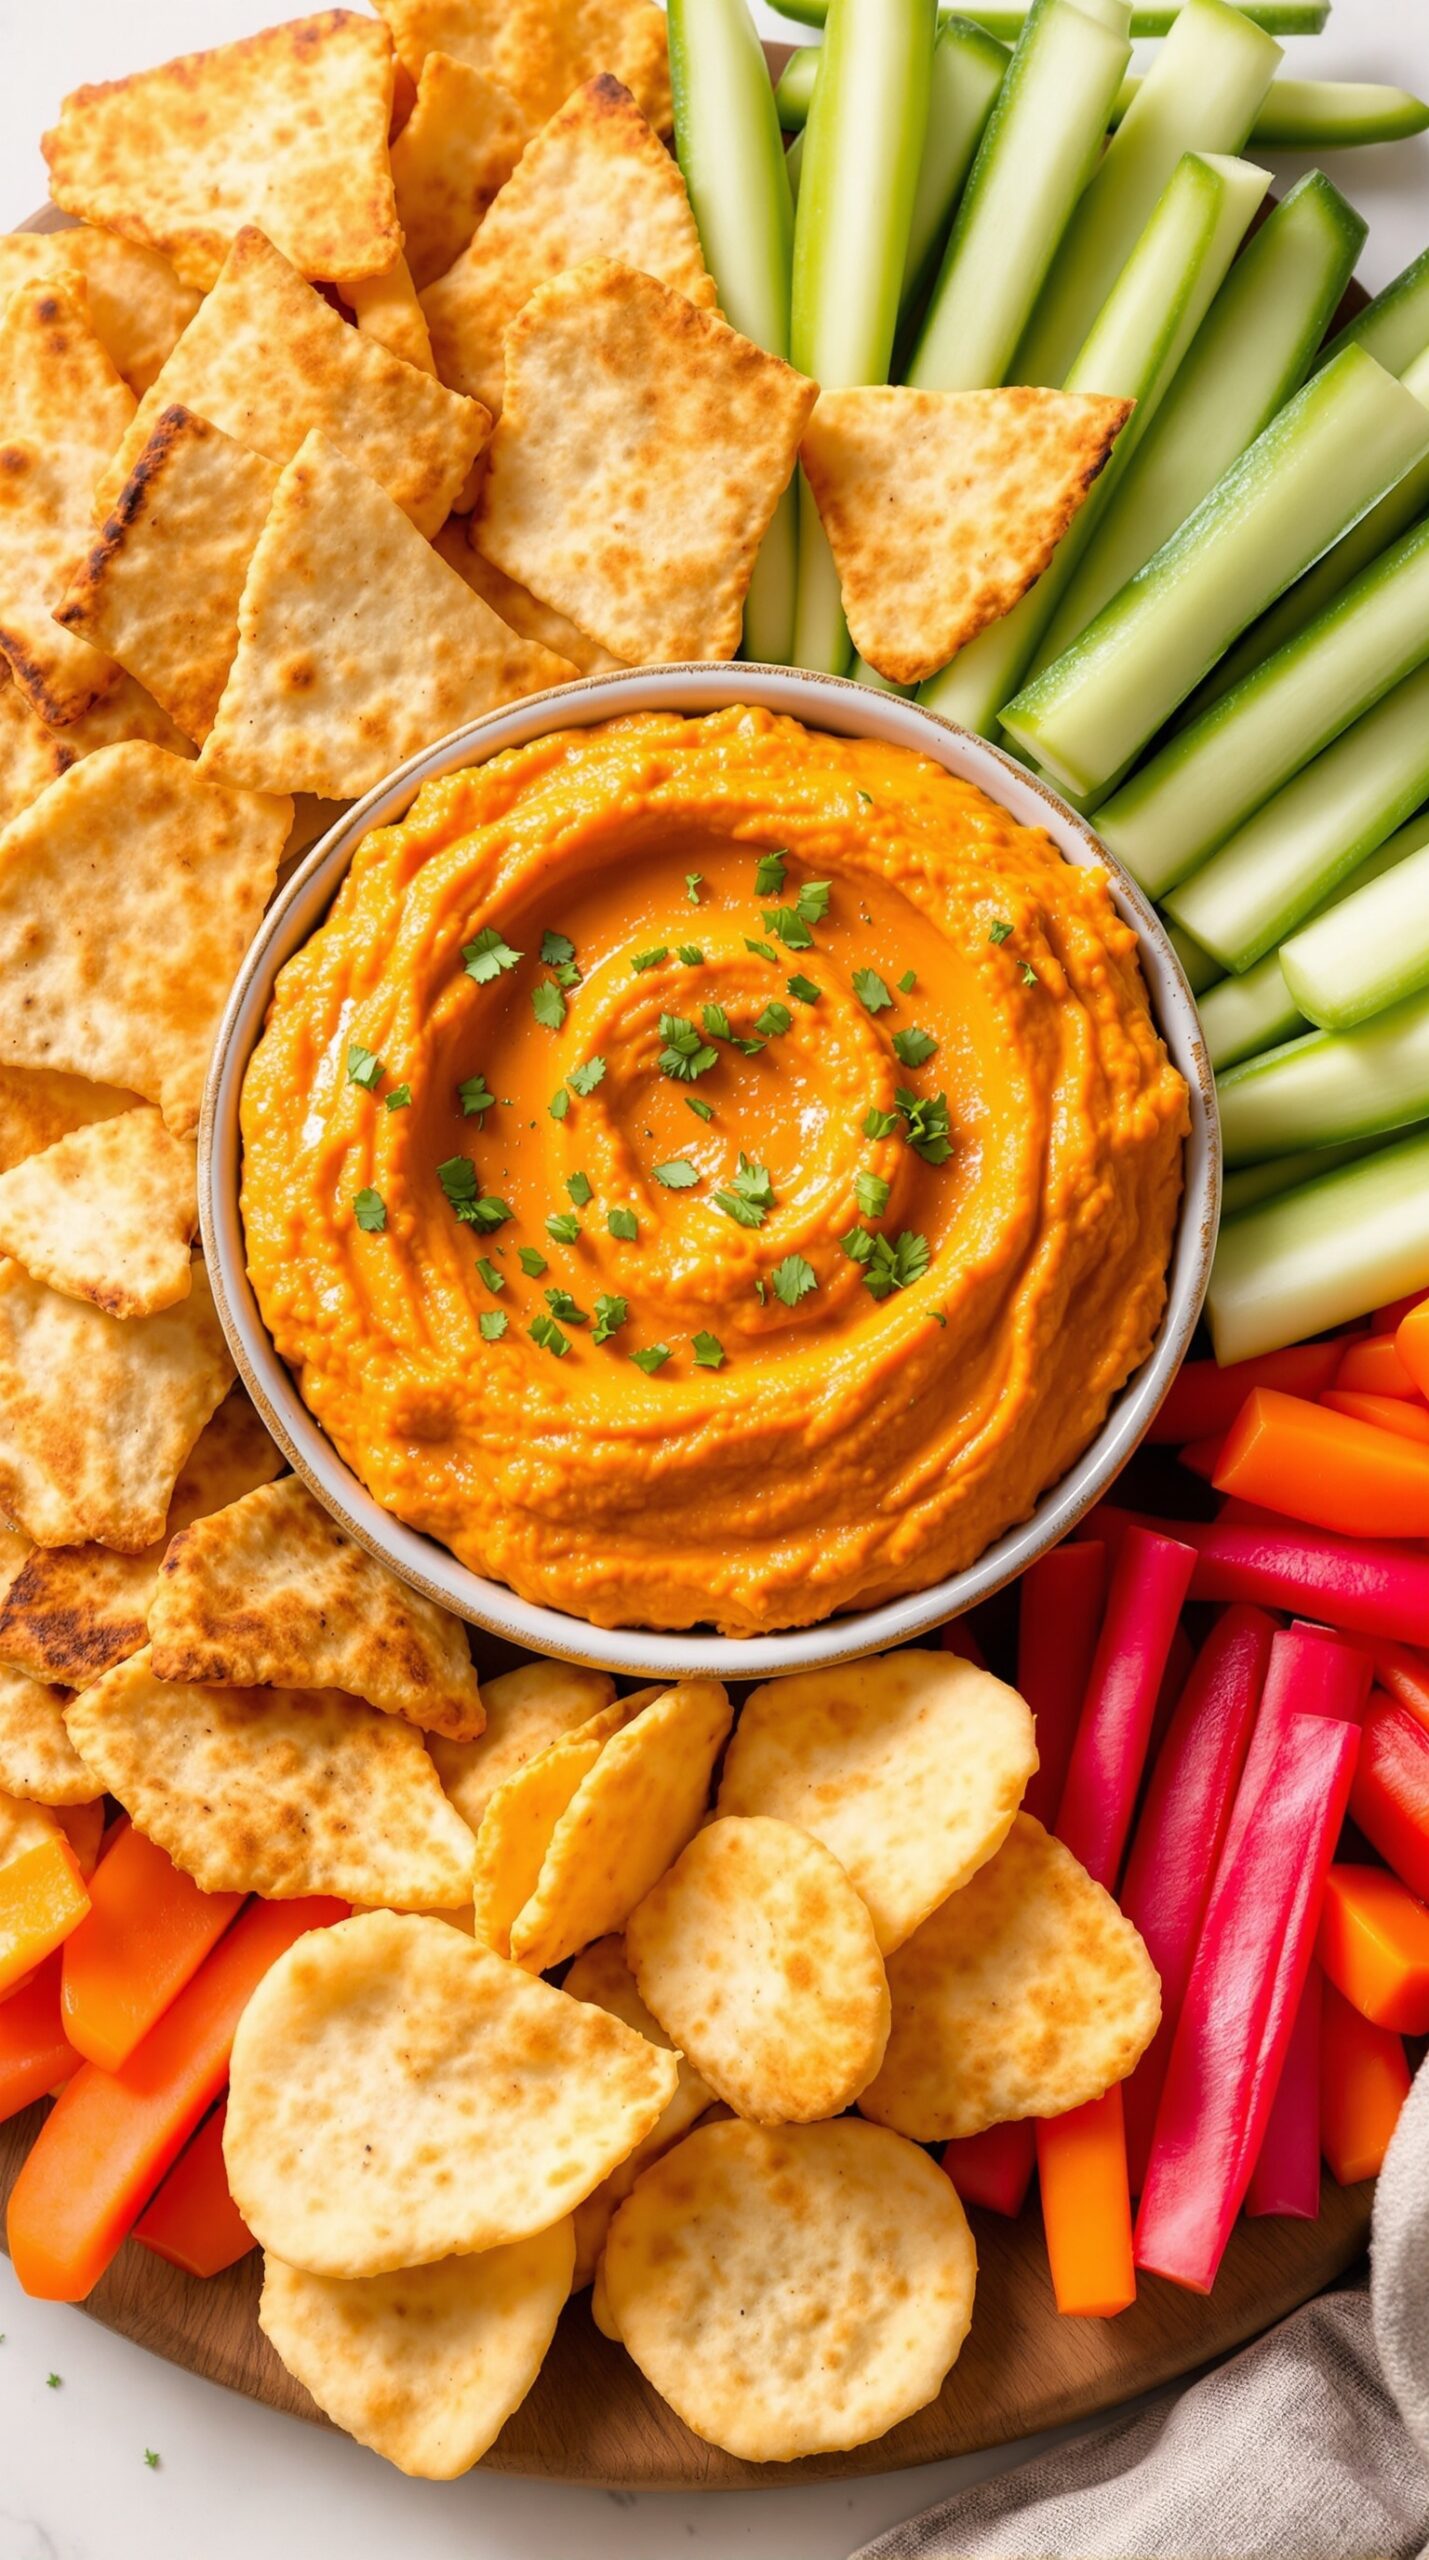
Roasted red pepper hummus is a delightful twist on the classic dip. Its vibrant orange color and creamy texture make it a standout appetizer. The hummus is surrounded by crispy pita chips, fresh cucumber sticks, and colorful bell peppers, creating a beautiful presentation. This dish is perfect for gatherings or a simple snack at home.
The combination of roasted red peppers and chickpeas gives this hummus a rich flavor. It’s easy to whip up and pairs wonderfully with the crunchy pita chips. You can also enjoy it with fresh veggies for a healthier option. Everyone will love dipping into this tasty treat!
Ingredients
- 1 can (15 oz) chickpeas, drained and rinsed
- 1/2 cup roasted red peppers, chopped
- 1/4 cup tahini
- 2 tablespoons olive oil
- 2 tablespoons lemon juice
- 1 clove garlic, minced
- 1/2 teaspoon cumin
- Salt and pepper to taste
- Pita chips for serving
- Fresh veggies (like cucumbers and bell peppers) for serving
Instructions
- Blend Ingredients: In a food processor, combine chickpeas, roasted red peppers, tahini, olive oil, lemon juice, garlic, and cumin. Blend until smooth.
- Season: Taste the hummus and add salt and pepper as needed. If it’s too thick, add a little water or more olive oil to reach your desired consistency.
- Serve: Transfer the hummus to a serving bowl. Drizzle with olive oil and sprinkle with additional roasted red peppers or herbs if desired.
- Enjoy: Serve with pita chips and fresh veggies for dipping. Enjoy this delicious appetizer!
Sweet and Spicy Bacon-Wrapped Dates
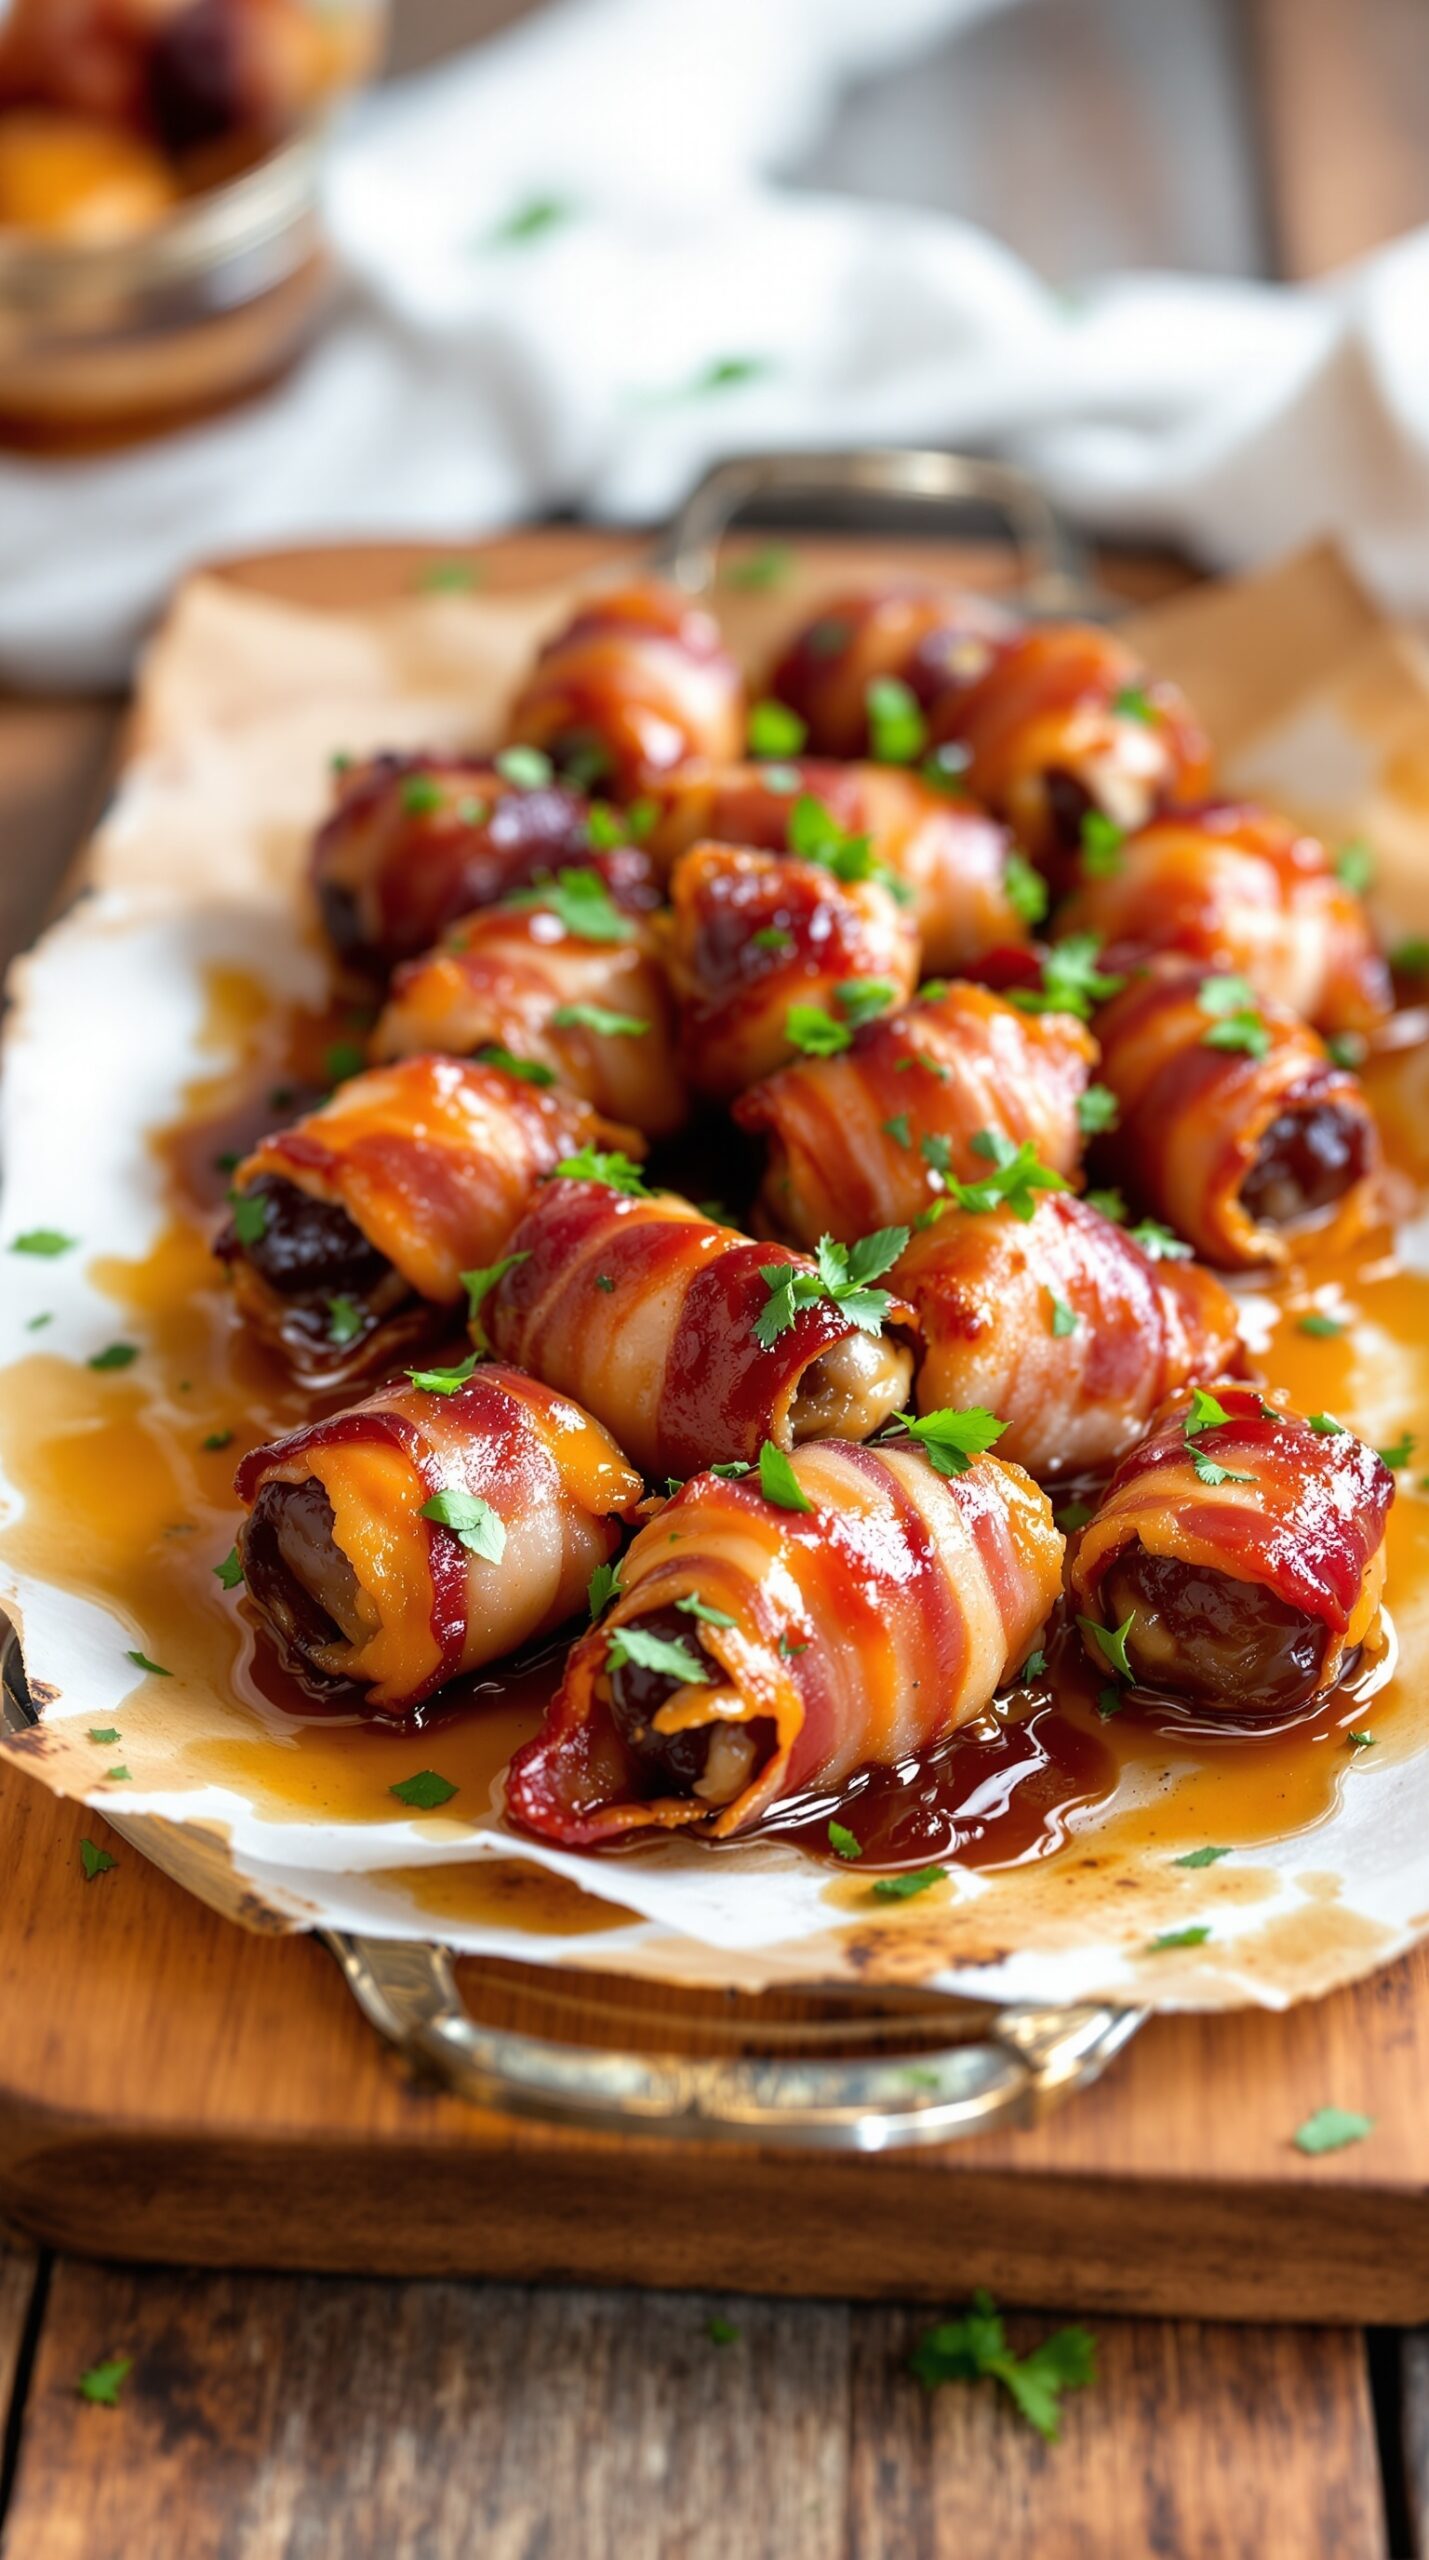
Sweet and spicy bacon-wrapped dates are a crowd-pleaser at any gathering. These little bites are a perfect mix of flavors and textures. The sweetness of the dates pairs wonderfully with the salty, crispy bacon. Plus, the hint of spice adds an exciting kick that keeps everyone coming back for more.
Making these treats is simple and fun. Start by wrapping each date in a slice of bacon. Secure it with a toothpick if needed. Then, bake them until the bacon is crispy and the dates are warm. The result is a delicious appetizer that’s sure to impress.
Ingredients
- 20 pitted dates
- 10 slices of bacon, cut in half
- 1/4 cup honey
- 1/2 teaspoon cayenne pepper
- 1/4 teaspoon salt
- Fresh parsley, chopped (for garnish)
Instructions
- Preheat the oven to 400°F (200°C).
- In a small bowl, mix honey, cayenne pepper, and salt.
- Wrap each date with a half slice of bacon and secure with a toothpick if needed.
- Place the wrapped dates on a baking sheet lined with parchment paper.
- Drizzle the honey mixture over the bacon-wrapped dates.
- Bake for 20-25 minutes, or until the bacon is crispy.
- Remove from the oven and let cool slightly. Garnish with chopped parsley before serving.