Dessert is the sweet finale to any meal, bringing joy and indulgence to the dining experience.
From cakes and pies to puddings and ice creams, there’s something delightful for everyone. It’s the perfect way to satisfy that sweet tooth and add a little extra happiness to the day!
Decadent Chocolate Lava Cake
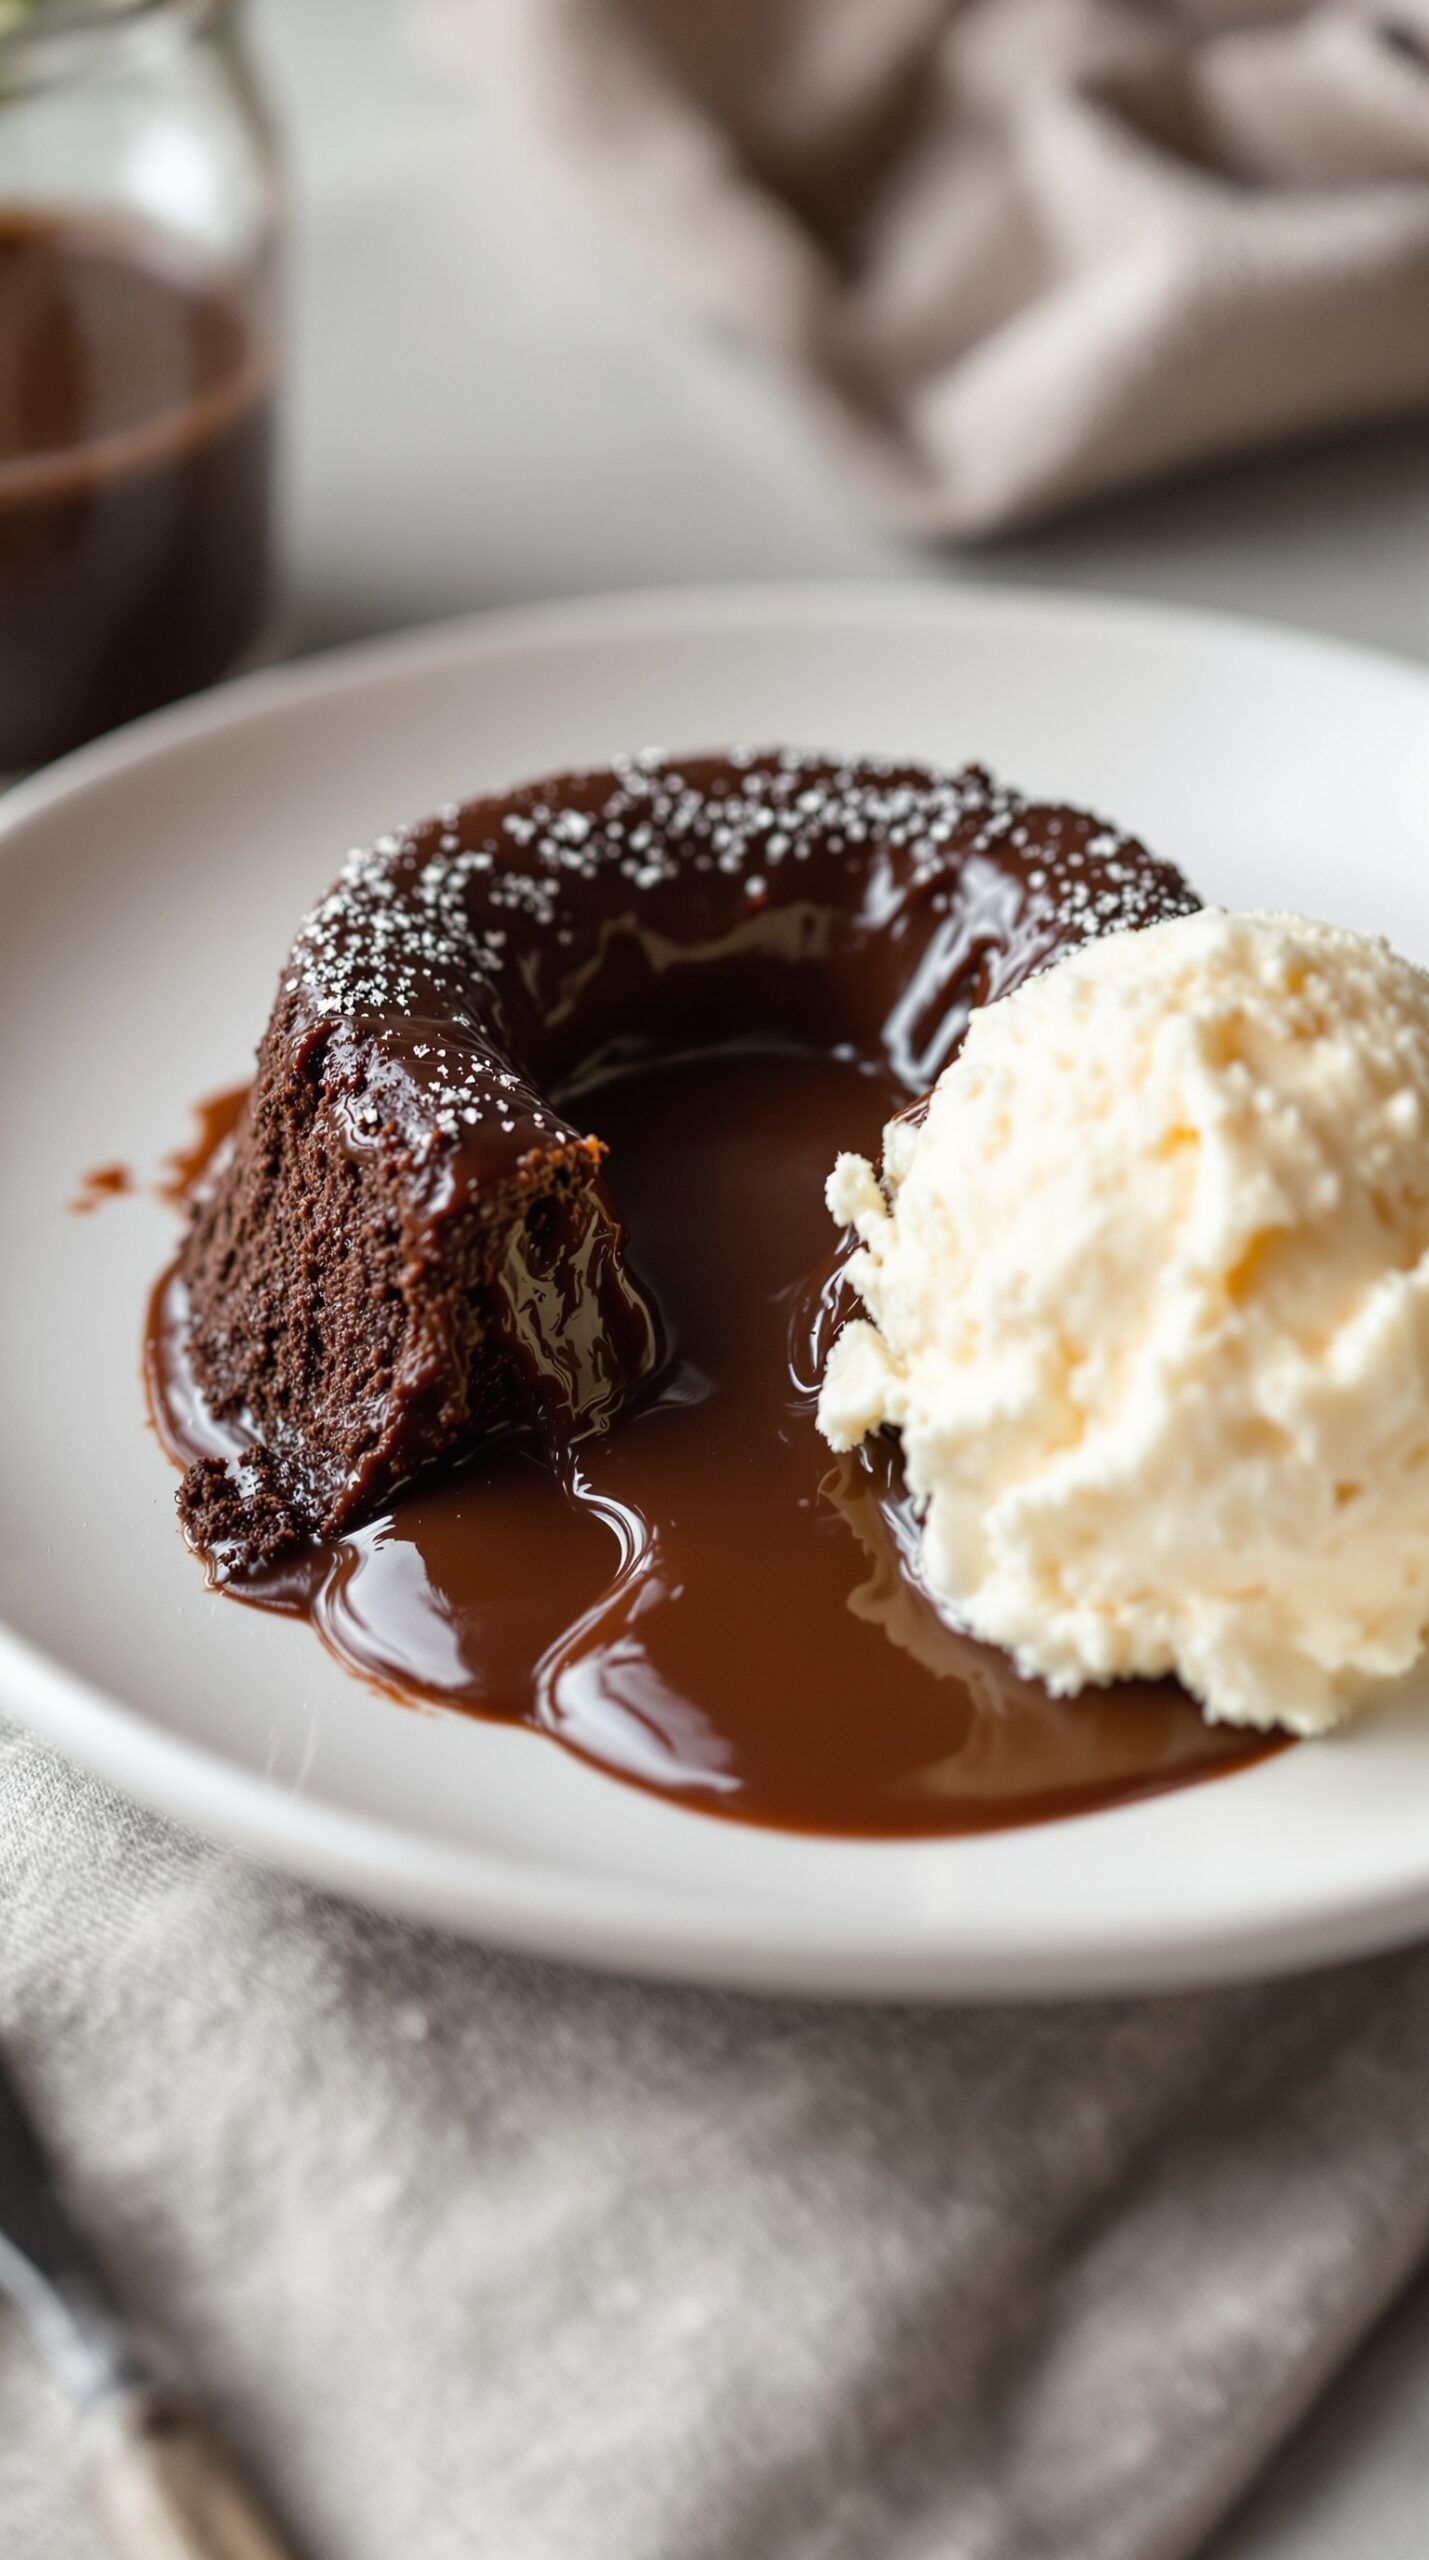
Chocolate lava cake is a true treat for anyone who loves dessert. This rich, warm cake has a gooey chocolate center that flows out when you cut into it. It’s the perfect way to satisfy a sweet tooth. Pair it with a scoop of vanilla ice cream, and you have a dessert that feels like a special occasion.
The image shows a beautifully plated chocolate lava cake, with a bite taken out, revealing its molten center. The shiny chocolate sauce pools around the cake, creating a tempting scene. A scoop of creamy vanilla ice cream sits beside it, adding a delightful contrast in flavor and texture.
Making chocolate lava cake at home is easier than you might think. With just a few ingredients, you can whip up this indulgent dessert that will impress your friends and family. Let’s get to the recipe!
Ingredients
- 1/2 cup unsalted butter
- 1 cup semi-sweet chocolate chips
- 2 large eggs
- 2 large egg yolks
- 1/4 cup granulated sugar
- 2 tablespoons all-purpose flour
- 1/4 teaspoon salt
- Powdered sugar for dusting
- Vanilla ice cream for serving
Instructions
- Preheat your oven to 425°F (220°C). Grease four ramekins with butter and dust with flour.
- In a microwave-safe bowl, melt the butter and chocolate chips together. Stir until smooth.
- In a separate bowl, whisk together the eggs, egg yolks, and granulated sugar until thick and pale.
- Pour the melted chocolate mixture into the egg mixture and stir to combine.
- Gently fold in the flour and salt until just combined.
- Divide the batter evenly among the prepared ramekins.
- Bake for 12-14 minutes, until the edges are firm but the center is still soft.
- Let the cakes cool for 1 minute, then invert onto plates. Dust with powdered sugar and serve with a scoop of vanilla ice cream.
Chocolate Chip Cookie Skillet Dessert
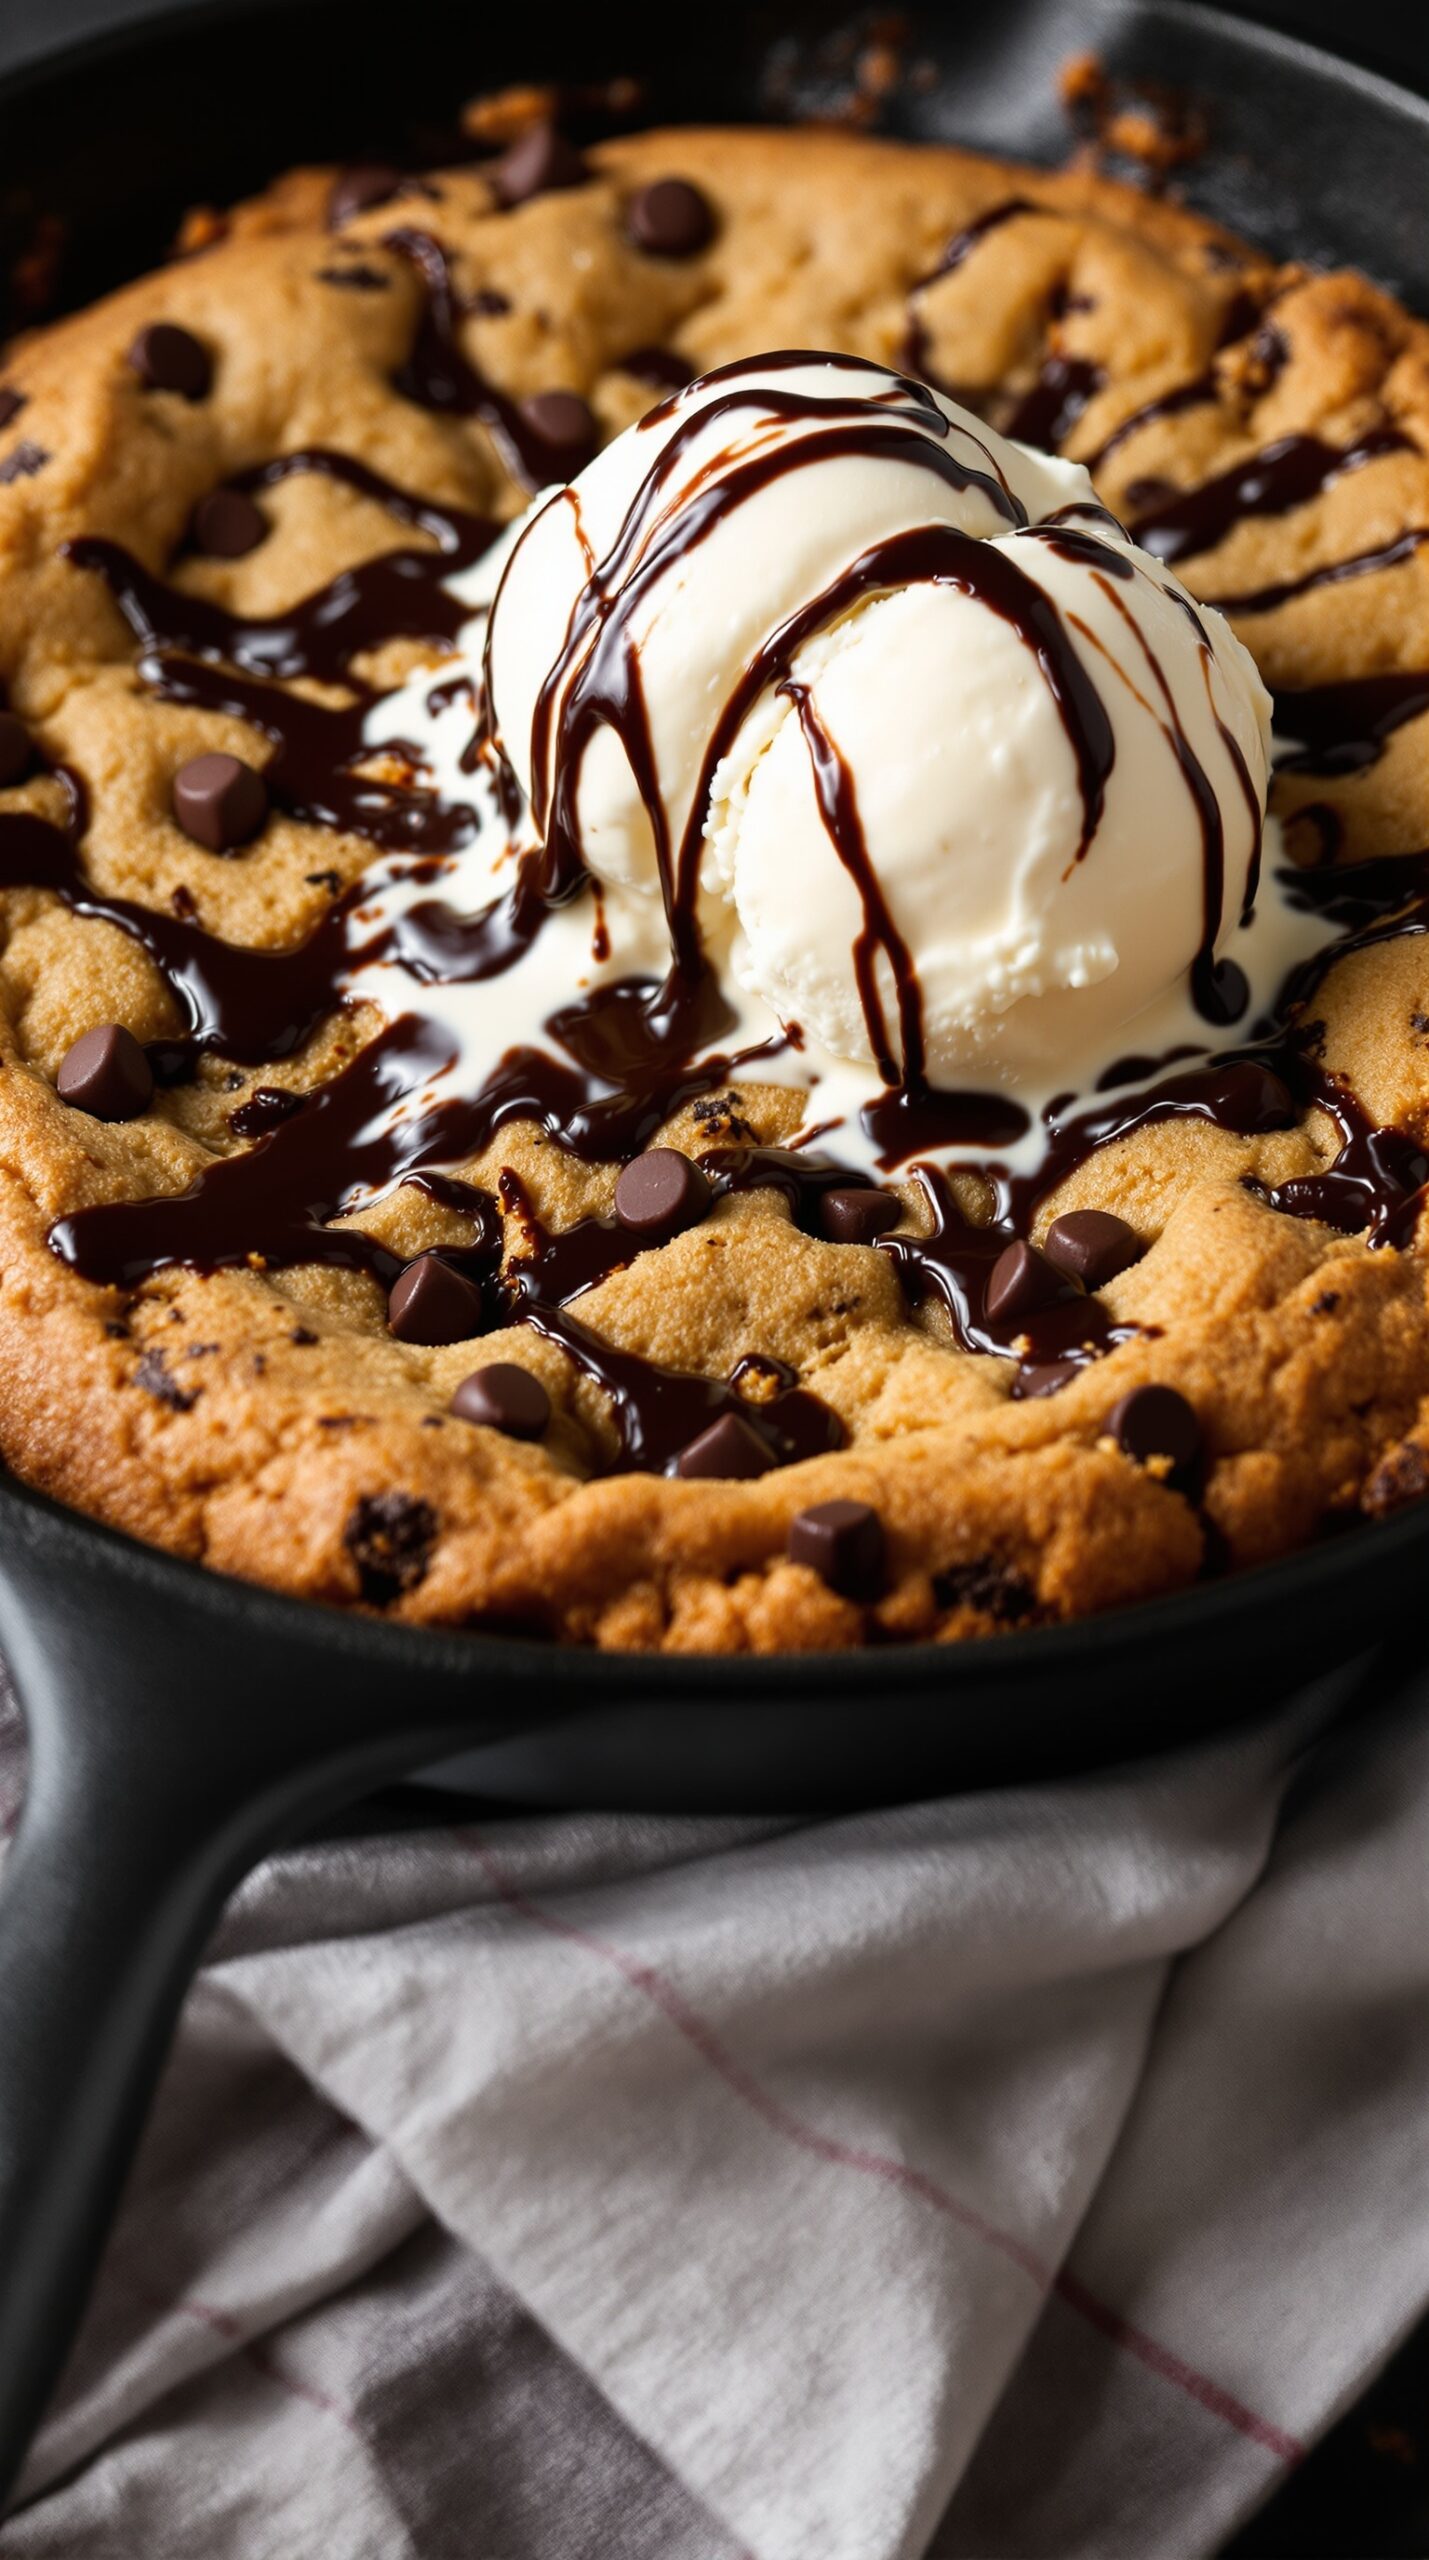
Imagine a warm, gooey chocolate chip cookie baked right in a skillet. This dessert is perfect for sharing, or not! The golden edges and soft center create a delightful contrast. Topped with a scoop of vanilla ice cream and a drizzle of chocolate sauce, it’s a treat that’s hard to resist.
To make this delicious dessert, you’ll need simple ingredients that you probably already have at home. The best part? It comes together quickly, making it ideal for a last-minute sweet craving.
Let’s get to the fun part—making it! Gather your ingredients and follow the steps below to whip up this indulgent dessert.
Ingredients
- 1 cup unsalted butter, softened
- 3/4 cup brown sugar, packed
- 1/2 cup granulated sugar
- 1 teaspoon vanilla extract
- 2 large eggs
- 2 1/4 cups all-purpose flour
- 1 teaspoon baking soda
- 1/2 teaspoon salt
- 2 cups chocolate chips
- Ice cream for serving
- Chocolate sauce for drizzling
Instructions
- Preheat your oven to 350°F (175°C).
- In a large bowl, cream together the softened butter, brown sugar, and granulated sugar until smooth. Add in the vanilla extract and eggs, mixing well.
- In another bowl, whisk together the flour, baking soda, and salt. Gradually add this dry mixture to the wet ingredients, stirring until just combined. Fold in the chocolate chips.
- Spread the cookie dough evenly in a greased skillet. Bake for 25-30 minutes, or until the edges are golden and the center is set.
- Let it cool slightly, then serve warm with a scoop of ice cream and a drizzle of chocolate sauce on top.
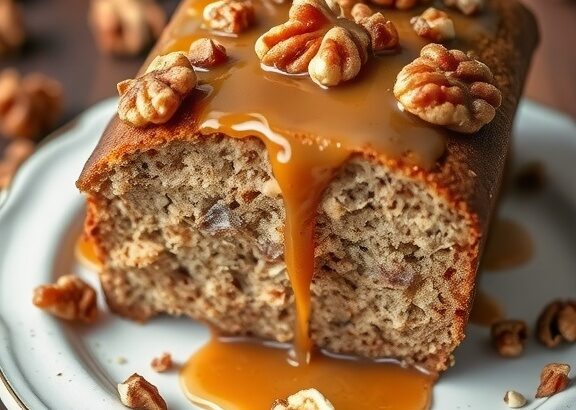
Rich Pecan Pie with Caramel Drizzle
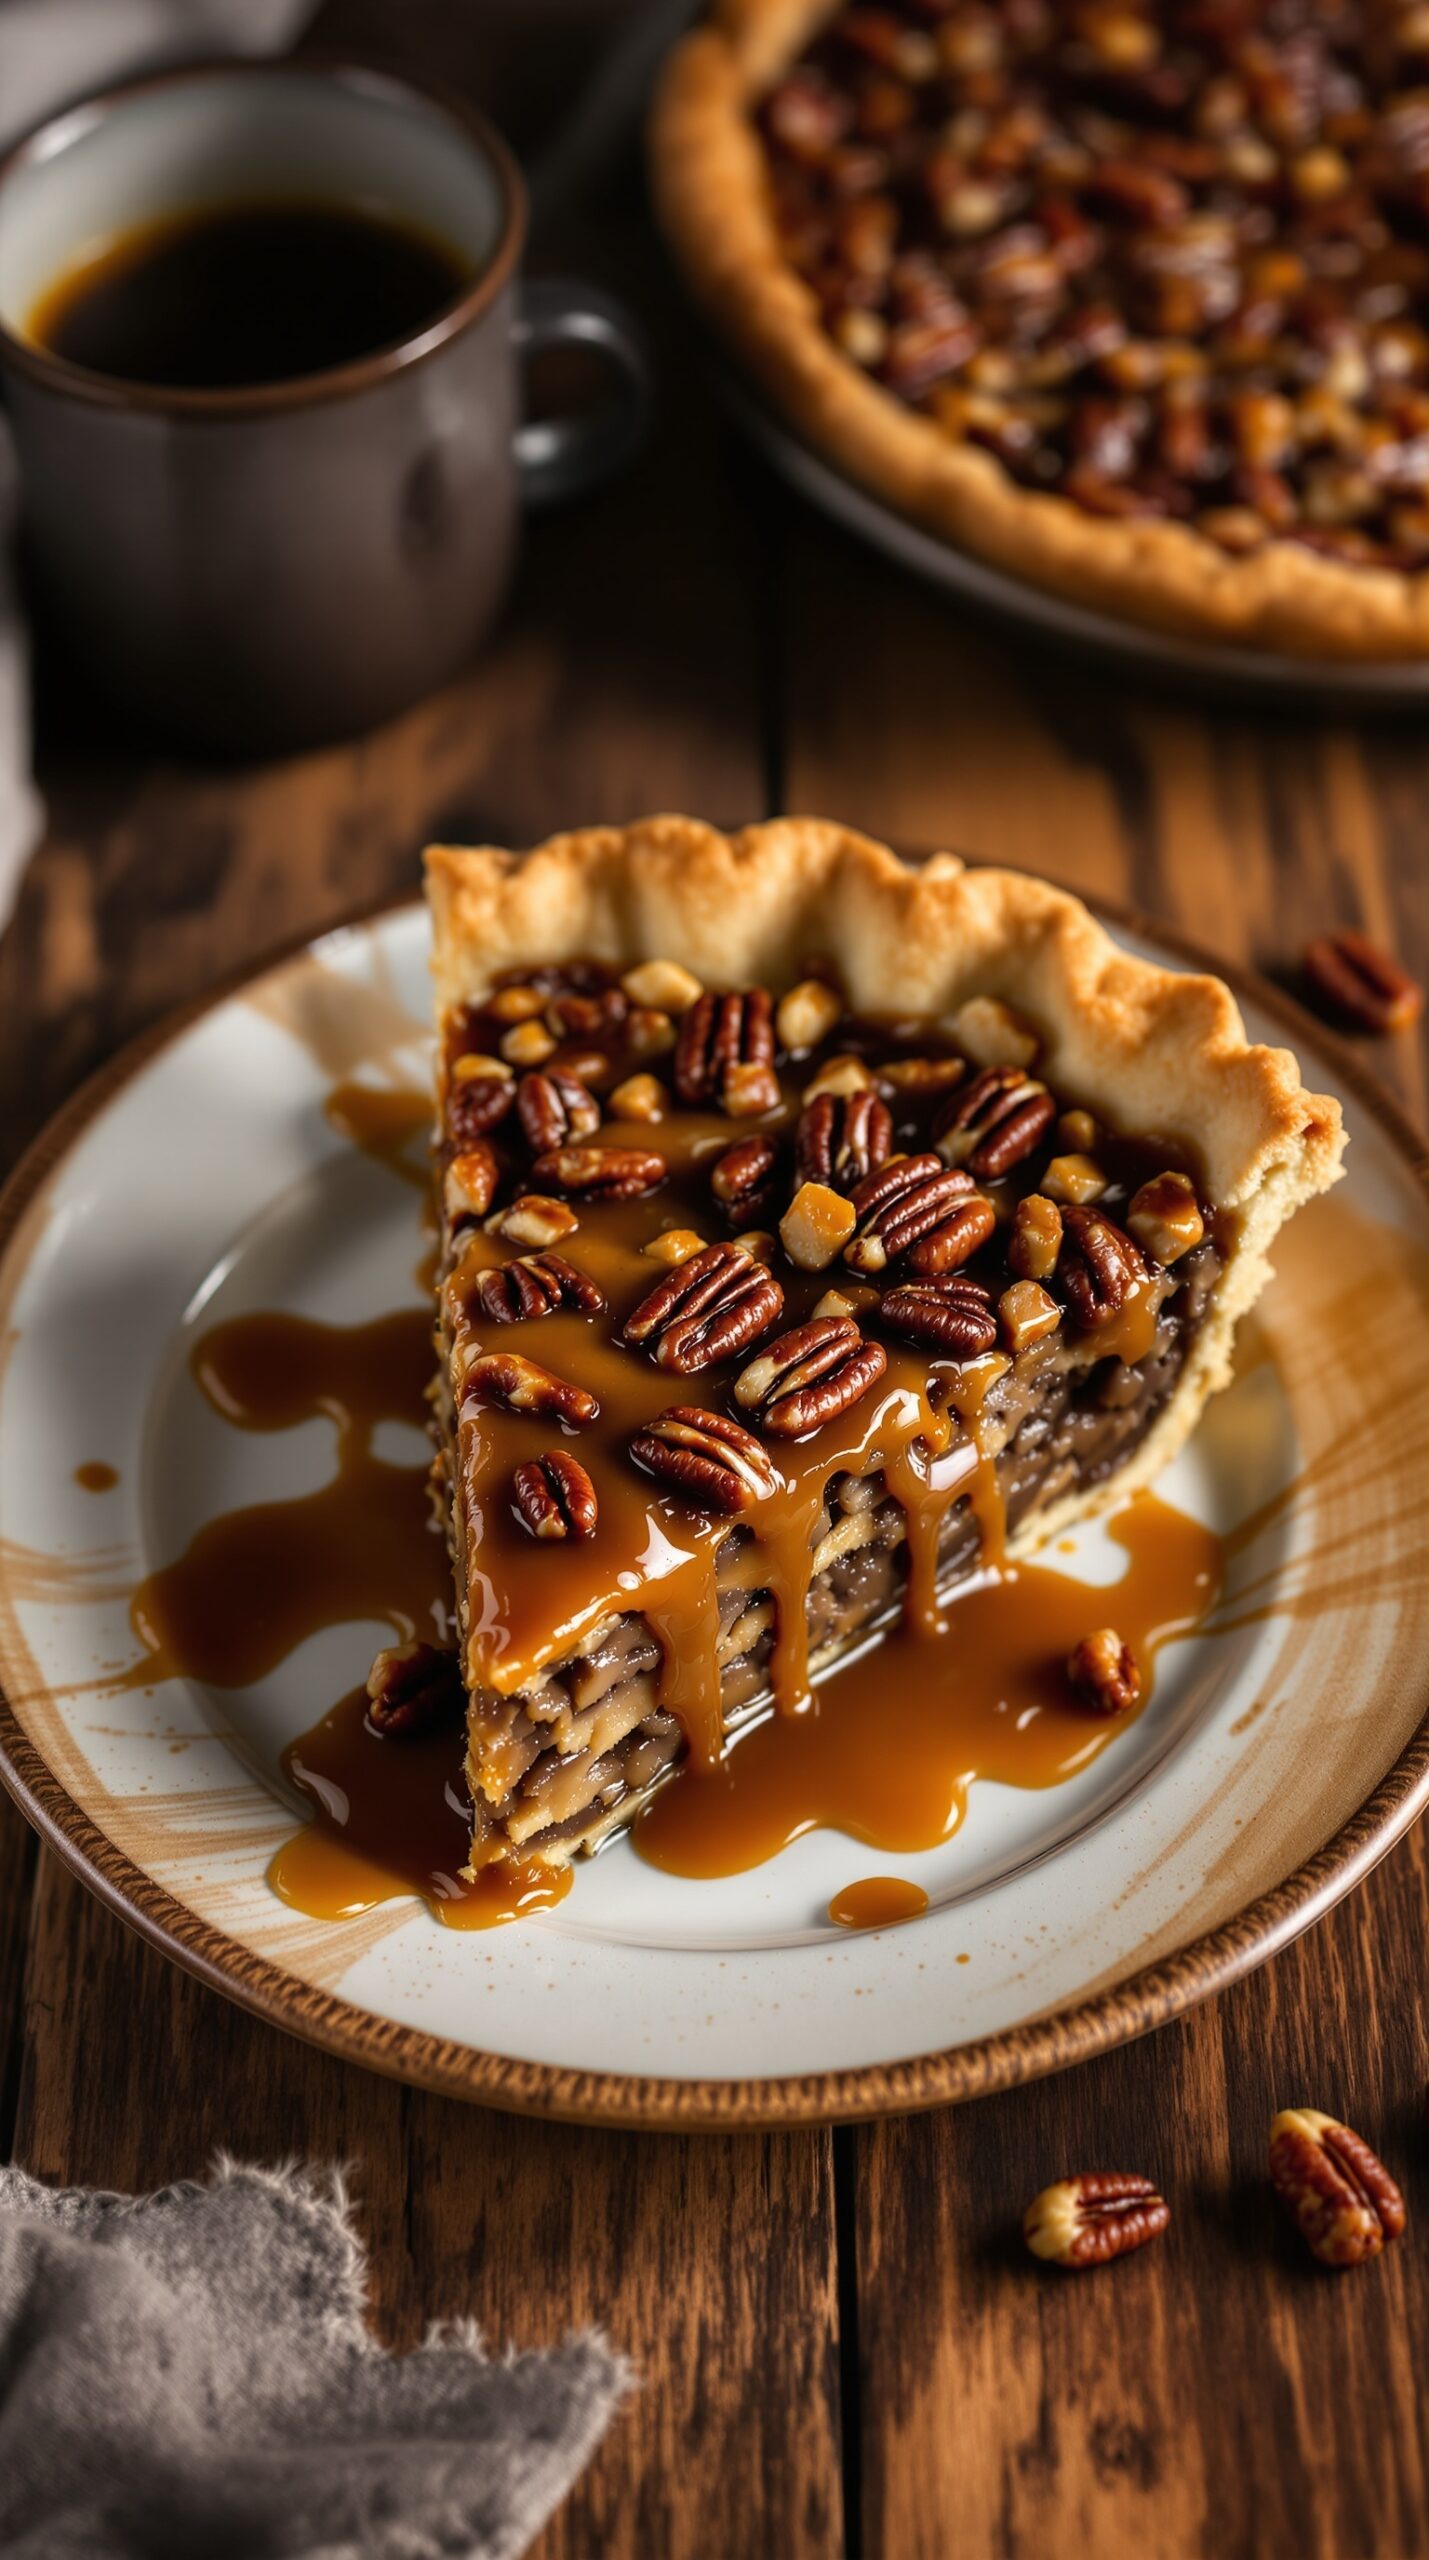
Pecan pie is a classic dessert that brings warmth and comfort to any table. This version is especially delightful, featuring a rich filling that perfectly complements the crunchy pecans on top. The caramel drizzle adds an extra layer of sweetness, making it a treat for anyone with a sweet tooth.
The pie crust is golden and flaky, providing the perfect base for the gooey filling. Each slice reveals a beautiful layer of pecans, glistening with caramel. It’s a dessert that not only tastes amazing but also looks stunning on any dessert table.
Pair this pie with a scoop of vanilla ice cream or a dollop of whipped cream for an extra special touch. Whether it’s a holiday gathering or a casual dinner, this pecan pie will surely impress your guests.
Ingredients
- 1 unbaked pie crust
- 1 cup corn syrup
- 1 cup brown sugar, packed
- 1/3 cup unsalted butter, melted
- 3 large eggs
- 1 teaspoon vanilla extract
- 2 cups pecan halves
- 1/2 cup caramel sauce (for drizzling)
Instructions
- Preheat your oven to 350°F (175°C).
- In a large bowl, mix together the corn syrup, brown sugar, melted butter, eggs, and vanilla extract until smooth.
- Stir in the pecan halves until they are well coated with the mixture.
- Pour the filling into the unbaked pie crust, spreading the pecans evenly.
- Bake for 60-70 minutes, or until the filling is set and the top is golden brown.
- Let the pie cool completely before drizzling with caramel sauce.
- Serve slices with extra caramel sauce if desired. Enjoy!
Fruit Tart with Creamy Custard
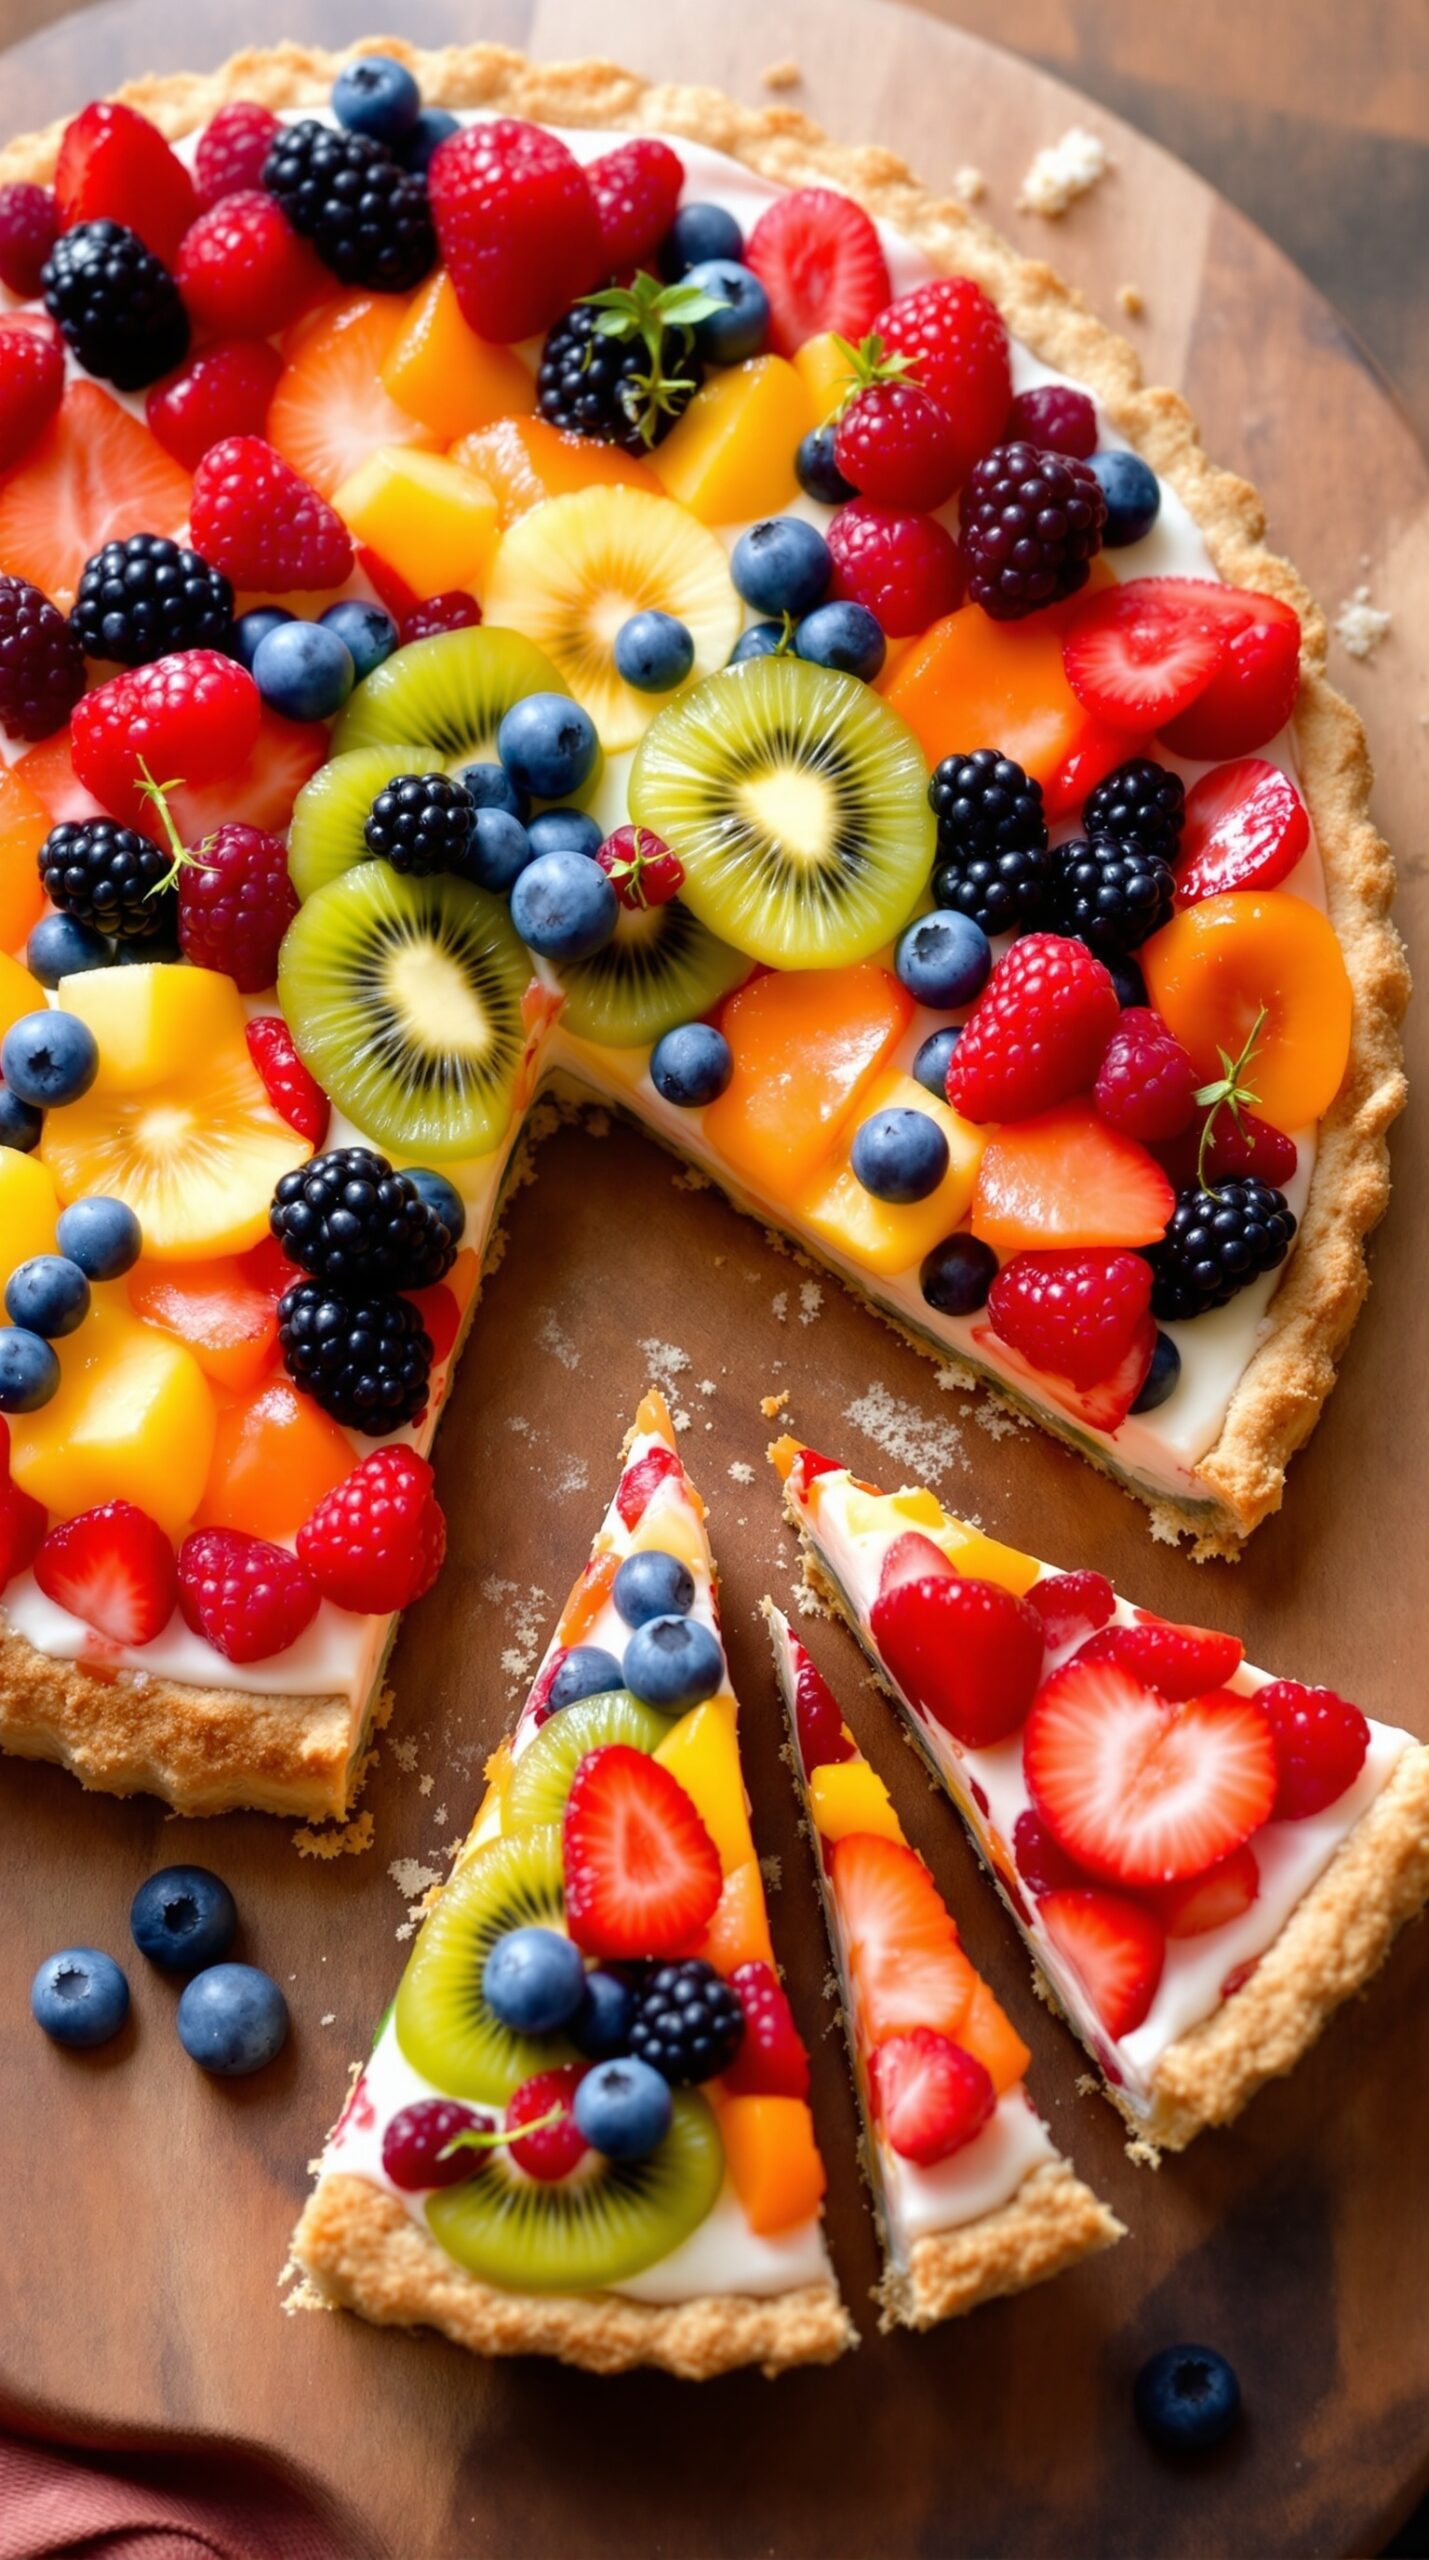
Fruit tarts are a delightful treat that combines a crisp pastry crust with a rich, creamy custard and a vibrant array of fresh fruits. This dessert is not only visually appealing but also offers a refreshing taste that can brighten any occasion.
The tart features a buttery crust that crumbles perfectly with each bite. Inside, the creamy custard is smooth and luscious, providing a wonderful contrast to the juicy fruits on top. You can use a variety of fruits like strawberries, blueberries, kiwi, and peaches to create a colorful display that’s sure to impress.
This dessert is perfect for gatherings, celebrations, or simply as a sweet indulgence after dinner. It’s easy to make and can be prepared ahead of time, making it a great option for busy days.
Ingredients
- 1 pre-made tart shell (9-inch)
- 2 cups mixed fresh fruits (strawberries, blueberries, kiwi, peaches)
- 1 cup heavy cream
- 1/2 cup granulated sugar
- 2 large egg yolks
- 2 tablespoons cornstarch
- 1 teaspoon vanilla extract
- 1/4 cup milk
Instructions
- Prepare the Custard: In a saucepan, whisk together the sugar, egg yolks, and cornstarch until smooth. Gradually add the milk and heavy cream, stirring constantly over medium heat until the mixture thickens. Remove from heat and stir in vanilla extract.
- Cool the Custard: Transfer the custard to a bowl and cover with plastic wrap, pressing it directly onto the surface to prevent a skin from forming. Let it cool completely.
- Assemble the Tart: Once the custard is cool, pour it into the pre-made tart shell, spreading it evenly. Arrange the fresh fruits on top in a decorative pattern.
- Chill: Refrigerate the tart for at least 1 hour before serving to allow the flavors to meld and the custard to set.
- Serve: Slice the tart into wedges and enjoy this beautiful and delicious dessert!
Lemon Meringue Pie with Toasted Topping
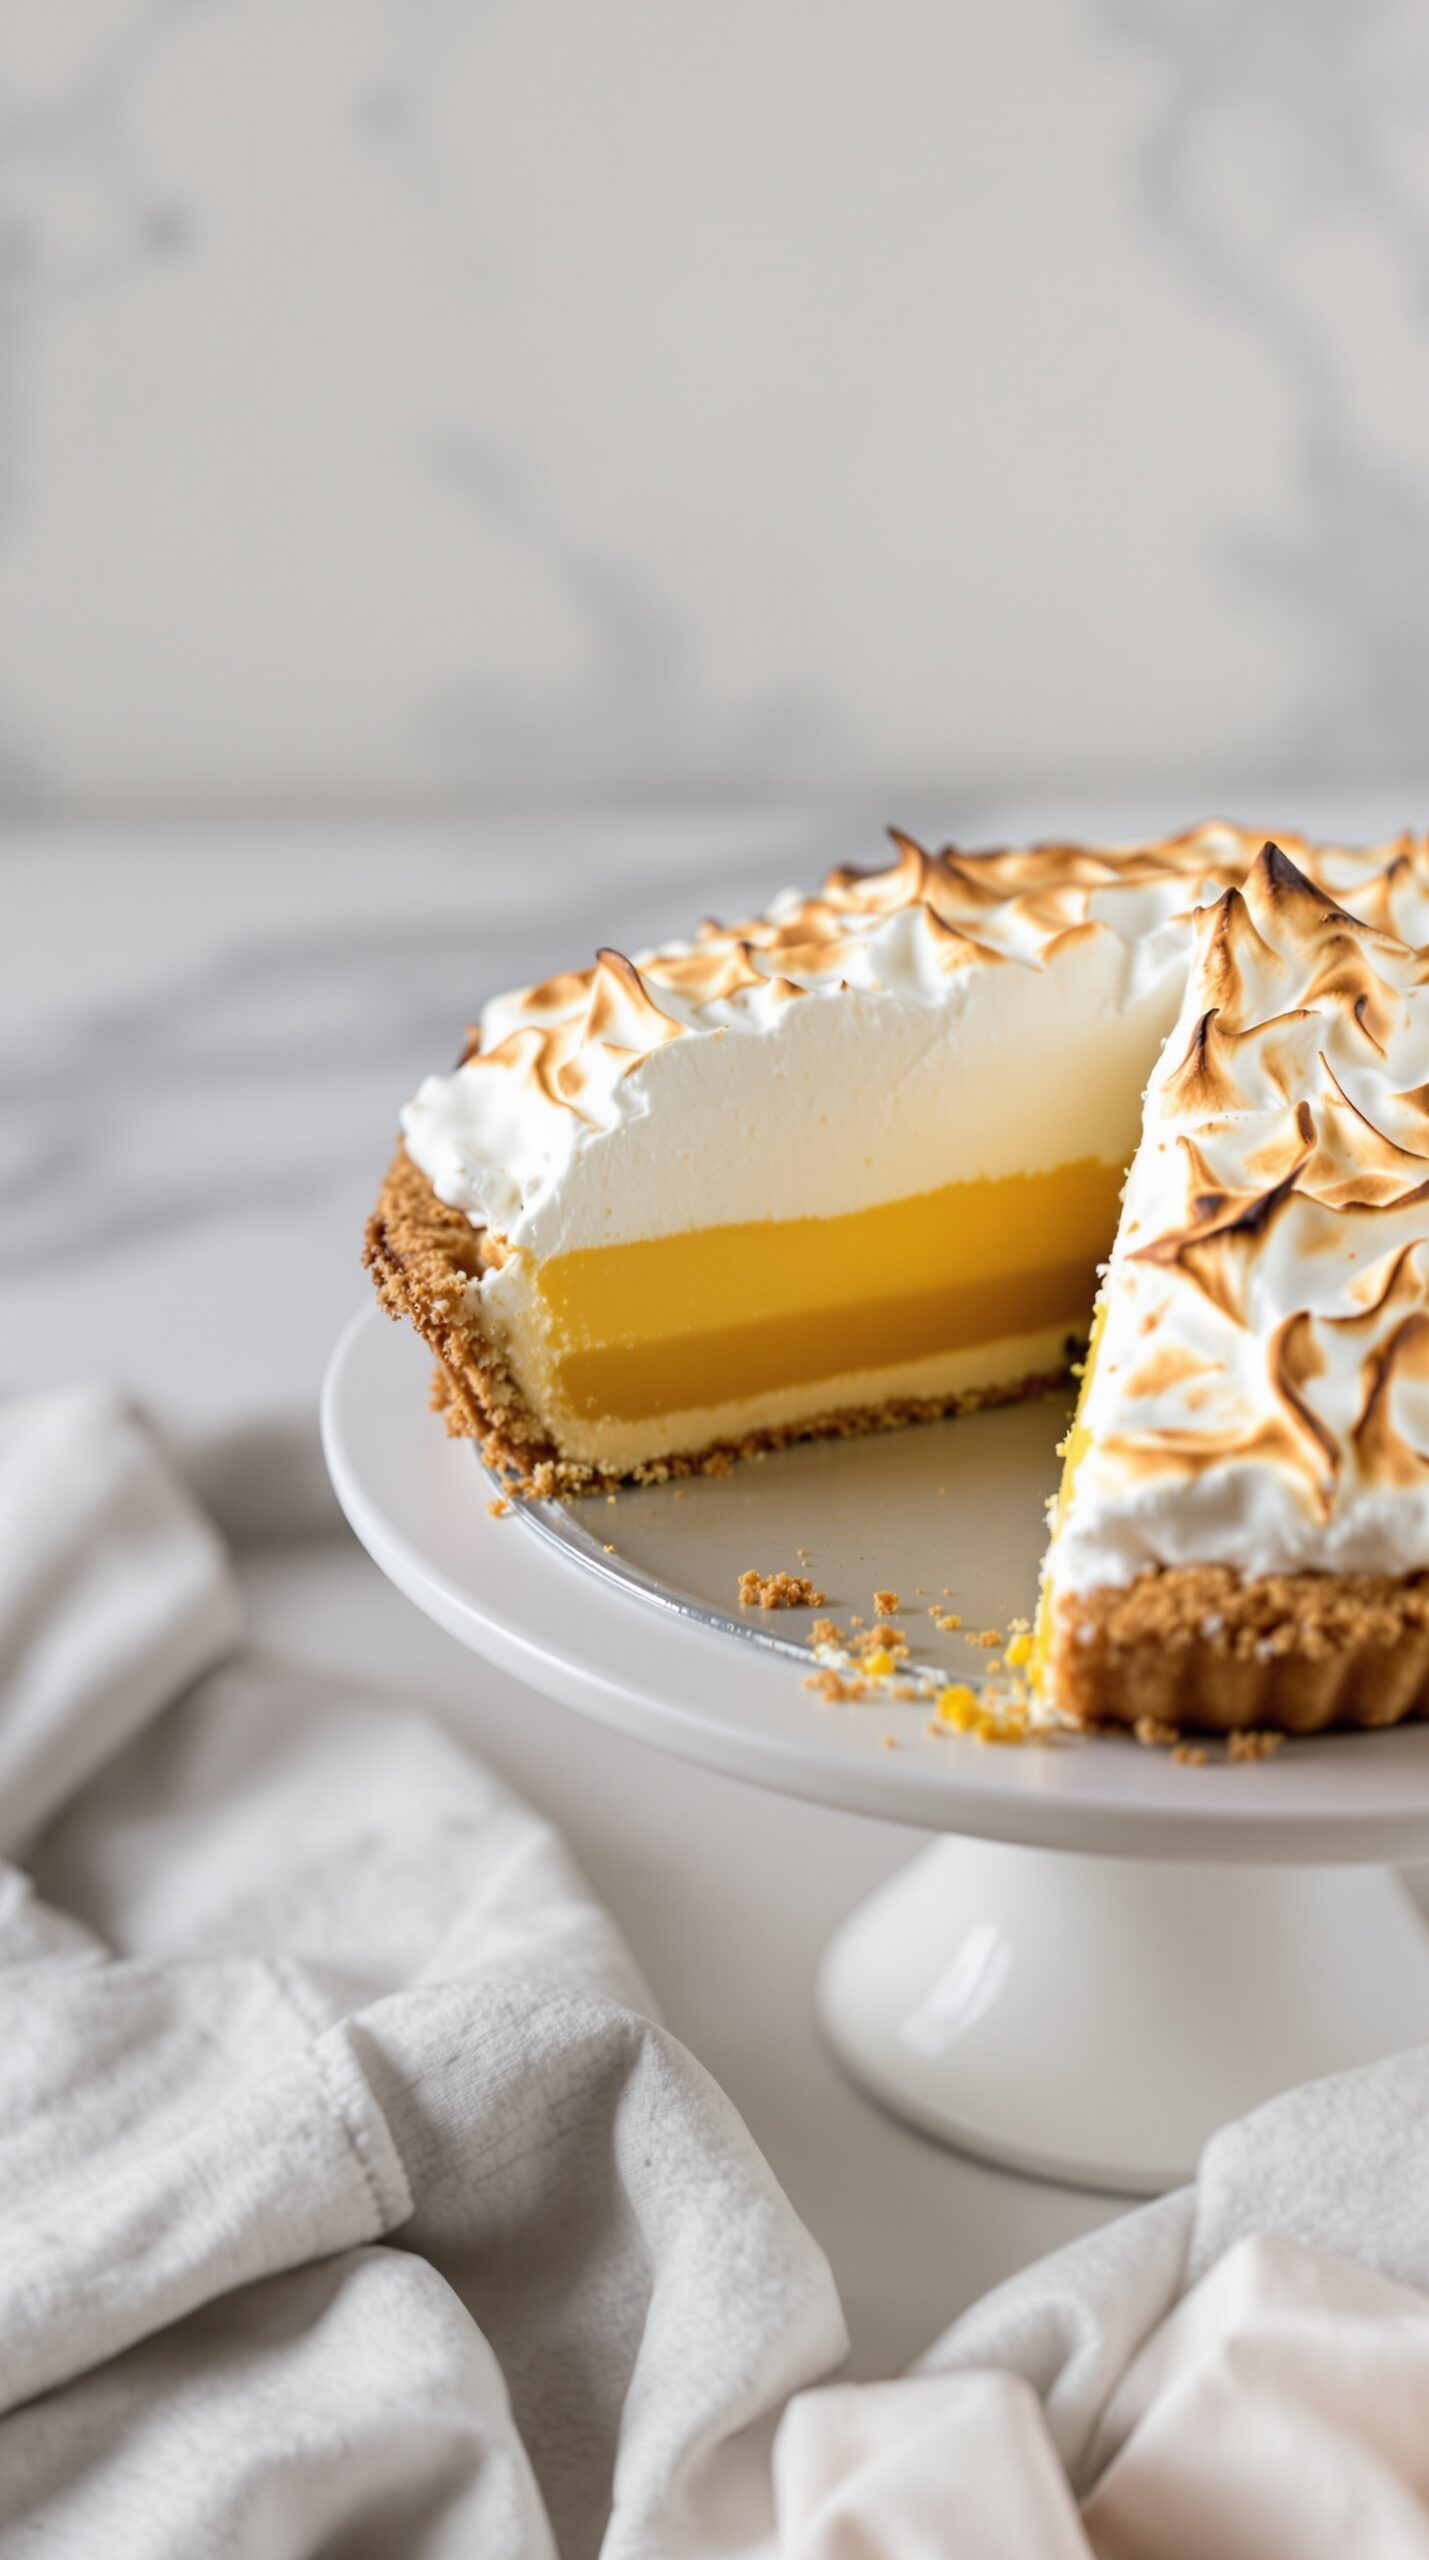
Lemon meringue pie is a classic dessert that combines a zesty lemon filling with a fluffy meringue topping. The image shows a beautifully crafted pie, with its golden-brown meringue peaks adding a delightful contrast to the bright yellow filling. The pie sits on a simple white cake stand, making it the star of the show.
This dessert is not just about looks; it’s a perfect balance of sweet and tart. The crust is typically made from crushed graham crackers or pastry, providing a crunchy base that complements the smooth filling. The meringue, made from whipped egg whites and sugar, is lightly toasted to create a crispy exterior while remaining soft inside.
Making lemon meringue pie at home is easier than it seems. With fresh ingredients and a bit of patience, you can whip up this delightful treat for any occasion. Whether it’s a family gathering or a cozy dinner, this pie is sure to impress.
Ingredients
- 1 pre-made pie crust (9-inch)
- 1 cup granulated sugar
- 2 tablespoons cornstarch
- 1/4 teaspoon salt
- 1 1/2 cups water
- 3 large egg yolks, beaten
- 1/2 cup fresh lemon juice
- 1 tablespoon lemon zest
- 2 tablespoons unsalted butter
- 3 large egg whites
- 1/4 teaspoon cream of tartar
- 1/2 cup granulated sugar (for meringue)
Instructions
- Prepare the Crust: Preheat your oven to 350°F (175°C). Bake the pie crust according to package instructions until golden brown. Let it cool.
- Make the Filling: In a saucepan, combine 1 cup sugar, cornstarch, and salt. Gradually whisk in water. Cook over medium heat, stirring constantly until thickened. Remove from heat.
- Add Egg Yolks: Stir a small amount of the hot mixture into the beaten egg yolks, then return it to the saucepan. Cook for another 2 minutes, then remove from heat. Stir in lemon juice, zest, and butter until smooth.
- Fill the Crust: Pour the lemon filling into the cooled pie crust and set aside.
- Make the Meringue: In a clean bowl, beat egg whites and cream of tartar until soft peaks form. Gradually add 1/2 cup sugar, beating until stiff peaks form.
- Top the Pie: Spread the meringue over the lemon filling, sealing the edges. Use a spatula to create peaks.
- Toast the Meringue: Bake in the preheated oven for about 10-12 minutes, or until the meringue is golden brown.
- Cool and Serve: Allow the pie to cool completely before slicing. Enjoy your homemade lemon meringue pie!
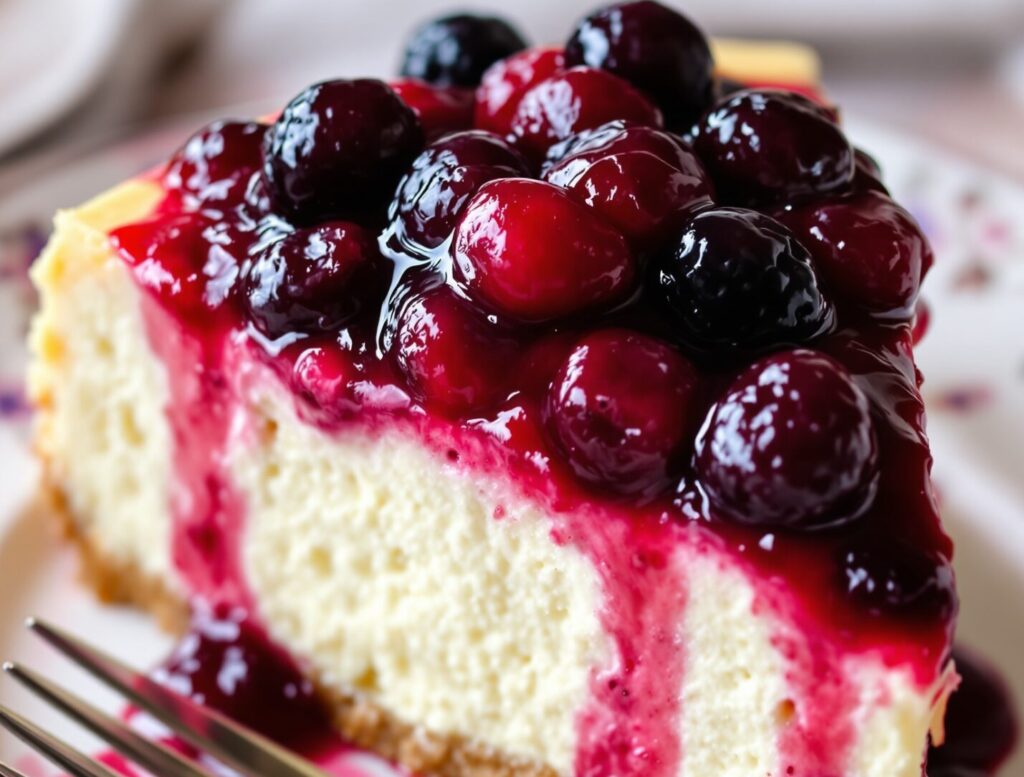
Velvety Cheesecake with Berry Compote

Cheesecake is a classic dessert that brings joy to many. This velvety cheesecake features a smooth, creamy texture that melts in your mouth. Topped with a vibrant berry compote, it adds a burst of flavor and color. The combination of sweet and tart berries perfectly complements the rich cheesecake.
The crust is made from crushed graham crackers, giving it a delightful crunch. Each slice is a treat, making it perfect for gatherings or a cozy night in. Serve it chilled, and watch as everyone savors each bite.
Ingredients
- 1 1/2 cups graham cracker crumbs
- 1/4 cup granulated sugar
- 1/2 cup unsalted butter, melted
- 4 (8 oz) packages cream cheese, softened
- 1 cup granulated sugar
- 1 teaspoon vanilla extract
- 4 large eggs
- 2 cups mixed berries (strawberries, blueberries, raspberries)
- 1/4 cup water
- 1/4 cup sugar (for compote)
- 1 tablespoon lemon juice
Instructions
- Prepare the Crust: Preheat your oven to 325°F (160°C). In a bowl, mix graham cracker crumbs, sugar, and melted butter. Press this mixture into the bottom of a 9-inch springform pan.
- Bake the Crust: Bake the crust for about 10 minutes. Remove from the oven and let it cool.
- Make the Filling: In a large bowl, beat the cream cheese until smooth. Gradually add sugar and vanilla, mixing well. Add eggs one at a time, beating just until combined.
- Pour the Filling: Pour the cream cheese mixture over the cooled crust. Smooth the top with a spatula.
- Bake the Cheesecake: Bake for 55-60 minutes, or until the center is set but still slightly jiggly. Turn off the oven and let it cool inside for an hour.
- Prepare the Berry Compote: In a saucepan, combine mixed berries, water, sugar, and lemon juice. Cook over medium heat until the berries break down and the mixture thickens, about 10 minutes.
- Cool and Serve: Let the compote cool. Once the cheesecake is completely cooled, top it with the berry compote. Chill in the refrigerator for at least 4 hours before serving.
Classic Tiramisu with Coffee Infusion
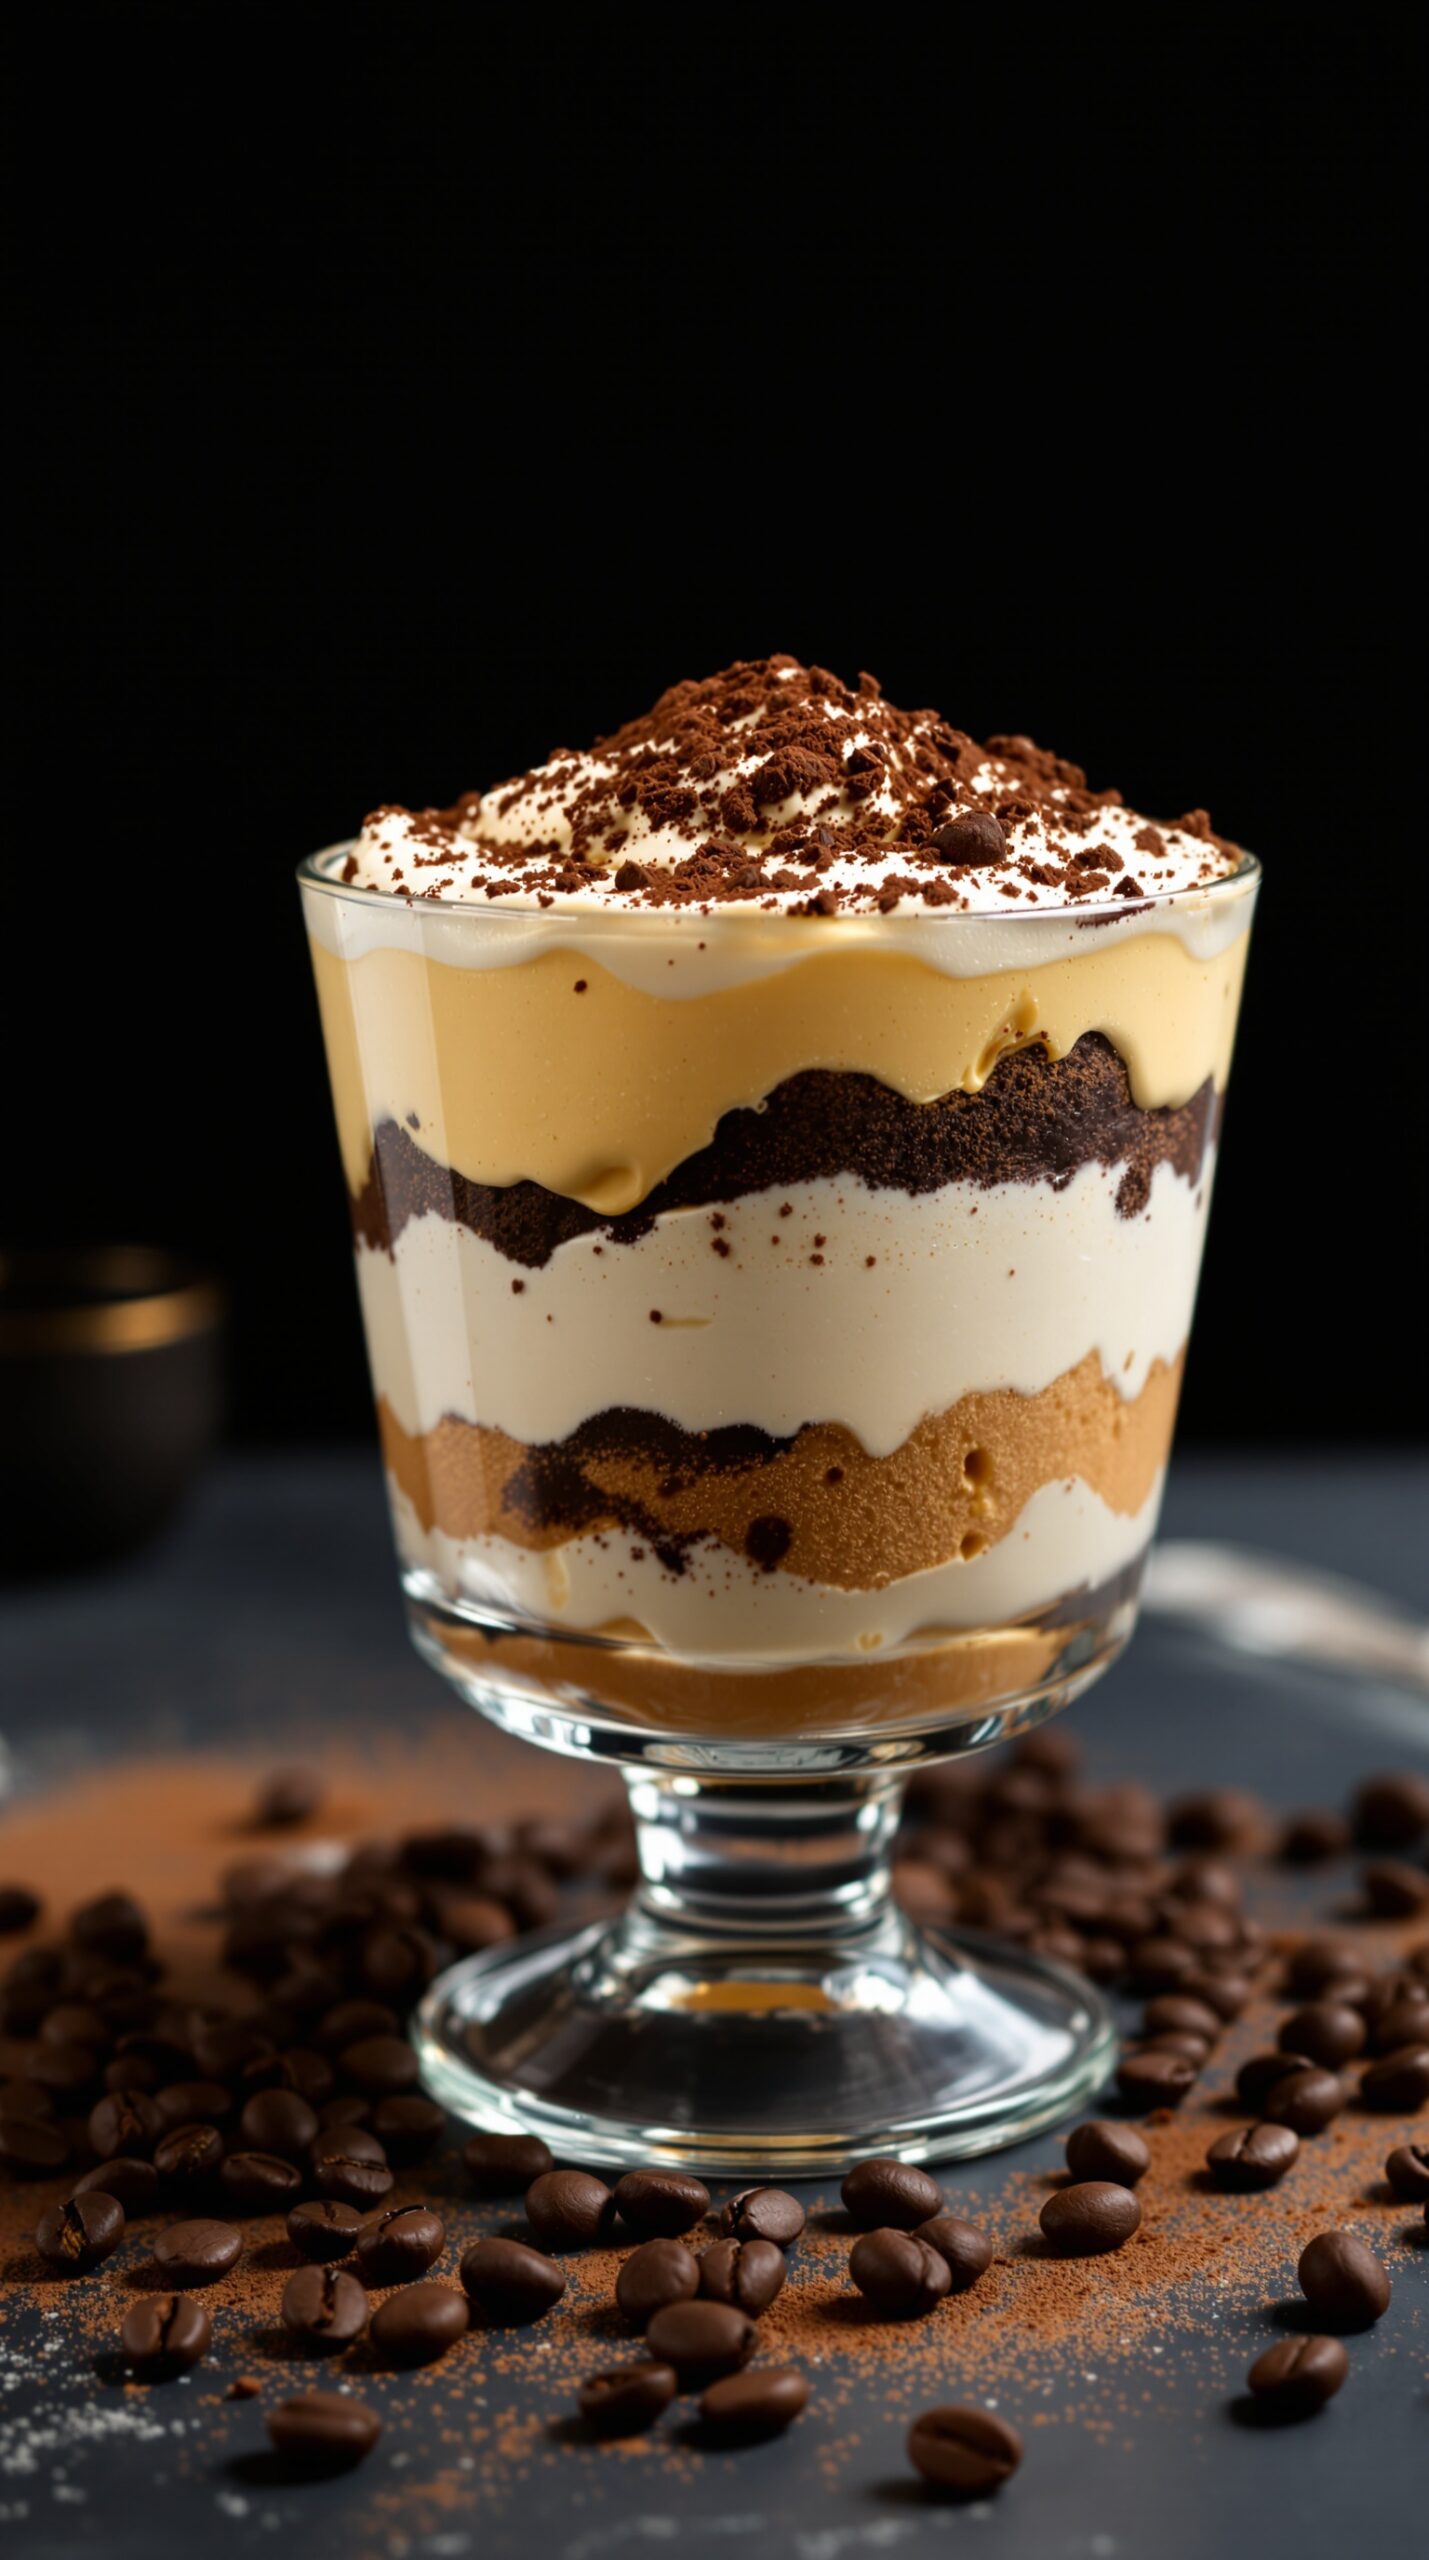
Tiramisu is a classic Italian dessert that brings together layers of coffee-soaked ladyfingers and a rich mascarpone mixture. The image showcases this delightful treat, beautifully layered in a glass, topped with cocoa powder and coffee beans. Each layer tells a story of flavor, from the bold coffee to the creamy mascarpone.
This dessert is perfect for coffee lovers. The infusion of coffee not only enhances the taste but also adds a delightful aroma. It’s a great way to end a meal or to enjoy as a sweet snack during the day.
Making tiramisu at home is easier than you might think. With just a few ingredients, you can create a dessert that impresses everyone. Let’s get into the recipe!
Ingredients
- 6 egg yolks
- 3/4 cup granulated sugar
- 2/3 cup milk
- 1 1/4 cups heavy cream
- 1 cup mascarpone cheese
- 1 cup strong brewed coffee, cooled
- 24 ladyfingers
- Cocoa powder for dusting
- Chocolate shavings (optional)
Instructions
- Prepare the Cream: In a saucepan, whisk together egg yolks and sugar over medium heat. Gradually add milk, stirring constantly until the mixture thickens. Remove from heat and let it cool.
- Whip the Cream: In a separate bowl, whip the heavy cream until soft peaks form. Gently fold in the mascarpone cheese until smooth.
- Combine: Once the egg mixture is cool, fold it into the whipped cream mixture until well combined.
- Soak the Ladyfingers: Dip each ladyfinger into the cooled coffee for a few seconds, ensuring they soak but don’t become too soggy.
- Layer: In a glass or dish, layer soaked ladyfingers, followed by the mascarpone mixture. Repeat until all ingredients are used, finishing with the mascarpone layer on top.
- Chill: Cover and refrigerate for at least 4 hours, or overnight for best results.
- Serve: Before serving, dust the top with cocoa powder and add chocolate shavings if desired.
Homemade Apple Pie with Flaky Crust
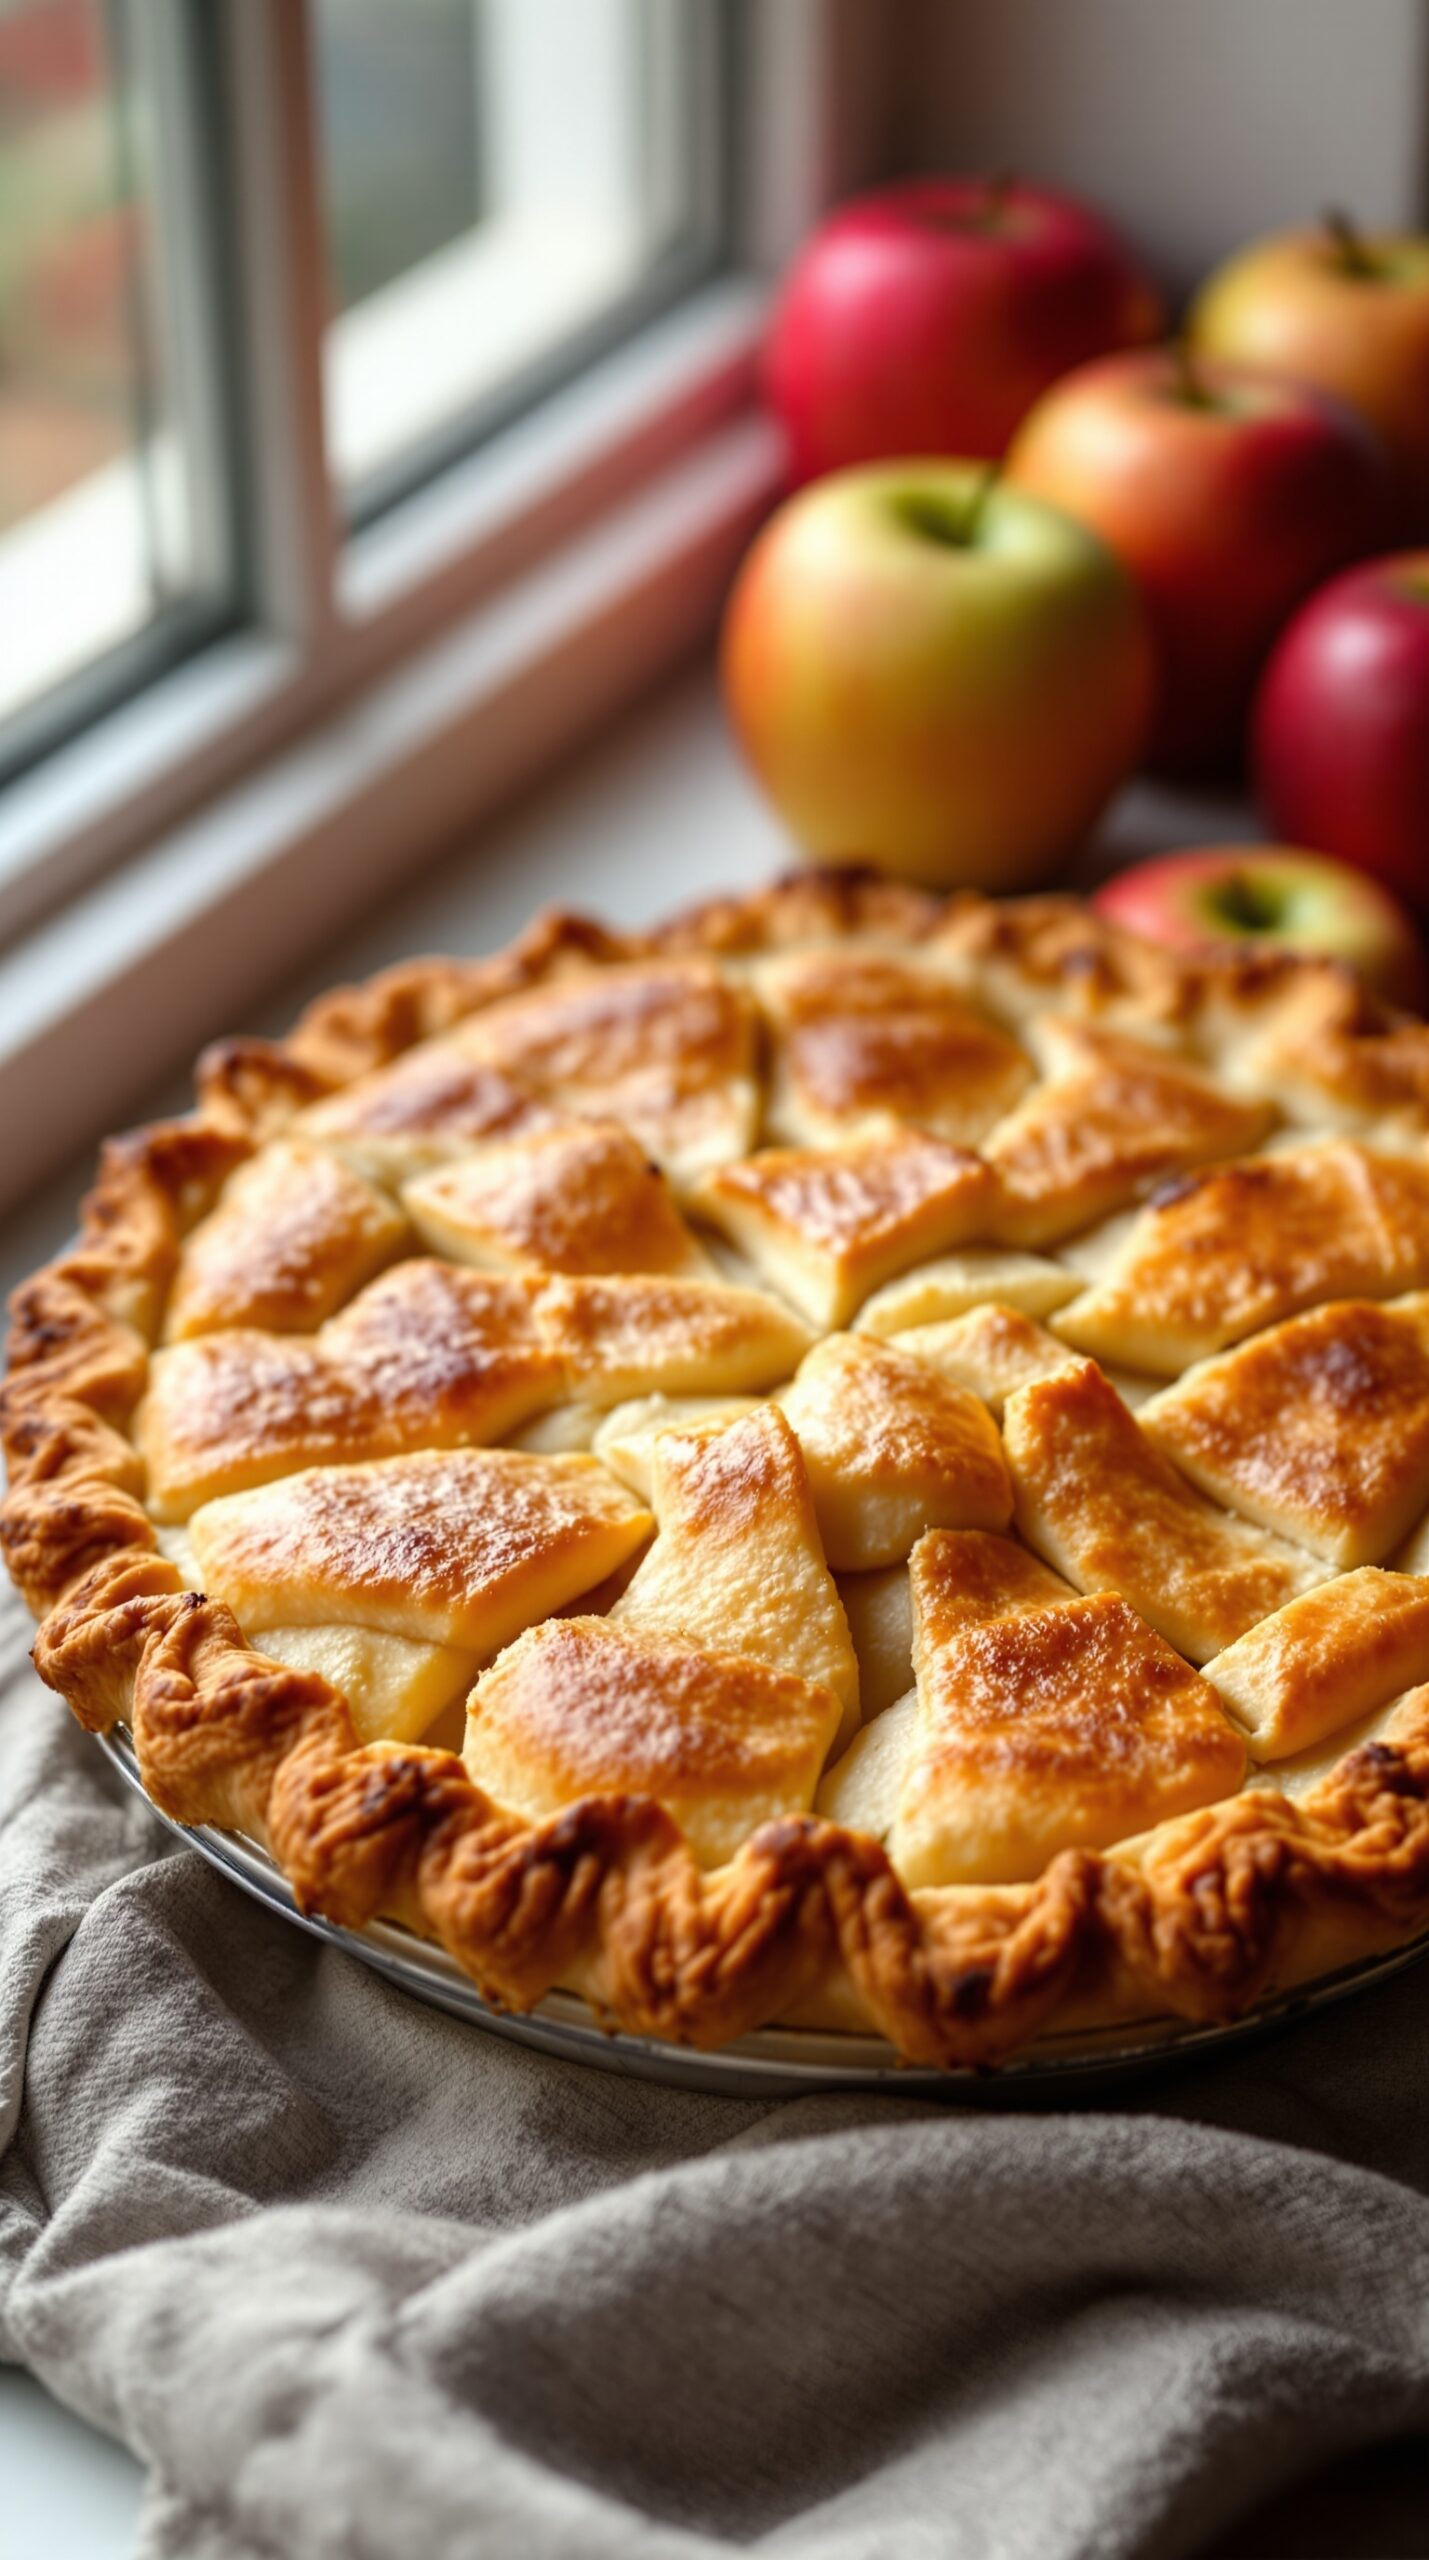
There’s something truly special about a homemade apple pie. The golden, flaky crust is a delight, and the sweet, spiced apple filling makes it a comforting dessert. This pie is perfect for gatherings or just a cozy night in. The aroma of baked apples and cinnamon fills the air, inviting everyone to take a slice.
Making apple pie at home is easier than you might think. Start with fresh apples, preferably a mix of sweet and tart varieties. This gives the pie a balanced flavor. The crust is key; it should be buttery and flaky, providing the perfect contrast to the soft apples inside.
When it comes to serving, a scoop of vanilla ice cream on top can elevate the experience. The creaminess pairs wonderfully with the warm pie. Whether you enjoy it after dinner or as a midday treat, this homemade apple pie is sure to please.
Ingredients
- 2 ½ cups all-purpose flour
- 1 teaspoon salt
- 1 tablespoon sugar
- 1 cup unsalted butter, chilled and diced
- 6 to 8 tablespoons ice water
- 6 to 8 apples, peeled, cored, and sliced
- ¾ cup sugar
- 2 tablespoons all-purpose flour
- 1 teaspoon ground cinnamon
- ¼ teaspoon nutmeg
- 1 tablespoon lemon juice
Instructions
- Make the Crust: In a bowl, mix flour, salt, and sugar. Cut in butter until the mixture resembles coarse crumbs. Stir in ice water, a tablespoon at a time, until the dough comes together. Divide into two balls, flatten, wrap in plastic, and refrigerate for at least 4 hours.
- Prepare the Filling: In a large bowl, toss sliced apples with sugar, flour, cinnamon, nutmeg, and lemon juice. Let it sit for about 15 minutes to allow the flavors to meld.
- Roll Out the Dough: Preheat your oven to 425°F (220°C). Roll out one dough ball on a floured surface to fit your pie dish. Place it in the dish and fill with the apple mixture.
- Top the Pie: Roll out the second dough ball and place it over the filling. Seal the edges and cut slits in the top to allow steam to escape. Brush with a little melted butter and sprinkle with sugar.
- Bake: Bake in the preheated oven for 15 minutes. Reduce the temperature to 350°F (175°C) and continue baking for 35 to 45 minutes, or until the apples are soft and the crust is golden brown.
- Cool and Serve: Let the pie cool for at least 2 hours before slicing. Serve warm or at room temperature, with ice cream if desired.
Coconut Macaroons with Drizzled Chocolate

Coconut macaroons are a delightful treat that brings a taste of the tropics to your dessert table. These little bites are made primarily from shredded coconut, which gives them a chewy texture and a sweet, nutty flavor. Topped with a drizzle of rich chocolate, they become a perfect blend of sweet and savory.
The image showcases a plate of these golden-brown macaroons, each one generously drizzled with dark chocolate. The contrast between the white coconut and the dark chocolate creates an appealing visual that is hard to resist. Sprinkled with extra shredded coconut, they look inviting and delicious, making them a great choice for any occasion.
Making coconut macaroons is simple and fun. They require just a few ingredients and can be whipped up in no time. Whether you’re hosting a gathering or just treating yourself, these macaroons are sure to impress.
Ingredients
- 3 cups shredded coconut
- 1 cup sweetened condensed milk
- 1 teaspoon vanilla extract
- 2 large egg whites
- 1/4 teaspoon salt
- 1 cup dark chocolate chips
Instructions
- Preheat the oven to 325°F (160°C) and line a baking sheet with parchment paper.
- In a large bowl, combine shredded coconut, sweetened condensed milk, vanilla extract, egg whites, and salt. Mix until well combined.
- Using a spoon or cookie scoop, drop mounds of the mixture onto the prepared baking sheet, spacing them about 2 inches apart.
- Bake for 20-25 minutes, or until the edges are golden brown. Remove from the oven and let cool completely.
- While the macaroons are cooling, melt the dark chocolate chips in a microwave-safe bowl in 30-second intervals, stirring in between until smooth.
- Once the macaroons are cool, drizzle the melted chocolate over the top using a fork or piping bag. Allow the chocolate to set before serving.
Raspberry Sorbet in Fresh Fruit Bowls
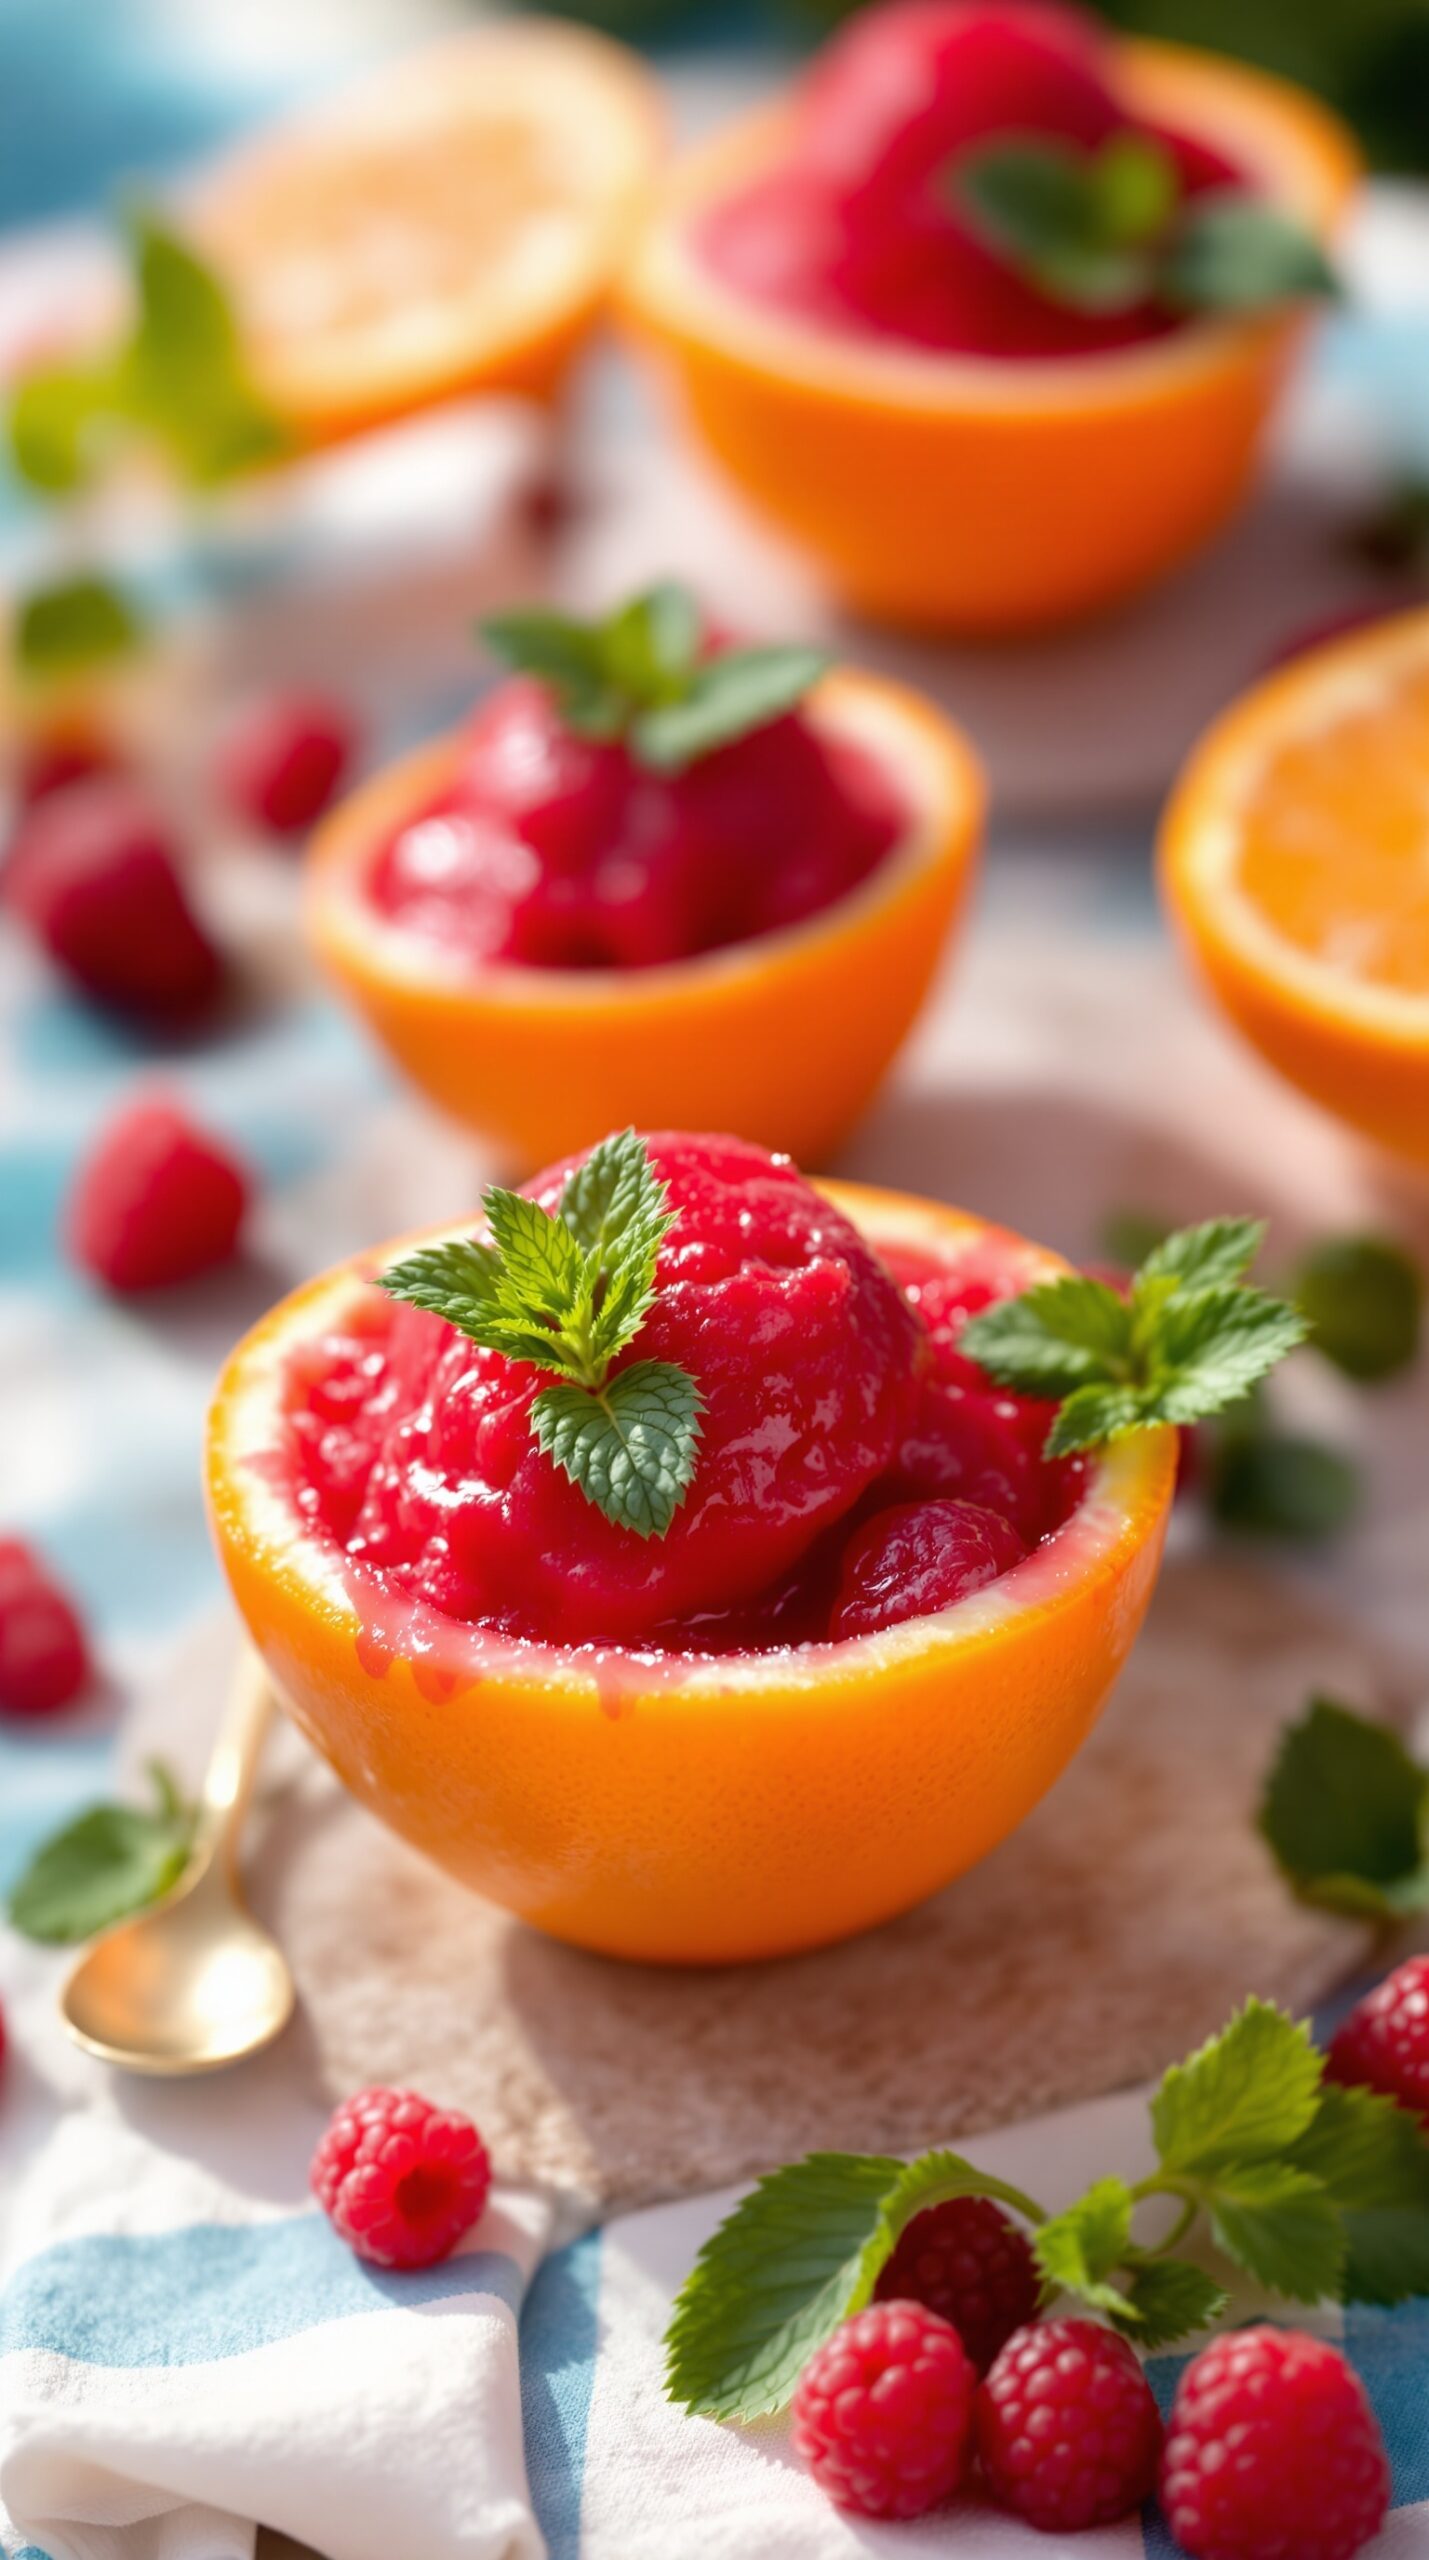
Raspberry sorbet is a refreshing treat, perfect for warm days. It’s bright, fruity, and has a lovely texture that melts in your mouth. Serving it in fresh fruit bowls adds a fun twist and makes it look extra appealing.
In this image, you can see vibrant orange bowls filled with raspberry sorbet. The sorbet is topped with fresh mint leaves, which not only look great but also add a hint of freshness. Surrounding the bowls are scattered raspberries, enhancing the fruity theme.
This dessert is not just about taste; it’s also about presentation. Using fruit bowls is a creative way to serve sorbet, making it feel special. Plus, it’s a great way to incorporate more fruit into your dessert!
Ingredients
- 2 cups fresh raspberries
- 1 cup granulated sugar
- 1 cup water
- 1 tablespoon lemon juice
- Fresh mint leaves for garnish
- 4 orange halves (for serving)
Instructions
- Make the Syrup: In a small saucepan, combine sugar and water. Heat over medium heat until the sugar dissolves. Remove from heat and let it cool.
- Blend the Raspberries: In a blender, combine raspberries, cooled syrup, and lemon juice. Blend until smooth.
- Strain the Mixture: Pour the mixture through a fine sieve to remove the seeds. This step is optional but will give you a smoother sorbet.
- Freeze the Sorbet: Pour the raspberry mixture into a shallow dish and freeze for about 4 hours, stirring every hour to break up ice crystals.
- Prepare the Bowls: While the sorbet is freezing, cut oranges in half and scoop out the flesh, leaving the peel intact. Set aside.
- Serve: Once the sorbet is ready, scoop it into the orange halves. Garnish with fresh mint leaves and serve immediately.
Banoffee Pie with Whipped Cream
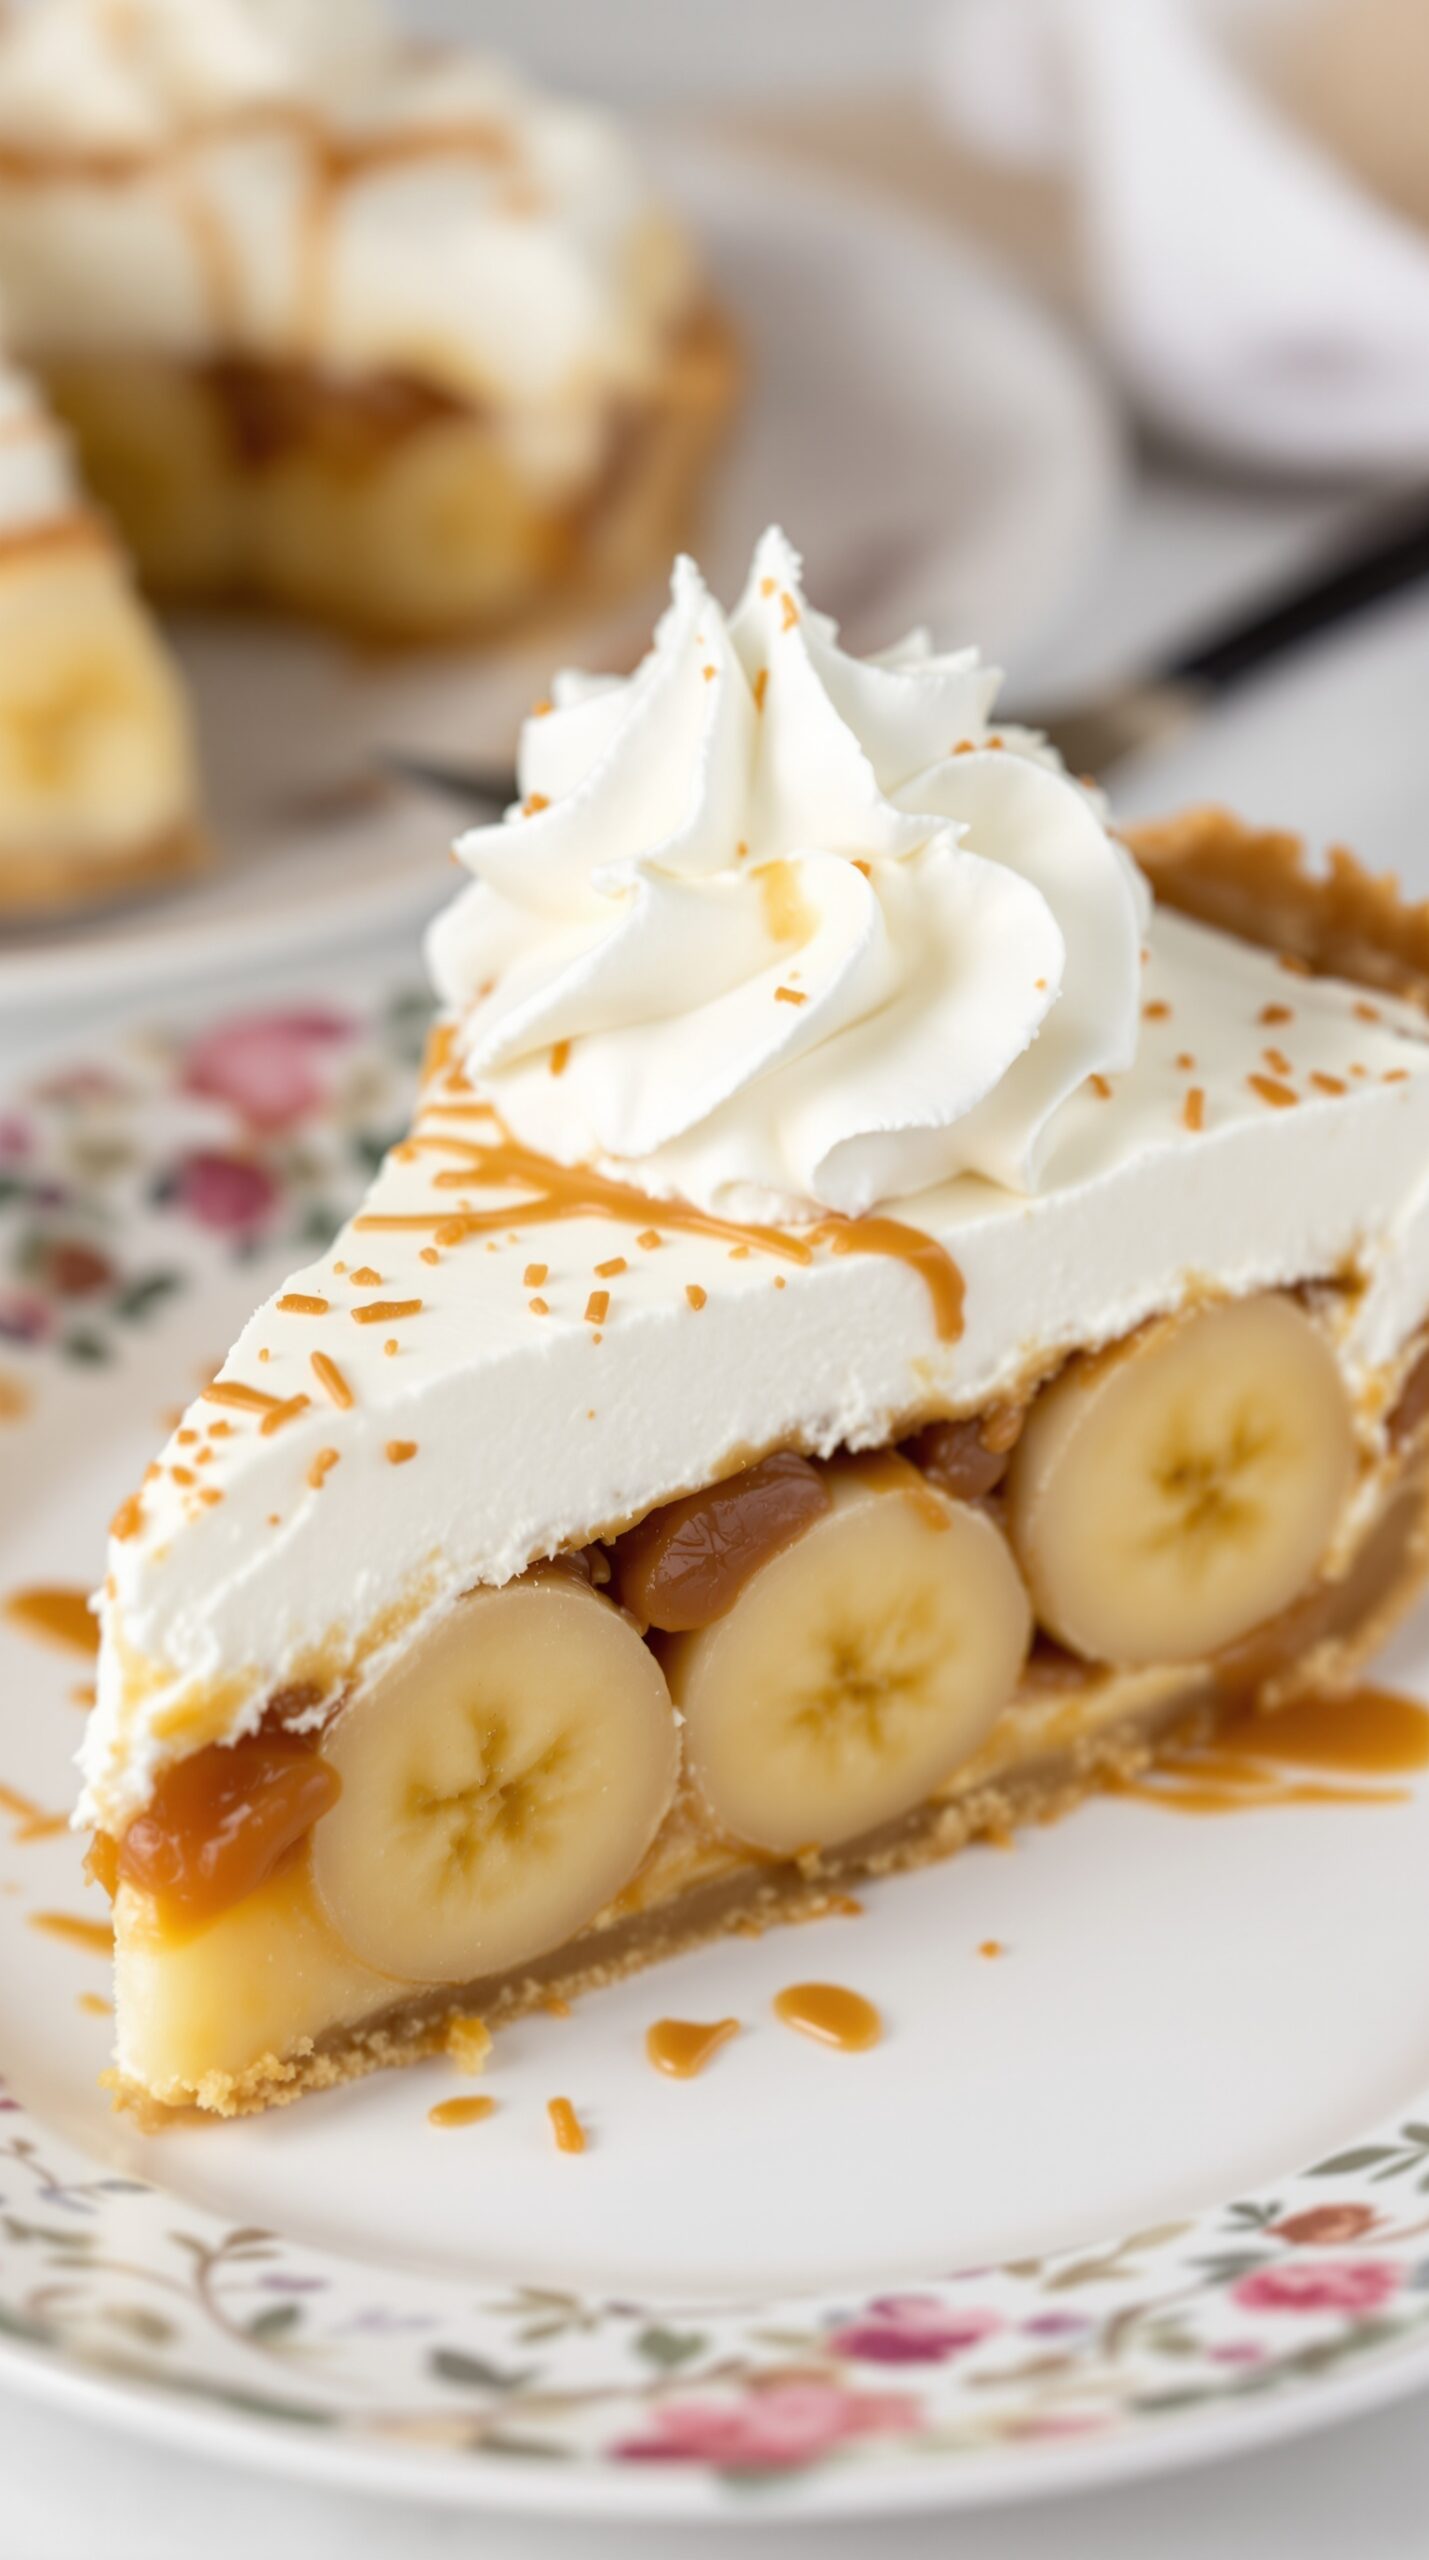
Banoffee pie is a delightful dessert that combines the sweetness of bananas with the rich flavor of toffee. This pie features a buttery biscuit base, layers of sliced bananas, and a creamy toffee filling topped with fluffy whipped cream. It’s a treat that brings smiles to everyone who tries it!
The pie is often garnished with a drizzle of caramel sauce and a sprinkle of chocolate shavings or crushed biscuits for an extra touch. The combination of textures and flavors makes each bite a little piece of heaven.
Making banoffee pie is simple and fun. You can whip it up for a special occasion or just to satisfy a sweet craving. It’s a crowd-pleaser that never goes out of style.
Ingredients
- 1 ½ cups digestive biscuits, crushed
- ½ cup unsalted butter, melted
- 1 can (14 oz) sweetened condensed milk
- 2 ripe bananas, sliced
- 1 cup heavy whipping cream
- 2 tablespoons powdered sugar
- 1 teaspoon vanilla extract
- Caramel sauce for drizzling
Instructions
- Prepare the Base: In a bowl, mix the crushed digestive biscuits with melted butter until well combined. Press the mixture into the bottom of a pie dish to form a crust. Chill in the fridge for 30 minutes.
- Make the Toffee: In a saucepan, cook the sweetened condensed milk over low heat, stirring constantly for about 10-15 minutes until it thickens and turns a caramel color. Pour the toffee over the chilled biscuit base and spread evenly.
- Add Bananas: Layer the sliced bananas on top of the toffee, spreading them out evenly.
- Whip the Cream: In a mixing bowl, whip the heavy cream with powdered sugar and vanilla extract until soft peaks form. Spread the whipped cream over the bananas.
- Finish: Drizzle caramel sauce over the whipped cream and add any additional toppings you like, such as chocolate shavings. Chill for another 30 minutes before serving.