
Impress your friends and family with a selection of irresistible appetizers that pack a punch of flavor and creativity.
These easy-to-make recipes are perfect for any gathering, from casual get-togethers to festive celebrations. Get ready to elevate your snacking game and make every bite count!
Homemade Bruschetta with Tomato and Basil
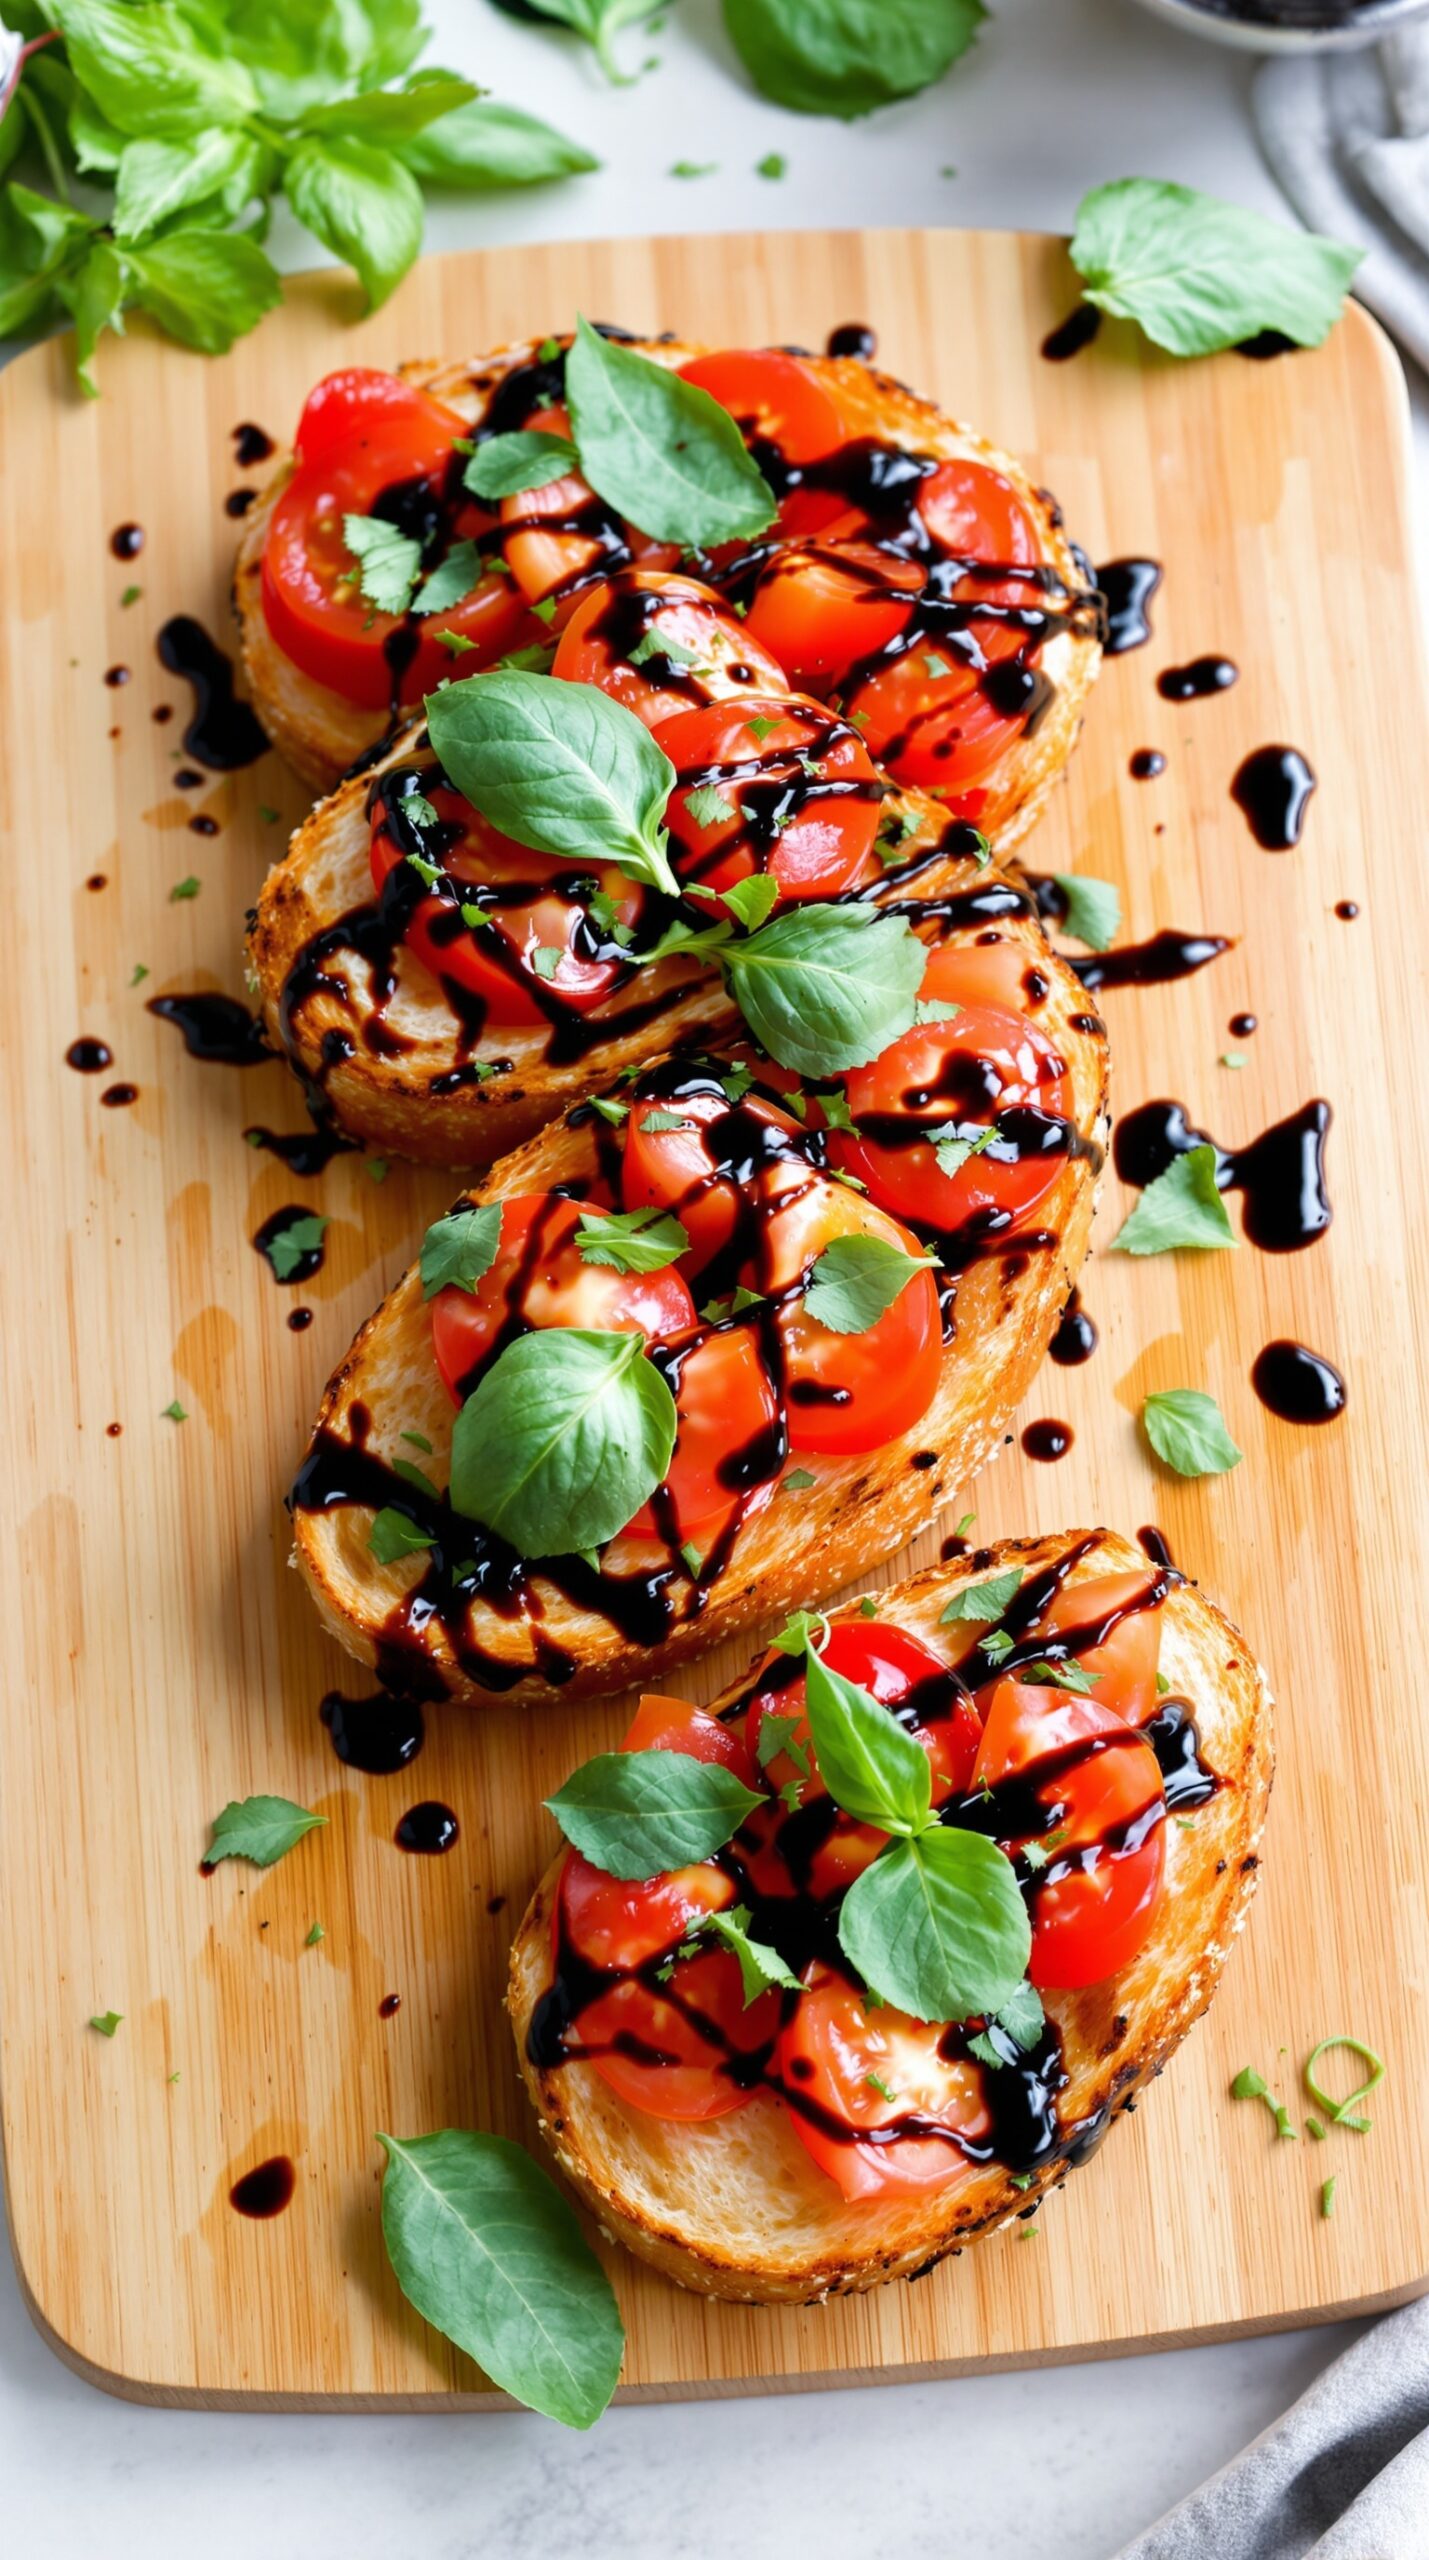
Bruschetta is a classic Italian appetizer that’s perfect for any gathering. The image shows beautifully toasted slices of bread topped with fresh tomatoes, vibrant basil, and a drizzle of balsamic glaze. This dish is not only visually appealing but also bursting with flavor.
Making bruschetta at home is simple and rewarding. The key is to use fresh ingredients. Ripe tomatoes and fragrant basil make all the difference. You can serve this dish as a starter or a snack, and it pairs wonderfully with a variety of drinks.
To prepare your homemade bruschetta, start by toasting slices of your favorite bread until golden brown. While the bread cools, chop fresh tomatoes and mix them with basil, olive oil, salt, and pepper. Spoon the mixture onto the toasted bread, and finish with a drizzle of balsamic glaze for that extra touch of sweetness.
This appetizer is sure to impress your guests and is perfect for summer gatherings. Enjoy the fresh flavors and the delightful crunch of the toasted bread!
Savory Stuffed Mushrooms

Stuffed mushrooms are a classic appetizer that never disappoints. They are easy to make and always a hit at gatherings. The image shows perfectly baked mushrooms, golden and topped with a cheesy, creamy filling. Each bite is a delightful mix of flavors and textures.
These mushrooms are versatile. You can fill them with various ingredients, from cheeses to herbs, and even meats. The combination of the earthy mushroom flavor with a rich filling makes them irresistible. Plus, they look great on any platter!
Ingredients
- 12 large mushrooms, stems removed
- 1 cup cream cheese, softened
- 1/2 cup shredded cheddar cheese
- 1/4 cup grated Parmesan cheese
- 2 cloves garlic, minced
- 1/4 cup fresh parsley, chopped
- 1/2 teaspoon salt
- 1/4 teaspoon black pepper
- 1/4 teaspoon paprika
- 1 tablespoon olive oil
Instructions
- Preheat your oven to 375°F (190°C).
- In a bowl, mix cream cheese, cheddar cheese, Parmesan cheese, garlic, parsley, salt, pepper, and paprika until well combined.
- Brush the mushroom caps with olive oil and place them on a baking sheet.
- Fill each mushroom cap generously with the cheese mixture.
- Bake for 20-25 minutes or until the mushrooms are tender and the tops are golden brown.
- Remove from the oven and let cool slightly before serving.
Crispy Baked Zucchini Fries
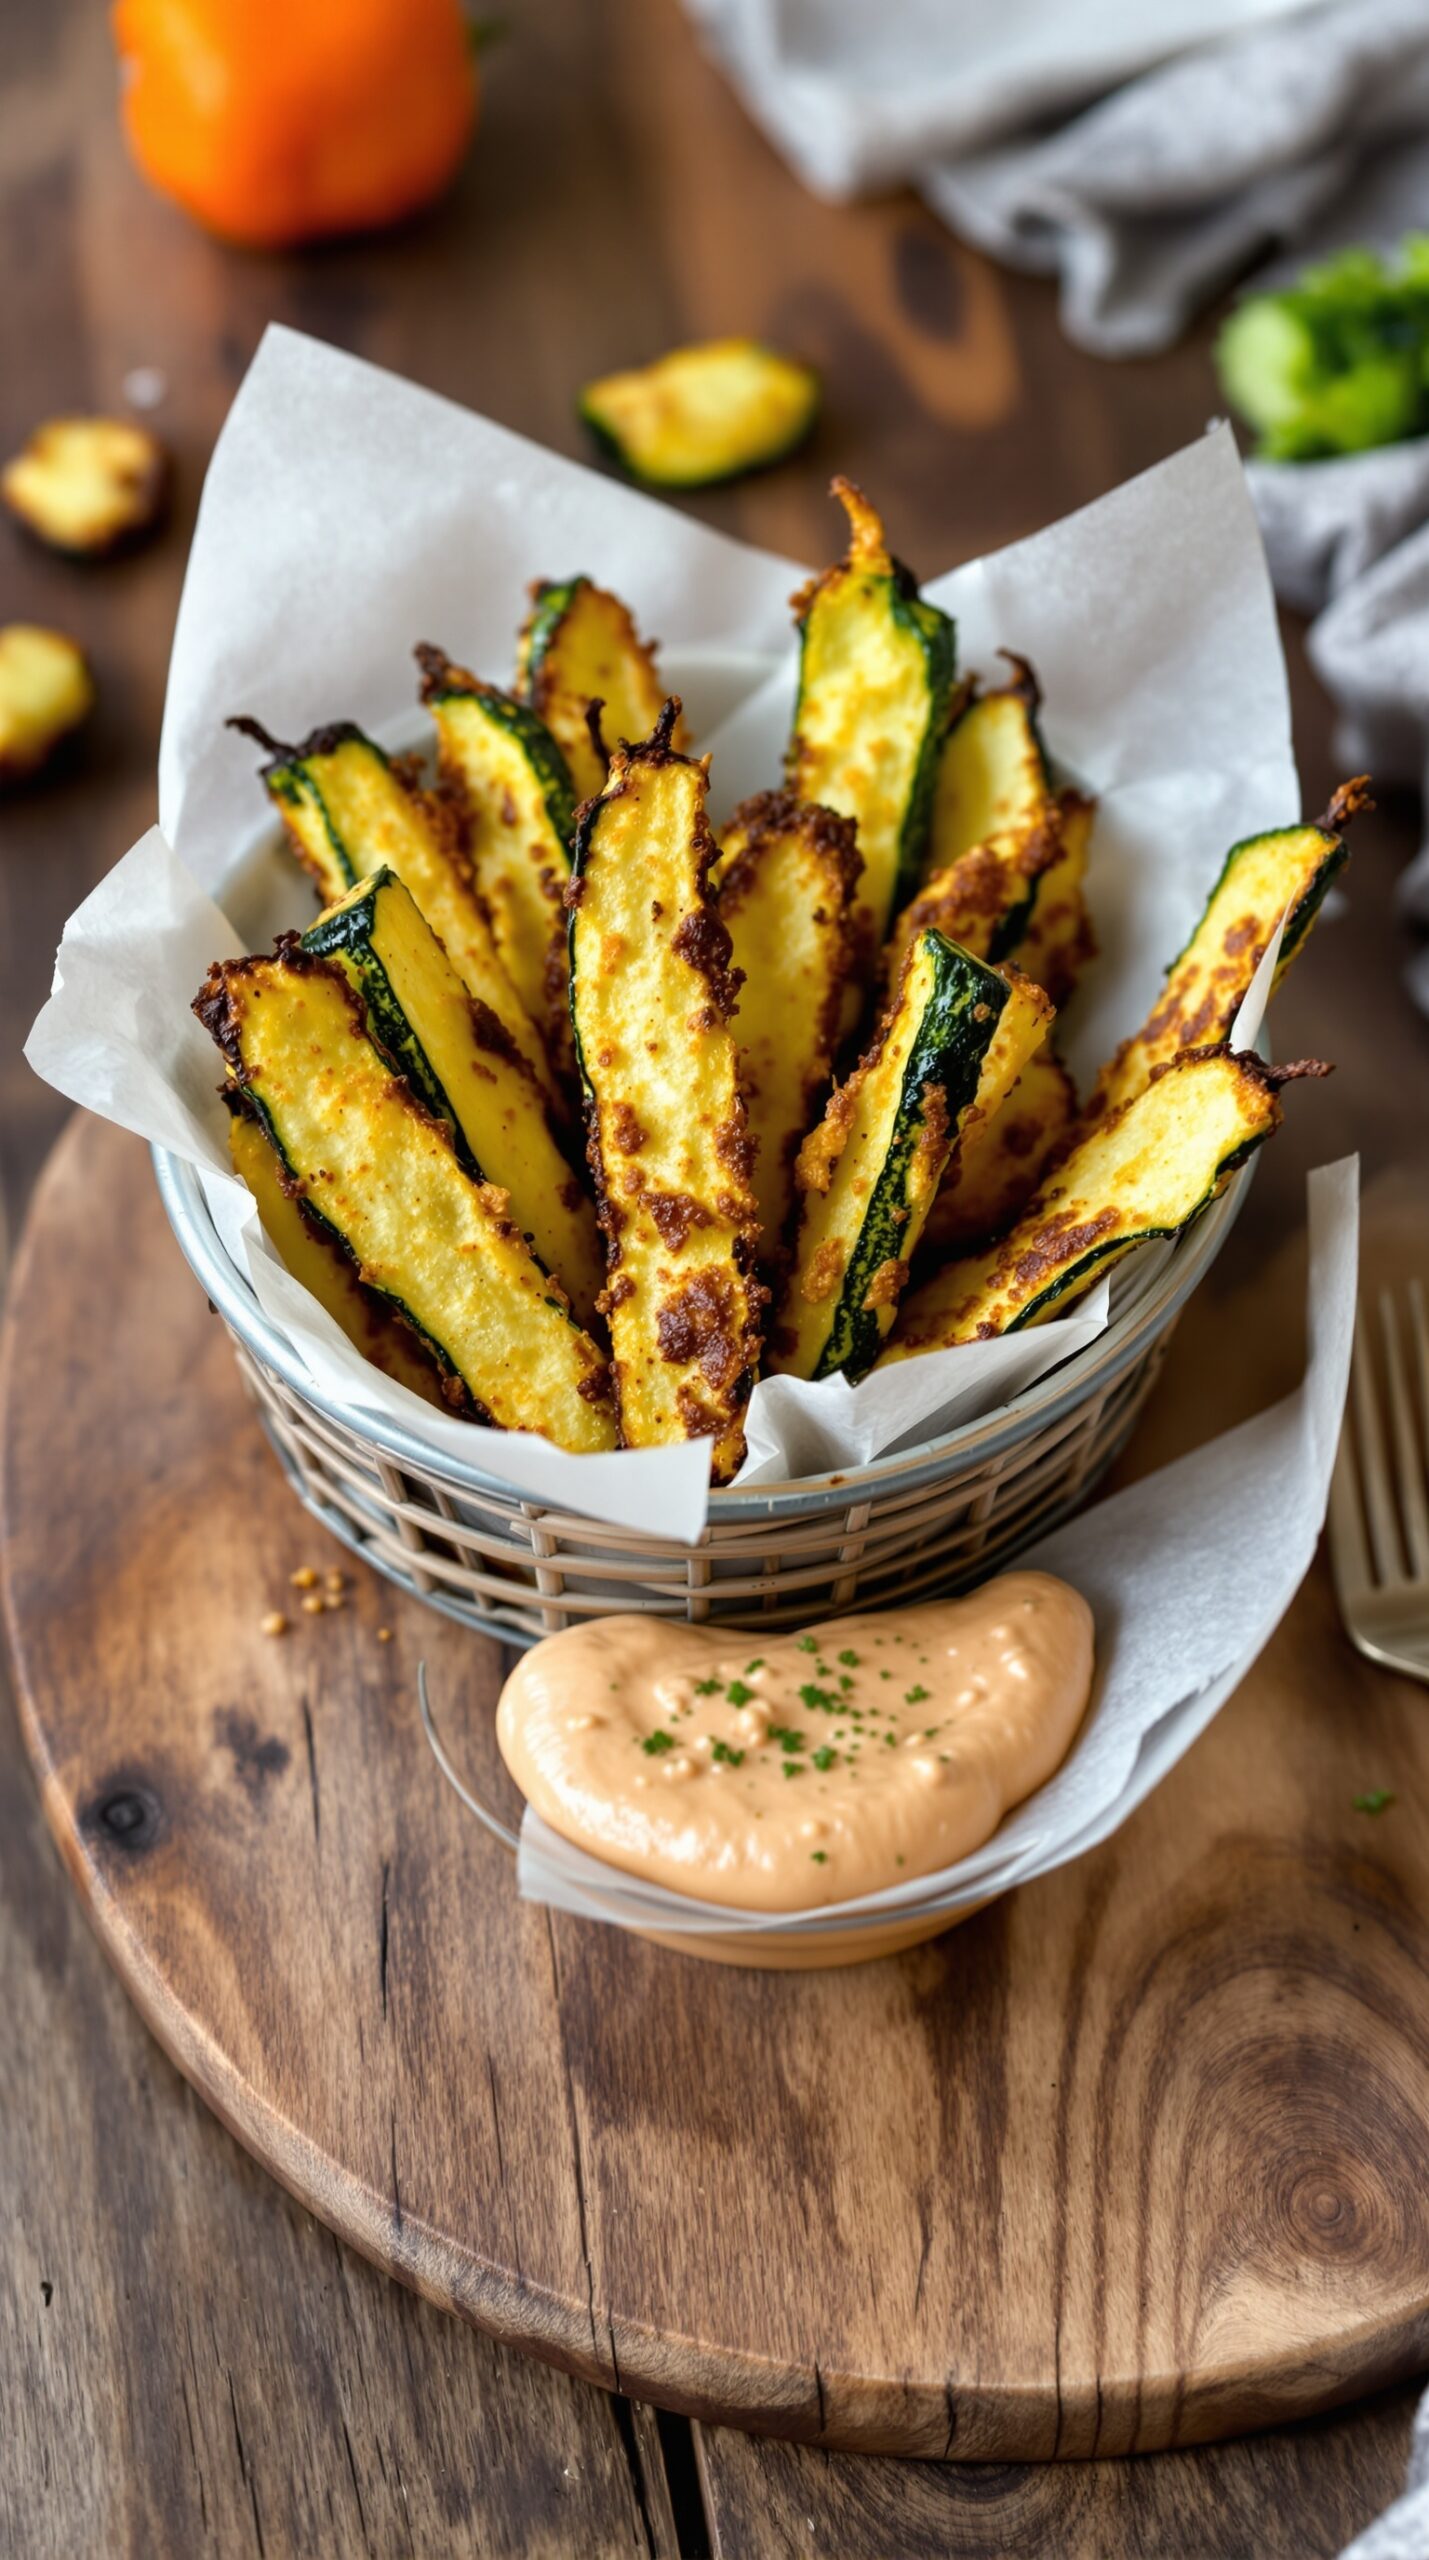
Crispy baked zucchini fries are a fun and healthy appetizer that everyone can enjoy. They are golden brown, crunchy on the outside, and tender on the inside. Served with a tasty dipping sauce, these fries are perfect for snacking or as a side dish at any gathering.
The image shows a basket filled with beautifully baked zucchini fries, arranged neatly and ready to be enjoyed. The fries are golden and crispy, with a hint of green peeking through. Beside the basket, there’s a small bowl of creamy dipping sauce, inviting you to take a bite.
Making these fries is simple and requires just a few ingredients. They are a great way to use up zucchini, especially during the summer months when they are in season. Plus, they are baked instead of fried, making them a lighter option for your appetizer spread.
Ingredients
- 2 medium zucchinis
- 1 cup breadcrumbs
- 1/2 cup grated Parmesan cheese
- 2 large eggs
- 1 teaspoon garlic powder
- 1 teaspoon onion powder
- Salt and pepper to taste
- Cooking spray
Instructions
- Preheat your oven to 425°F (220°C) and line a baking sheet with parchment paper.
- Slice the zucchinis into fry shapes, about 1/4 inch thick.
- In a bowl, mix together breadcrumbs, Parmesan cheese, garlic powder, onion powder, salt, and pepper.
- In another bowl, beat the eggs.
- Dip each zucchini fry into the egg, then coat it with the breadcrumb mixture. Place the coated fries on the baking sheet.
- Spray the fries lightly with cooking spray for extra crispiness.
- Bake for 20-25 minutes, flipping halfway through, until golden brown and crispy.
- Serve warm with your favorite dipping sauce.
Herbed Goat Cheese and Fig Crostini

Herbed goat cheese and fig crostini make for a delightful appetizer that’s perfect for any gathering. The creamy goat cheese pairs beautifully with the sweetness of fig preserves, all atop a crispy crostini. This combination is not only tasty but also visually appealing, making it a hit at parties.
To make these crostini, start by toasting slices of baguette until golden brown. Spread a generous layer of herbed goat cheese on each piece. Top with a spoonful of fig preserves and a sprinkle of fresh herbs for that extra touch. The result is a simple yet elegant appetizer that will impress your guests.
Ingredients
- 1 French baguette, sliced
- 8 oz goat cheese, softened
- 1/4 cup cream cheese, softened
- 1/4 cup fresh herbs (like thyme or parsley), chopped
- 1/2 cup fig preserves
- Olive oil, for drizzling
- Salt and pepper, to taste
Instructions
- Preheat the oven to 375°F (190°C).
- Arrange baguette slices on a baking sheet. Drizzle with olive oil and sprinkle with salt and pepper.
- Bake for about 10-12 minutes, or until golden and crispy.
- In a bowl, mix the goat cheese and cream cheese until smooth. Stir in the chopped herbs.
- Spread the herbed cheese mixture on each toasted baguette slice.
- Top with a spoonful of fig preserves and garnish with additional herbs if desired.
- Serve immediately and enjoy!
Savory Bacon-Wrapped Dates

Bacon-wrapped dates are a delightful treat that combines sweet and salty flavors in every bite. These little bites are perfect for any gathering, whether it’s a casual get-together or a fancy dinner party. The crispy bacon adds a savory crunch, while the dates provide a natural sweetness that balances everything out. Plus, they’re super easy to make!
To prepare these tasty appetizers, you’ll need just a few ingredients. The combination of bacon and dates is simple yet satisfying. You can even add a touch of cheese or nuts for extra flavor and texture. Serve them warm with a dipping sauce, and watch them disappear!
Ingredients
- 20 large Medjool dates
- 10 slices of bacon, cut in half
- 1/2 cup cream cheese (optional)
- 1/4 cup chopped nuts (optional)
- 1/4 cup barbecue sauce (for dipping)
- Fresh parsley for garnish
Instructions
- Preheat your oven to 400°F (200°C).
- If using, stuff each date with cream cheese and a few chopped nuts for added crunch.
- Wrap each stuffed date with a half slice of bacon, securing it with a toothpick.
- Place the wrapped dates on a baking sheet lined with parchment paper.
- Bake for 15-20 minutes, or until the bacon is crispy and golden brown.
- Remove from the oven and let them cool slightly before serving.
- Serve warm with barbecue sauce for dipping and garnish with fresh parsley.
Creamy Spinach and Artichoke Dip
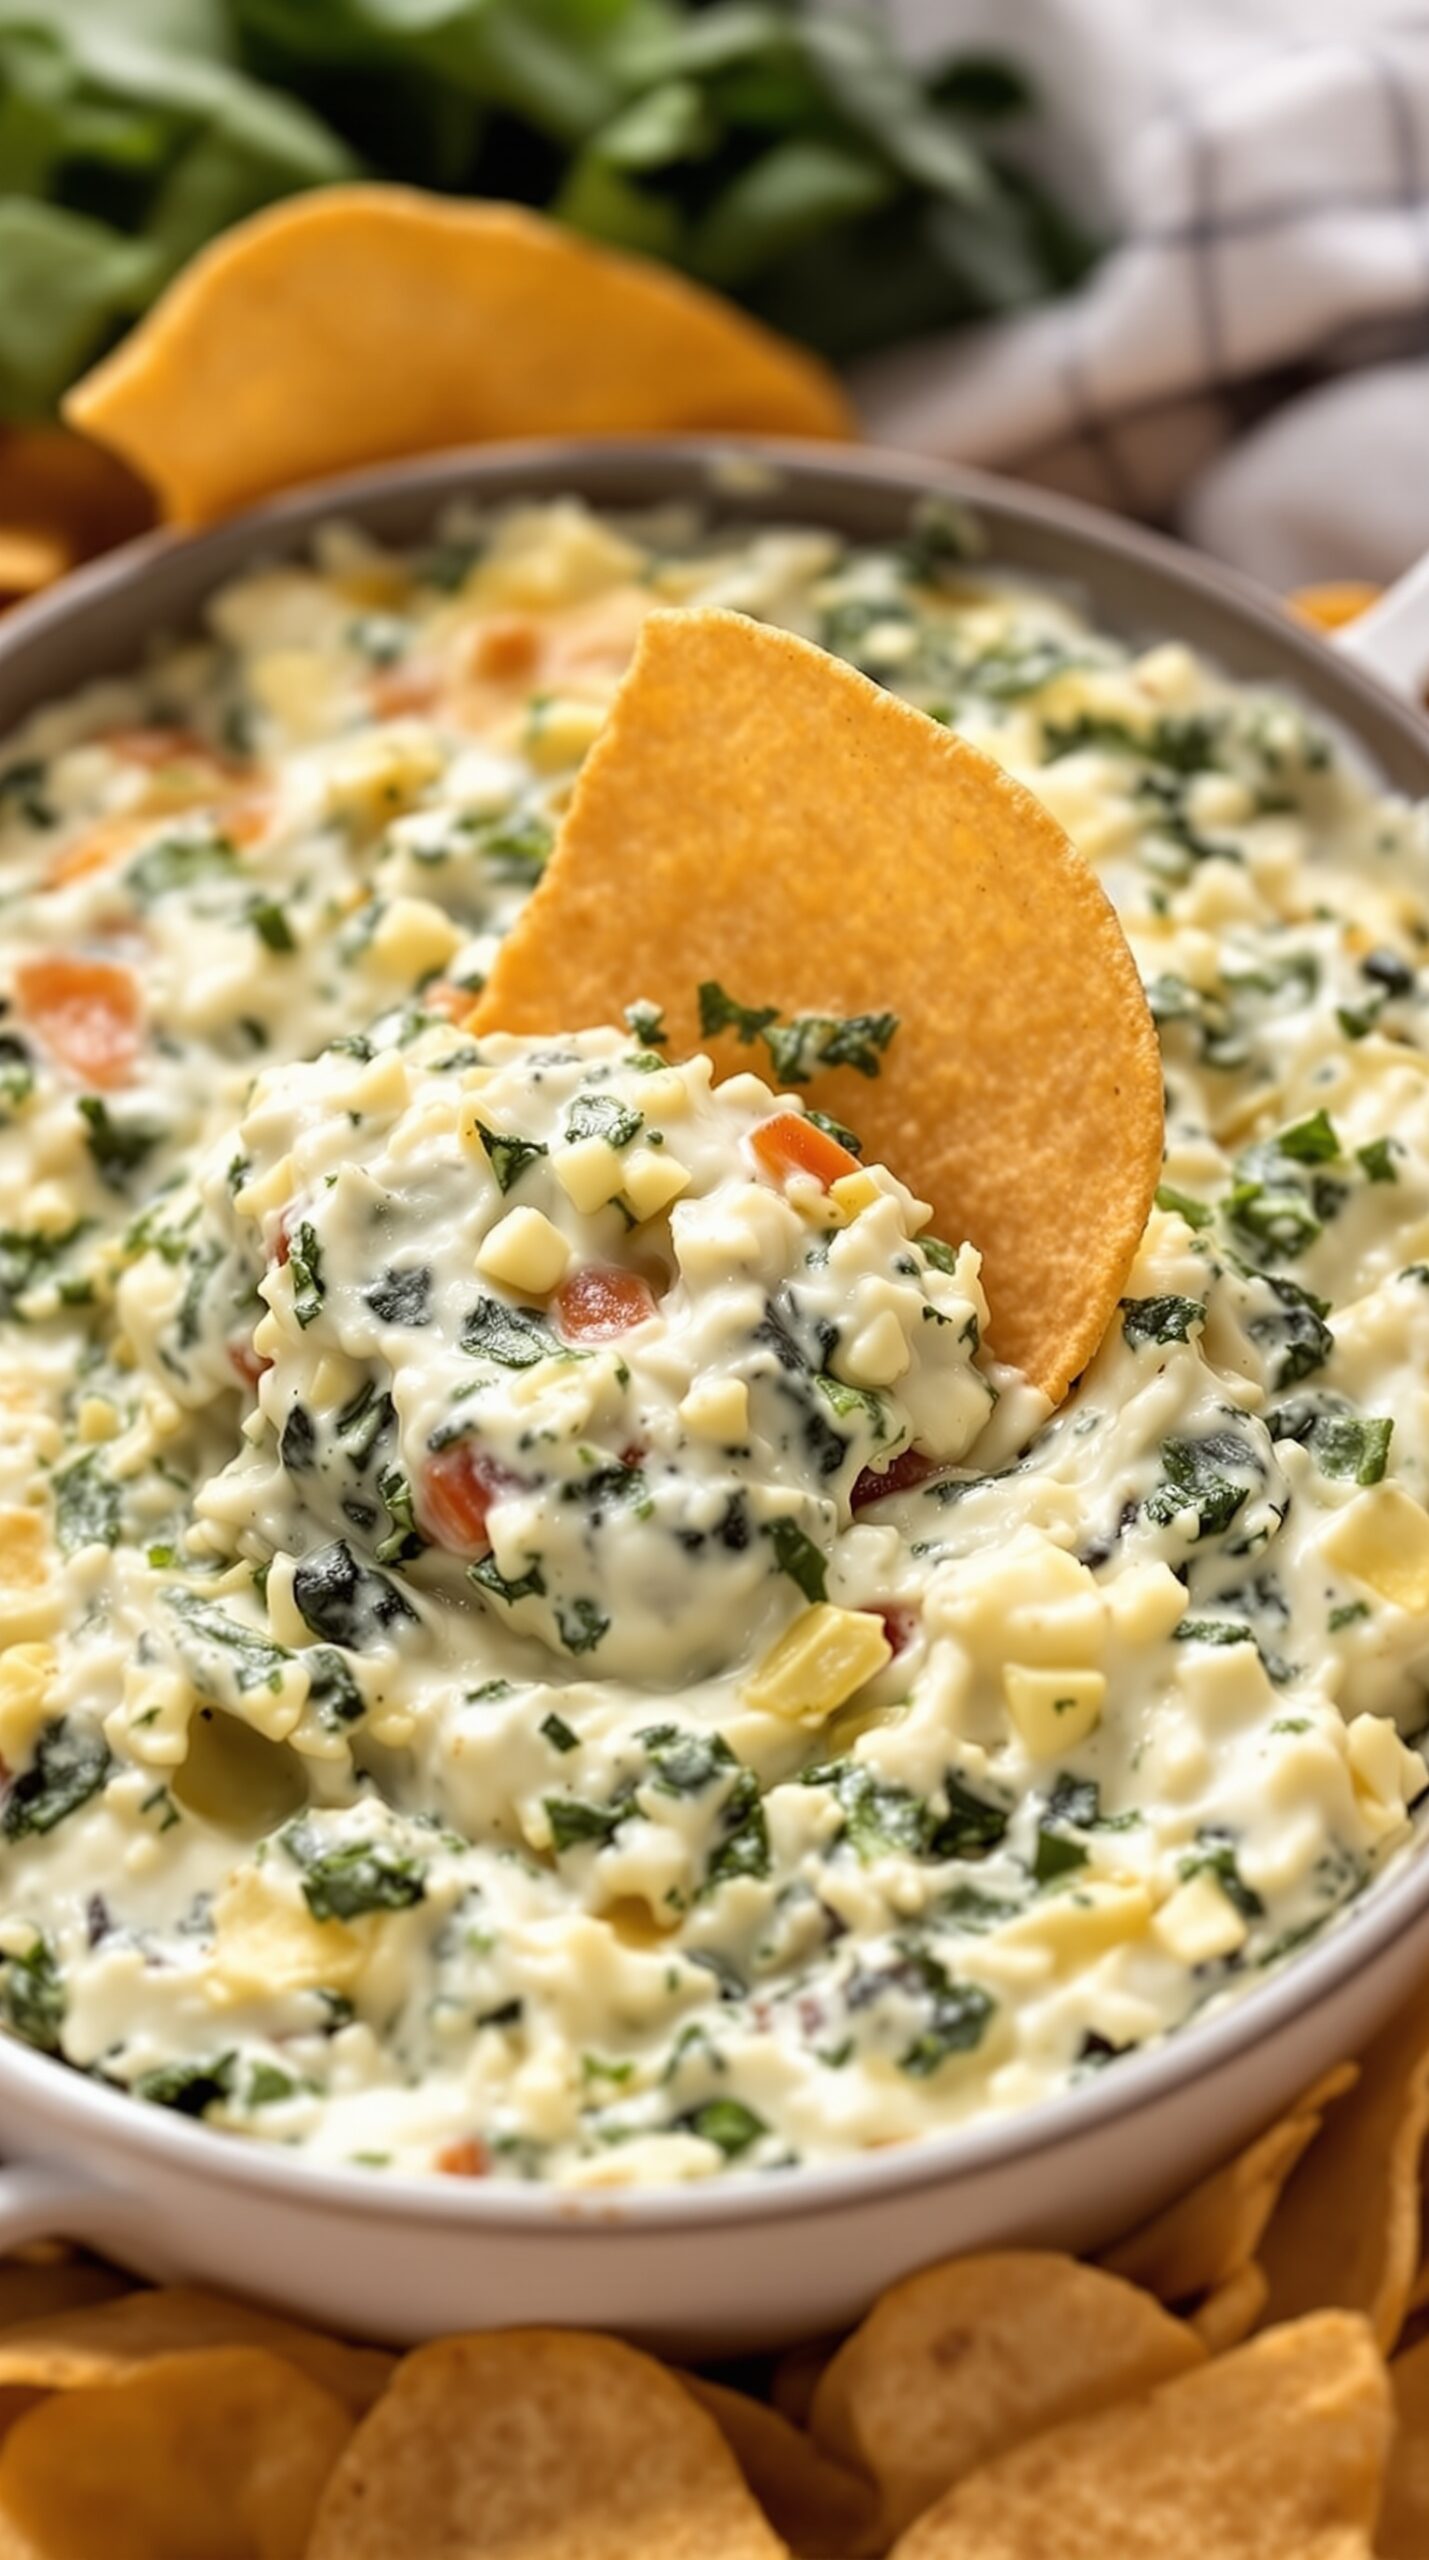
Creamy Spinach and Artichoke Dip is a classic appetizer that never fails to impress. This dip is rich, cheesy, and packed with flavor. It’s perfect for gatherings, game days, or just a cozy night in. The combination of spinach and artichokes creates a delightful texture, while the creamy base makes it irresistible.
In the image, you can see a bowl filled with this delicious dip, surrounded by crispy tortilla chips. The vibrant colors of the spinach and artichokes contrast beautifully with the creamy white dip, making it look as good as it tastes. A chip is ready to scoop up a generous portion, inviting you to dig in!
Making this dip is simple and requires just a few ingredients. You can serve it warm or at room temperature, and it pairs well with various dippers like bread, crackers, or veggies.
Ingredients
- 1 cup frozen spinach, thawed and drained
- 1 can (14 oz) artichoke hearts, drained and chopped
- 1 cup cream cheese, softened
- 1/2 cup sour cream
- 1/2 cup mayonnaise
- 1 cup shredded mozzarella cheese
- 1/2 cup grated Parmesan cheese
- 2 cloves garlic, minced
- 1 teaspoon onion powder
- Salt and pepper to taste
Instructions
- Preheat your oven to 350°F (175°C).
- In a mixing bowl, combine the cream cheese, sour cream, and mayonnaise. Mix until smooth.
- Add the chopped spinach, artichokes, mozzarella cheese, Parmesan cheese, garlic, onion powder, salt, and pepper. Stir until well combined.
- Transfer the mixture to a baking dish and spread it evenly.
- Bake for 25-30 minutes, or until the dip is bubbly and golden on top.
- Remove from the oven and let it cool slightly before serving. Enjoy with tortilla chips or your favorite dippers!
Spicy Shrimp Tacos

Spicy shrimp tacos are a delightful treat that packs a punch. The image shows two soft tortillas filled with perfectly cooked shrimp, topped with fresh avocado and cilantro. The vibrant colors make these tacos not just tasty but visually appealing too. The lime wedges on the side hint at the zesty flavor that complements the shrimp.
These tacos are perfect for gatherings or a casual dinner. They are quick to prepare and can be customized with your favorite toppings. Whether you like it spicy or mild, these tacos can easily fit your taste.
Ingredients
- 1 pound shrimp, peeled and deveined
- 2 tablespoons olive oil
- 1 teaspoon chili powder
- 1/2 teaspoon cumin
- 1/2 teaspoon garlic powder
- Salt and pepper to taste
- 8 small corn tortillas
- 1 avocado, diced
- 1/4 cup fresh cilantro, chopped
- Lime wedges for serving
Instructions
- Prepare the Shrimp: In a bowl, toss the shrimp with olive oil, chili powder, cumin, garlic powder, salt, and pepper until well coated.
- Cook the Shrimp: Heat a skillet over medium-high heat. Add the shrimp and cook for about 2-3 minutes on each side until they are pink and opaque.
- Warm the Tortillas: In another skillet, warm the corn tortillas for about 30 seconds on each side until they are pliable.
- Assemble the Tacos: Place a few shrimp in each tortilla. Top with diced avocado and chopped cilantro.
- Serve: Squeeze fresh lime juice over the tacos before serving for an extra burst of flavor.
Mini Caprese Skewers
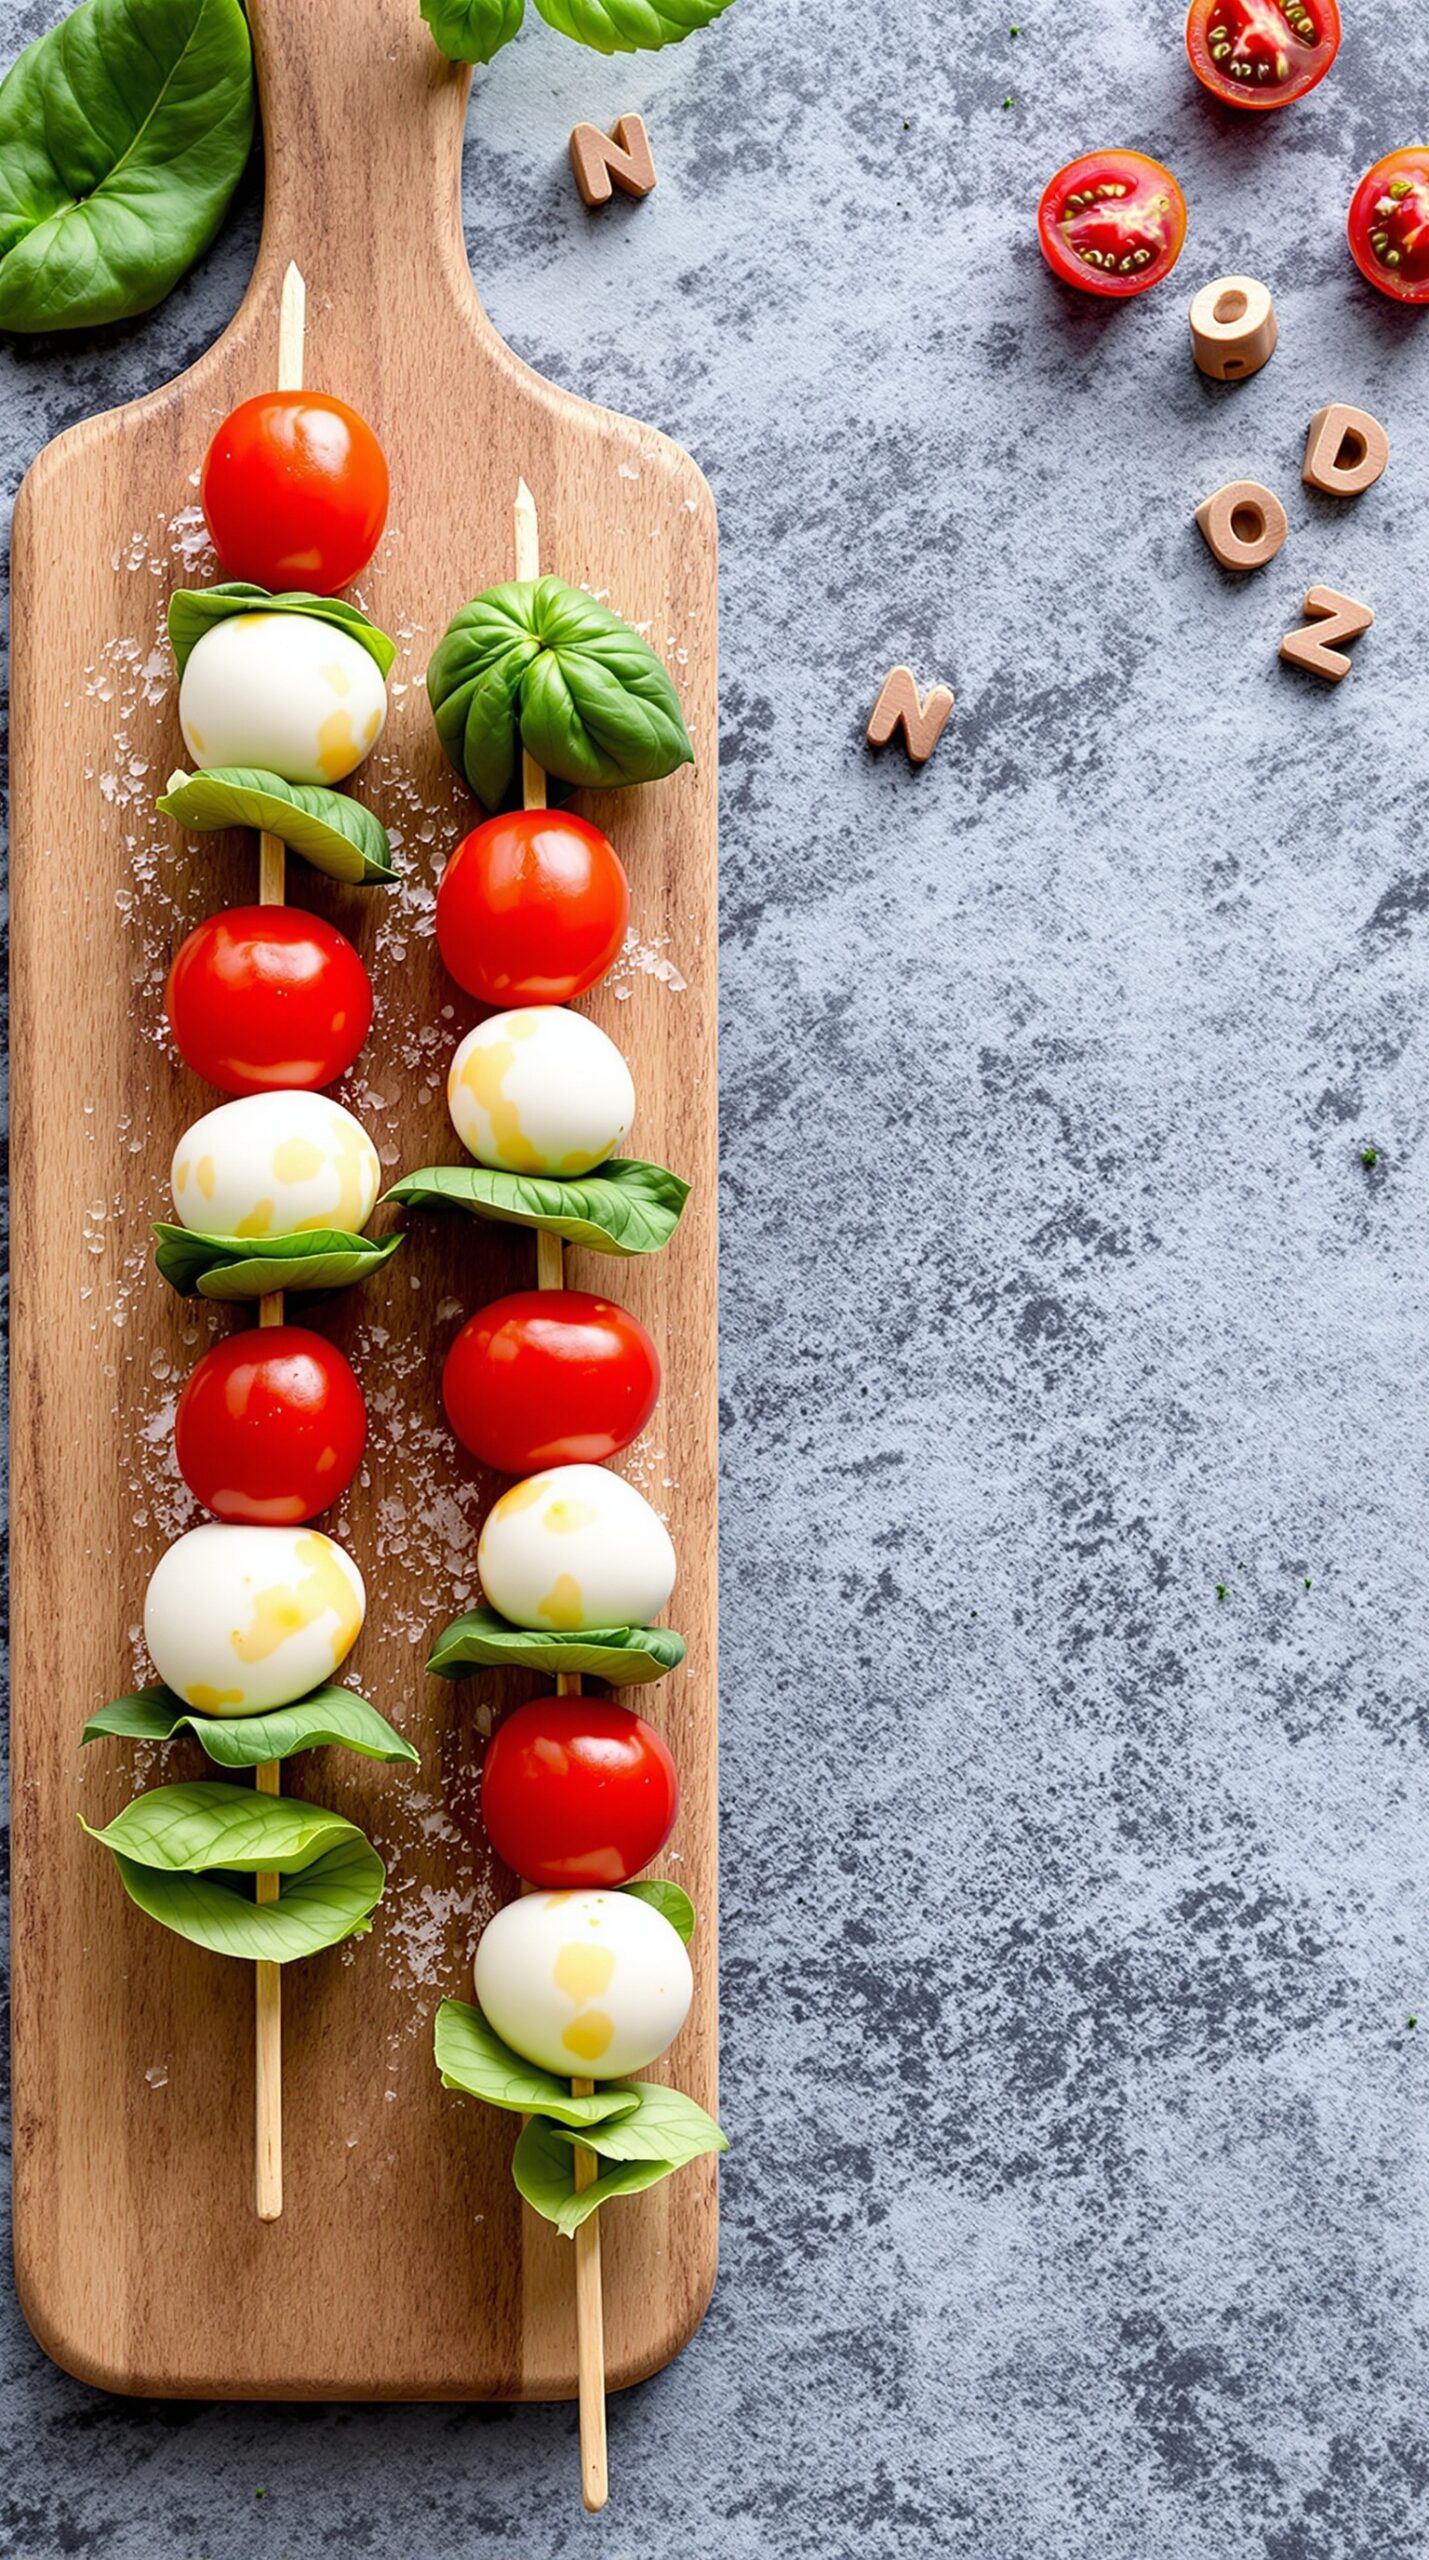
Mini Caprese skewers are a fun and fresh appetizer that everyone loves. They combine juicy cherry tomatoes, creamy mozzarella balls, and fragrant basil leaves, all drizzled with a bit of balsamic glaze. These skewers are not only easy to make but also look great on any table.
To prepare these tasty bites, simply thread a cherry tomato, a basil leaf, and a mozzarella ball onto a skewer. Repeat this pattern until the skewer is filled. The colors are vibrant and inviting, making them perfect for parties or casual gatherings.
These skewers are light, refreshing, and bursting with flavor. They are a great way to kick off any meal or serve as a snack. Plus, they can be made in just a few minutes!
Ingredients
- 1 pint cherry tomatoes
- 8 oz fresh mozzarella balls
- 1 bunch fresh basil leaves
- Balsamic glaze for drizzling
- Salt and pepper to taste
- Skewers (6-inch or 8-inch)
Instructions
- Prepare the Skewers: Start by washing the cherry tomatoes and basil leaves. Drain the mozzarella balls if they are in water.
- Assemble the Skewers: Take a skewer and thread a cherry tomato, followed by a basil leaf, and then a mozzarella ball. Repeat this until the skewer is filled, leaving a bit of space at each end.
- Season: Once all the skewers are assembled, drizzle them with balsamic glaze. Sprinkle with salt and pepper to enhance the flavors.
- Serve: Arrange the skewers on a platter and enjoy them fresh. They are best served immediately but can be made a few hours ahead of time and stored in the fridge.
Roasted Red Pepper Hummus with Veggies
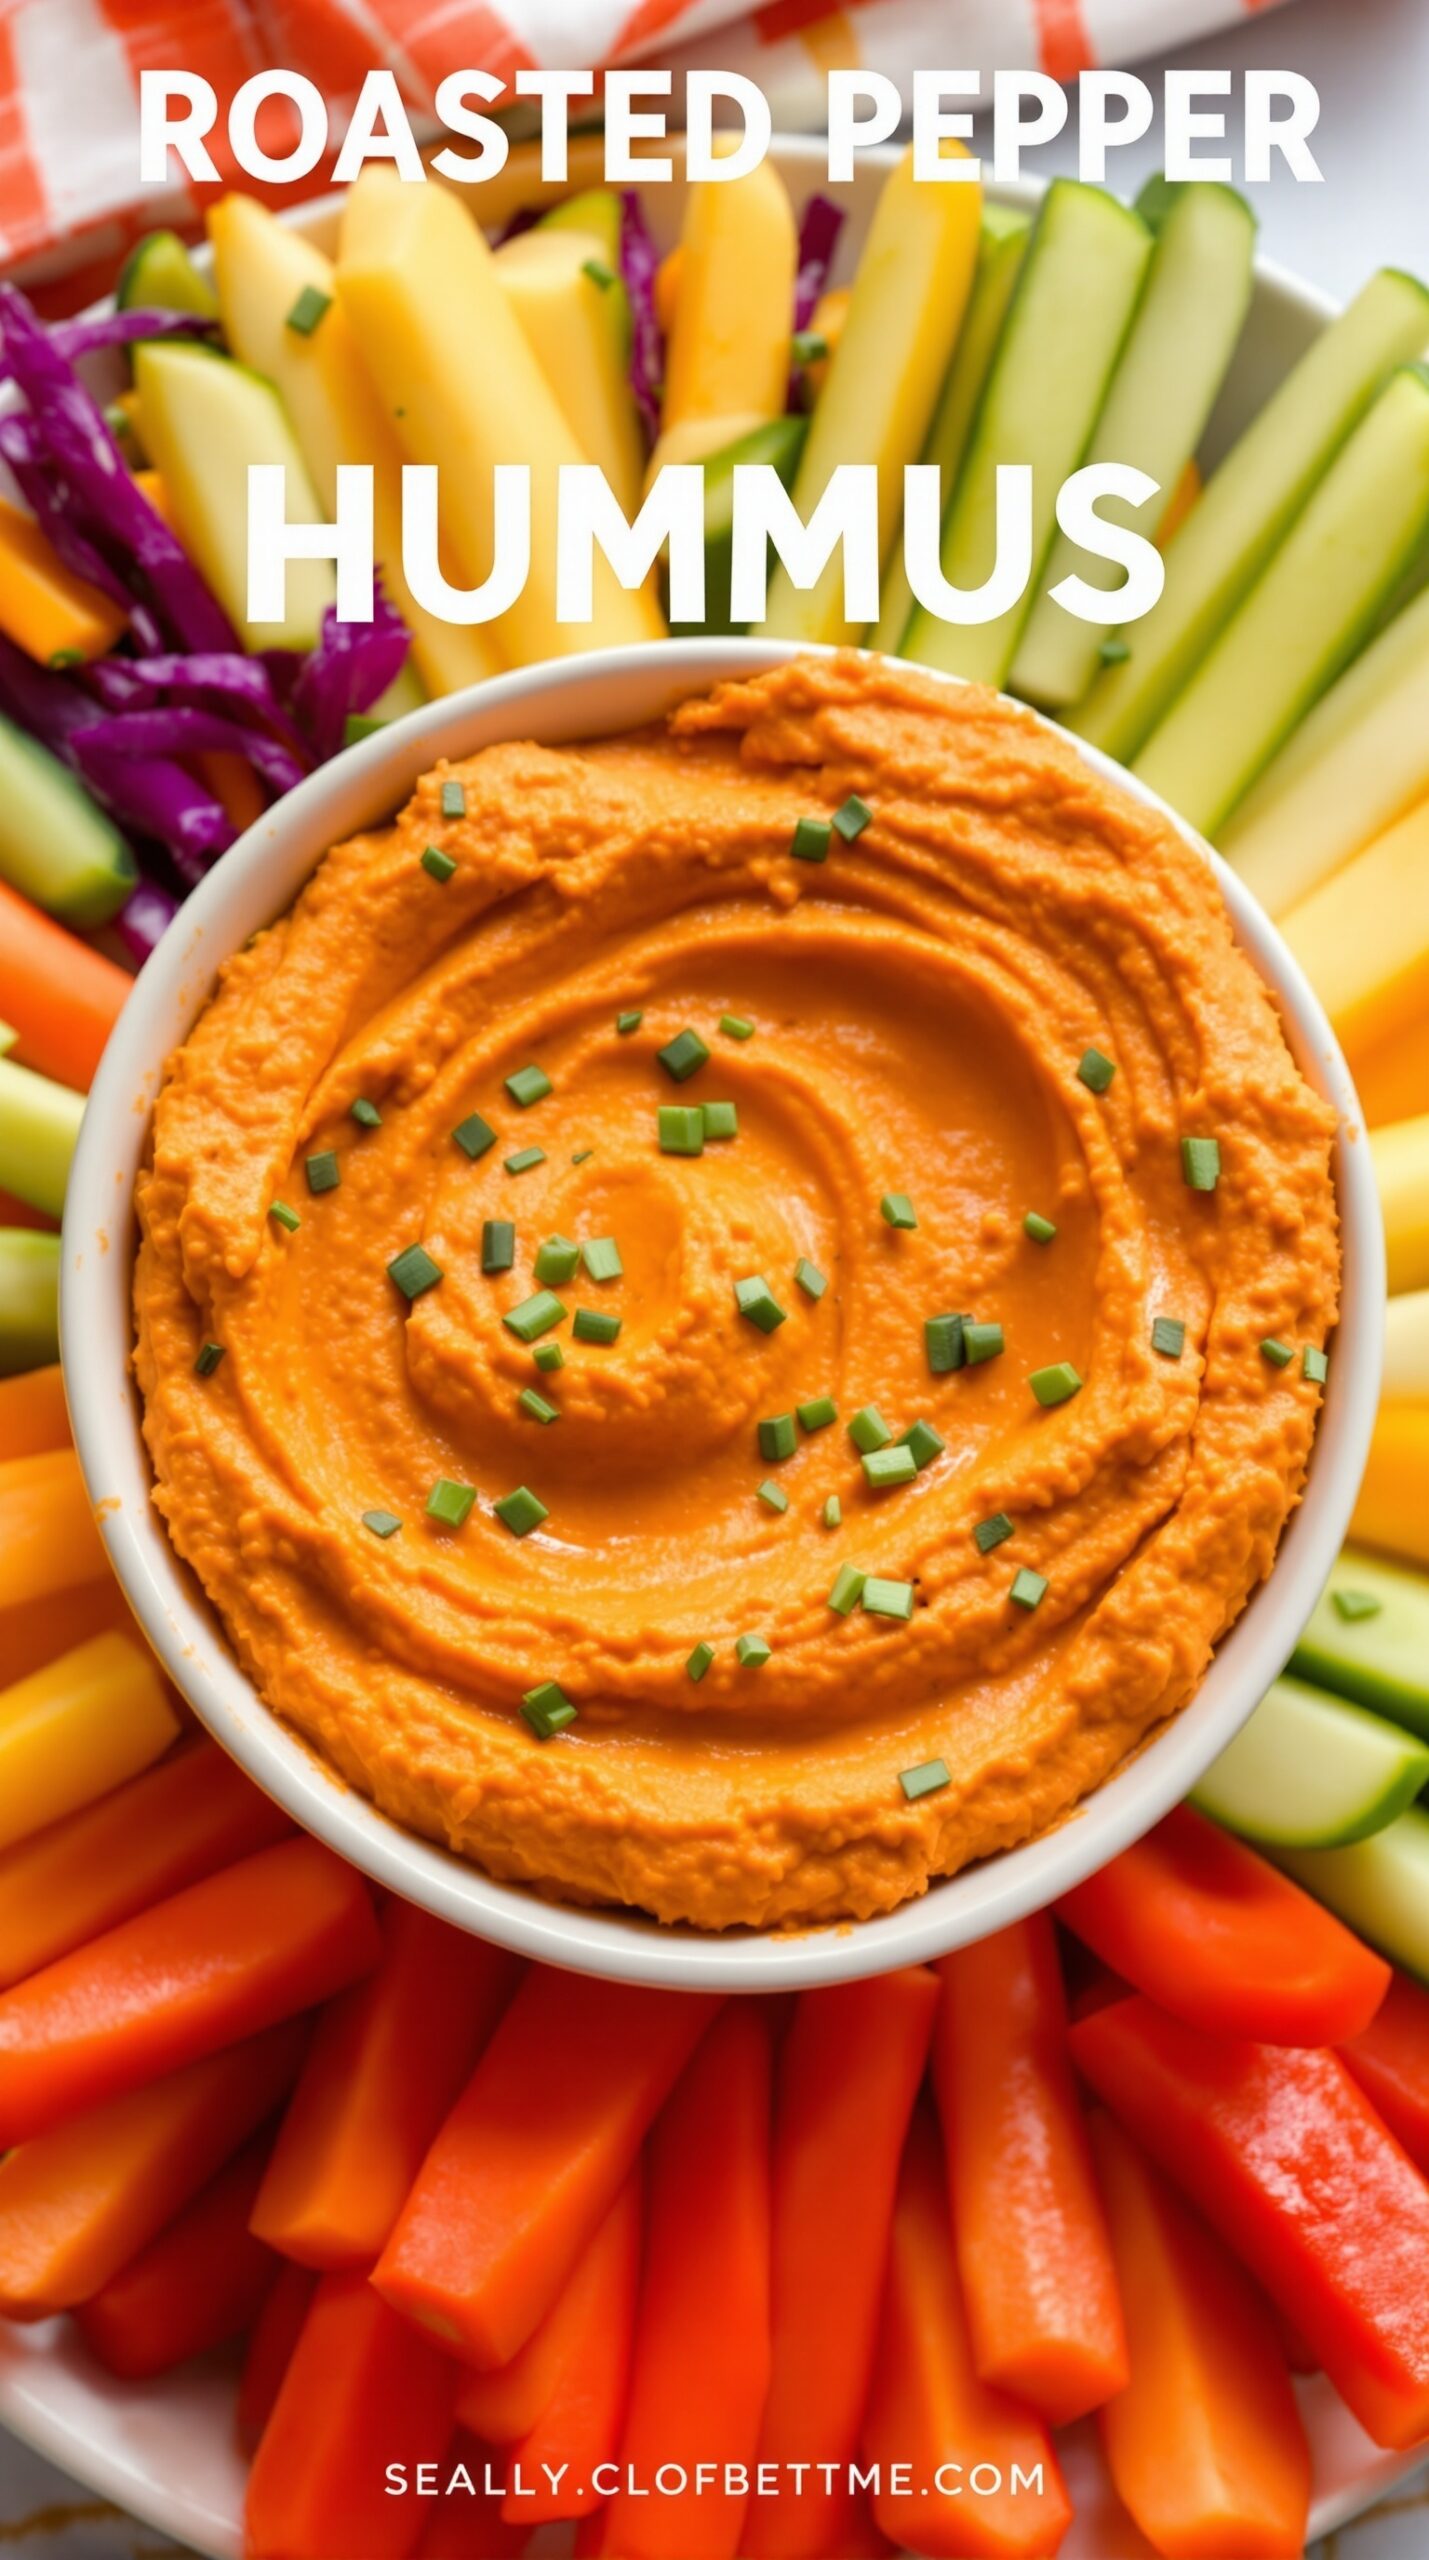
Roasted red pepper hummus is a delightful twist on the classic dip. Its vibrant orange color catches the eye and makes it a perfect appetizer for any gathering. The creamy texture pairs beautifully with fresh veggies, creating a healthy and tasty snack.
The image showcases a bowl of hummus surrounded by an array of colorful vegetables. You can see bright orange carrots, crisp cucumbers, and crunchy purple cabbage, all ready to be dipped. This combination not only looks appealing but also offers a variety of flavors and textures.
Making roasted red pepper hummus is simple and rewarding. You can whip it up in no time, making it a go-to recipe for parties or casual get-togethers.
Ingredients
- 1 can (15 oz) chickpeas, drained and rinsed
- 1/2 cup roasted red peppers, jarred or homemade
- 1/4 cup tahini
- 2 tablespoons olive oil
- 2 tablespoons lemon juice
- 1 garlic clove, minced
- 1/2 teaspoon cumin
- Salt and pepper to taste
- Fresh veggies for dipping (carrots, cucumbers, bell peppers, etc.)
Instructions
- Blend Ingredients: In a food processor, combine chickpeas, roasted red peppers, tahini, olive oil, lemon juice, garlic, cumin, salt, and pepper.
- Process Until Smooth: Blend until the mixture is creamy and smooth. If it’s too thick, add a little water or more olive oil to reach your desired consistency.
- Taste and Adjust: Give it a taste and adjust the seasoning if needed. You can add more lemon juice or salt based on your preference.
- Serve: Transfer the hummus to a serving bowl and drizzle with olive oil. Arrange the fresh veggies around the bowl for dipping.