Dessert ideas can turn any meal into a sweet celebration! From classic treats to creative concoctions, there’s something for everyone to satisfy that sweet tooth.
Whether you’re planning a casual gathering or looking for inspiration for your next baking endeavor, this list has you covered with simple and delicious options.
Banoffee Pie with Whipped Cream
Banoffee pie is a delightful dessert that combines the rich flavors of bananas and toffee. The image showcases a slice of this delicious pie, topped with a generous layer of whipped cream and sprinkled with crunchy bits, adding a nice texture. The golden caramel drips down the side, making it even more tempting.
This dessert is perfect for any occasion, whether it’s a family gathering or a casual dinner with friends. The combination of creamy, sweet, and slightly salty flavors makes it a crowd-pleaser. Plus, it’s easy to make, which is always a bonus!
To create your own banoffee pie, you’ll need a few simple ingredients. Let’s get started!
Ingredients
- 1 pre-made graham cracker crust
- 2 ripe bananas, sliced
- 1 cup heavy whipping cream
- 1/2 cup sweetened condensed milk
- 1/4 cup caramel sauce
- 1/4 cup chopped nuts (like peanuts or walnuts)
- 1 tablespoon powdered sugar
Instructions
- Prepare the Toffee: In a saucepan, cook the sweetened condensed milk over low heat for about 30-40 minutes, stirring constantly until it turns a golden brown color.
- Assemble the Pie: Pour the toffee into the graham cracker crust, spreading it evenly. Layer the sliced bananas on top.
- Make the Whipped Cream: In a mixing bowl, whip the heavy cream with powdered sugar until soft peaks form. Spread the whipped cream over the bananas.
- Add Toppings: Drizzle caramel sauce over the whipped cream and sprinkle chopped nuts on top for added crunch.
- Chill: Refrigerate the pie for at least 2 hours before serving to let the flavors meld together.
Enjoy your homemade banoffee pie! It’s sure to be a hit!
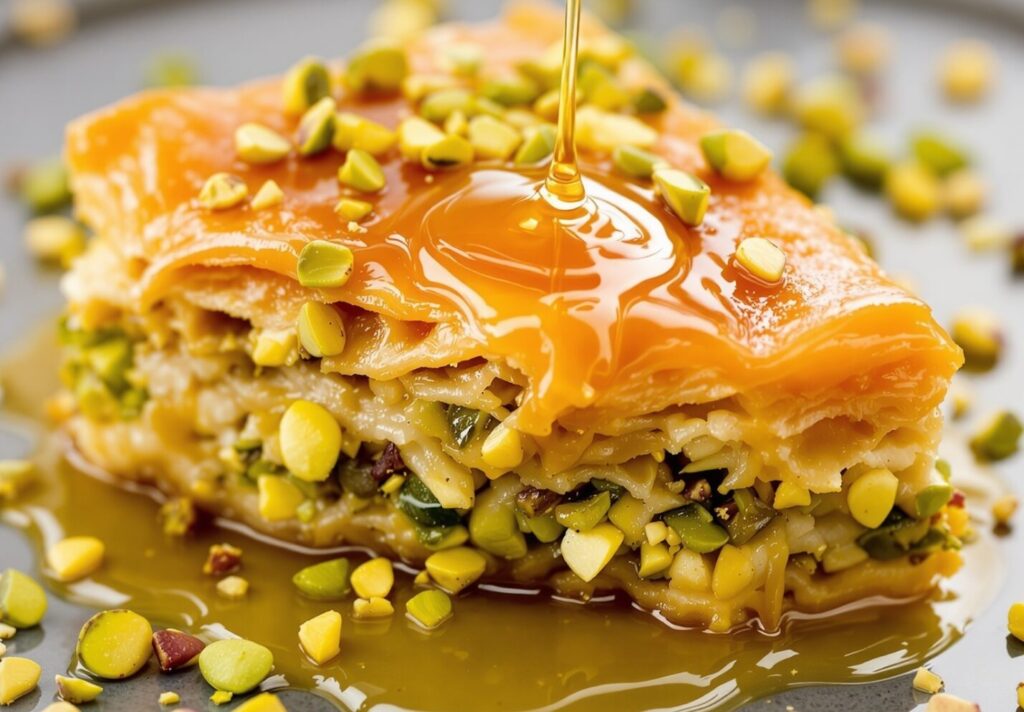
Pistachio Baklava with Honey Syrup
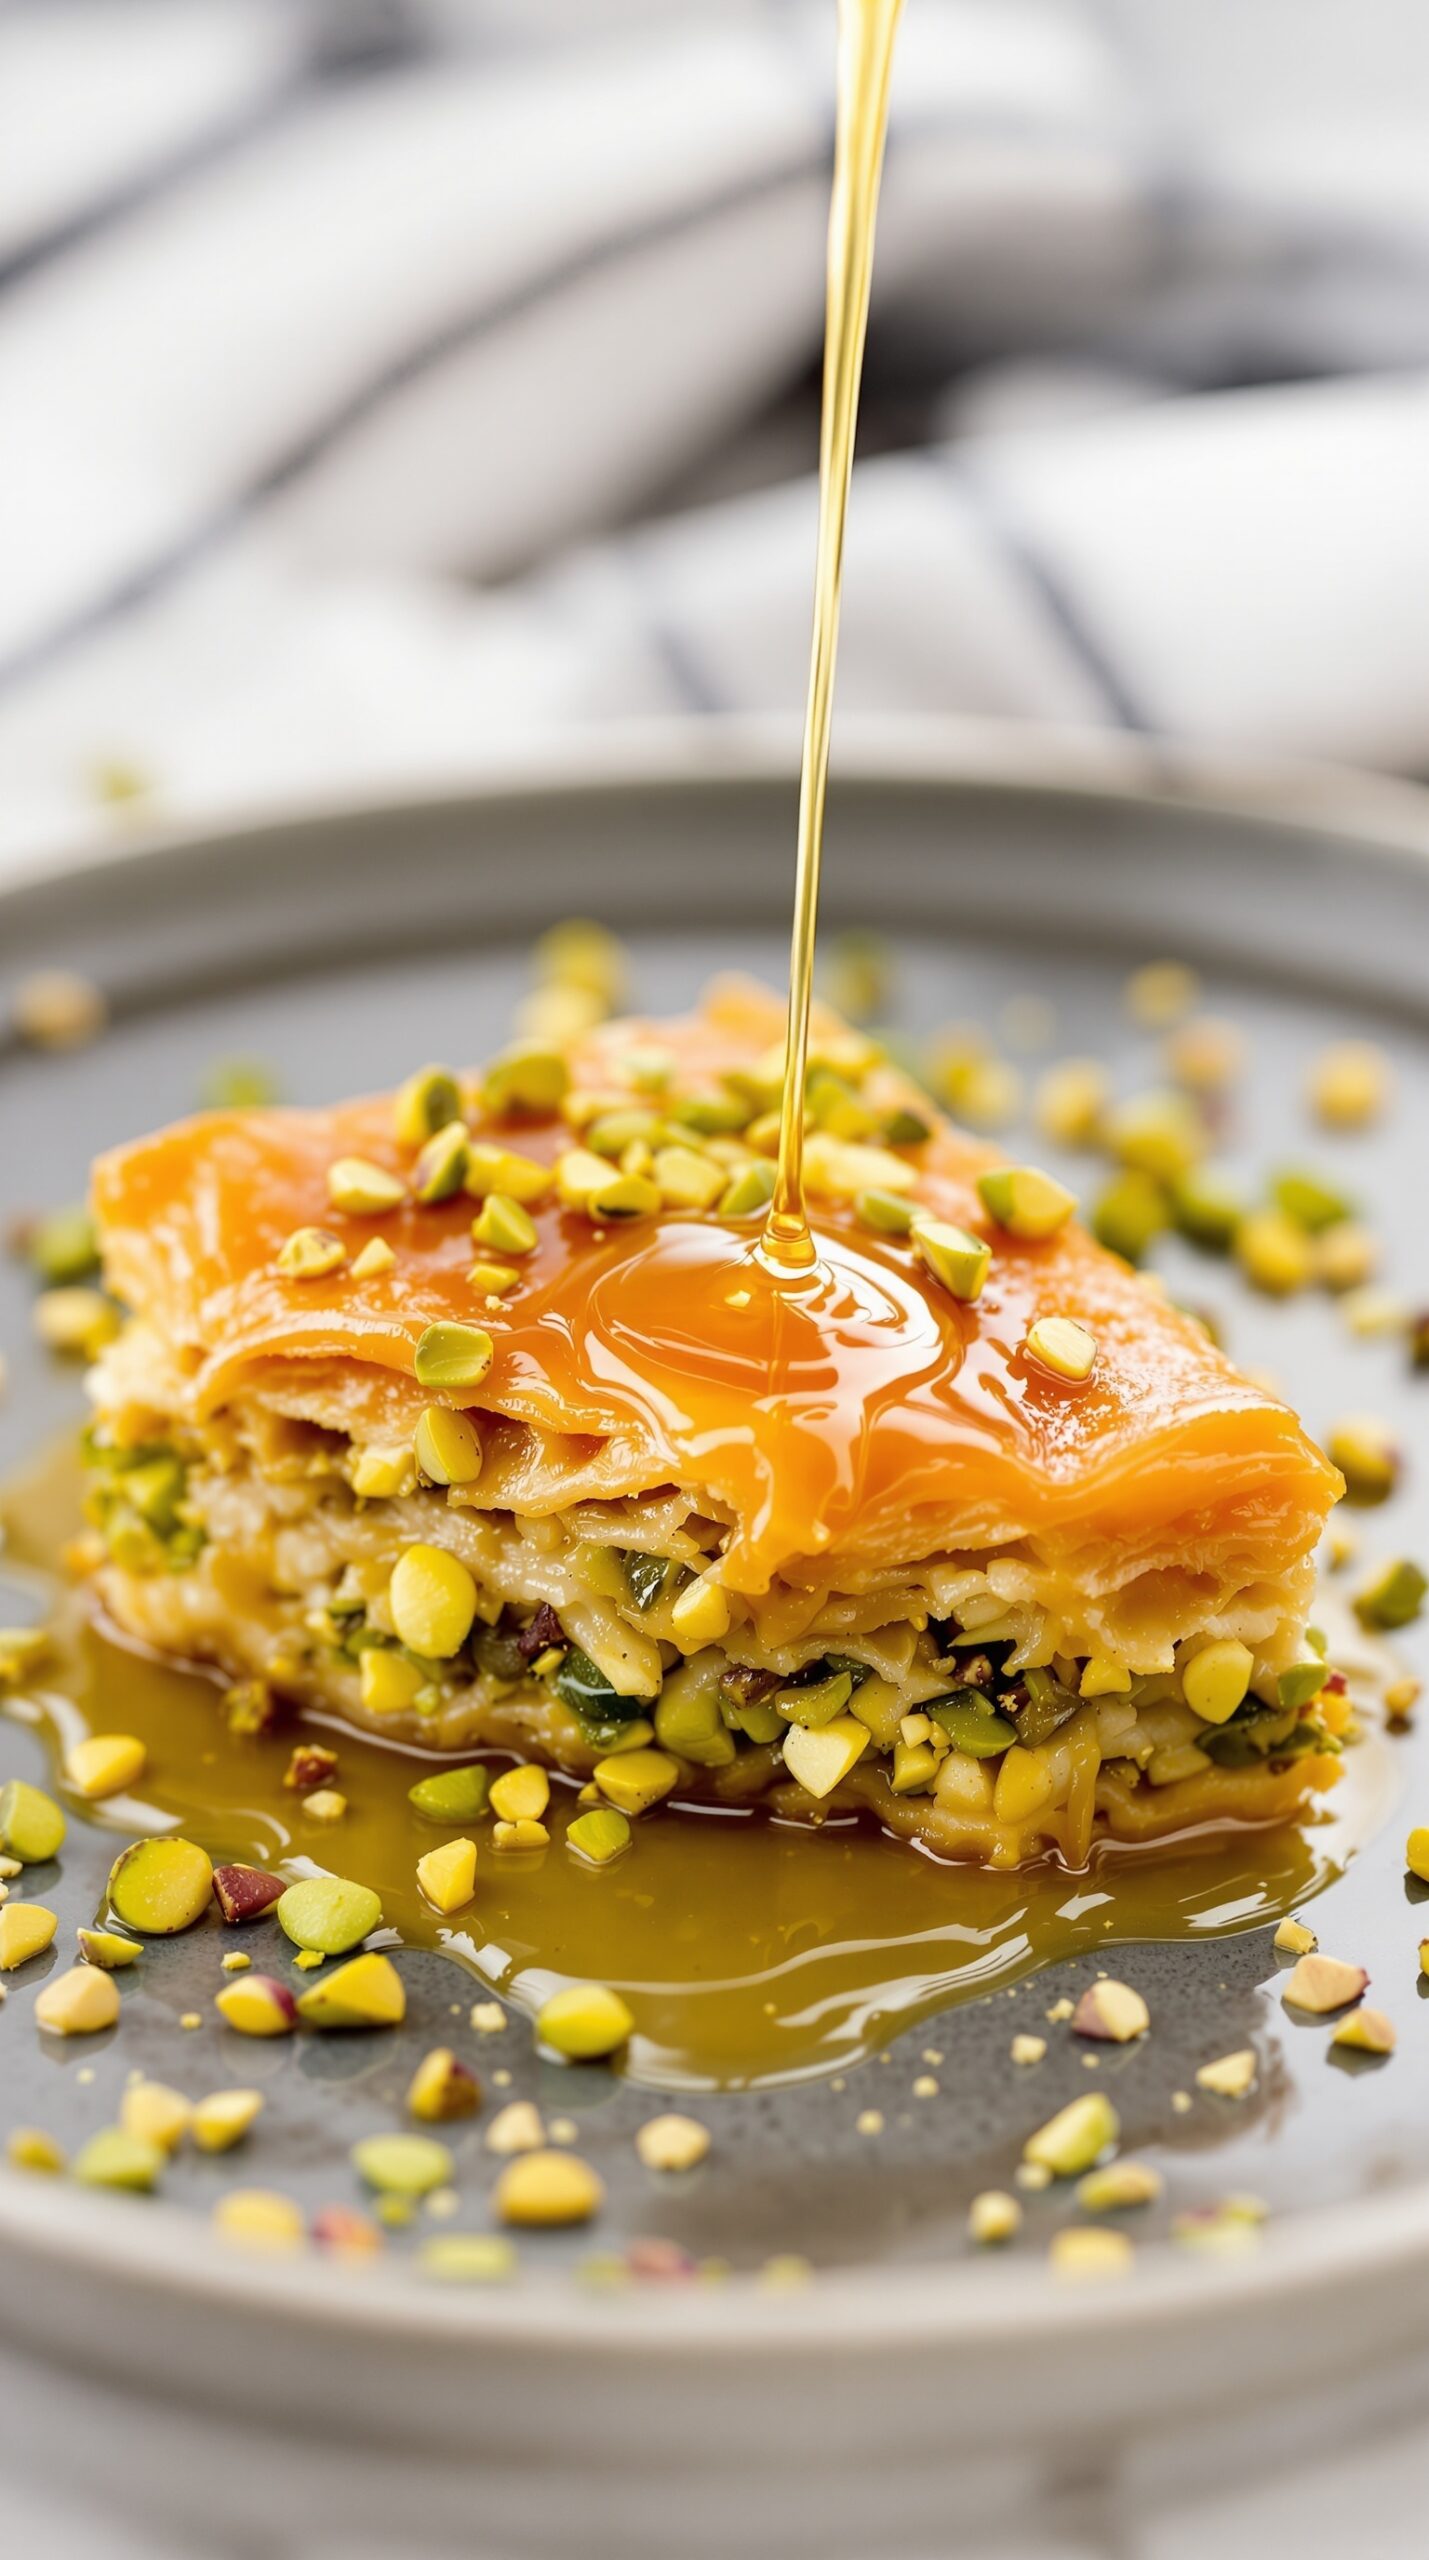
Pistachio baklava is a delightful dessert that brings together layers of flaky pastry, crunchy nuts, and a sweet honey syrup. The image showcases a piece of baklava drizzled with golden syrup, making it look irresistible. The vibrant green of the pistachios adds a pop of color, making this treat not only tasty but also visually appealing.
This dessert is perfect for special occasions or just to satisfy a sweet tooth. The combination of textures—from the crisp layers of phyllo dough to the chewy syrup—creates a wonderful experience with every bite. If you’re looking to impress your friends or family, this baklava is a fantastic choice!
Ingredients
- 1 package of phyllo dough (16 oz)
- 2 cups pistachios, finely chopped
- 1 cup unsalted butter, melted
- 1 teaspoon ground cinnamon
- 1 cup water
- 1 cup granulated sugar
- 1/2 cup honey
- 1 teaspoon vanilla extract
Instructions
- Preheat your oven to 350°F (175°C).
- In a bowl, mix the chopped pistachios with cinnamon. Set aside.
- Brush a 9×13 inch baking dish with melted butter. Layer 8 sheets of phyllo dough, brushing each layer with butter.
- Spread a layer of the pistachio mixture over the phyllo. Repeat layering with 4 sheets of phyllo and more pistachios until all ingredients are used, finishing with 8 layers of phyllo on top.
- Cut the baklava into diamond or square shapes before baking. Bake for 45-50 minutes until golden brown.
- While the baklava is baking, prepare the syrup. In a saucepan, combine water, sugar, honey, and vanilla. Bring to a boil, then reduce heat and simmer for about 10 minutes.
- Once the baklava is done, pour the hot syrup over it while still warm. Allow it to cool completely before serving.
Coconut Macaroons with Chocolate Drizzle
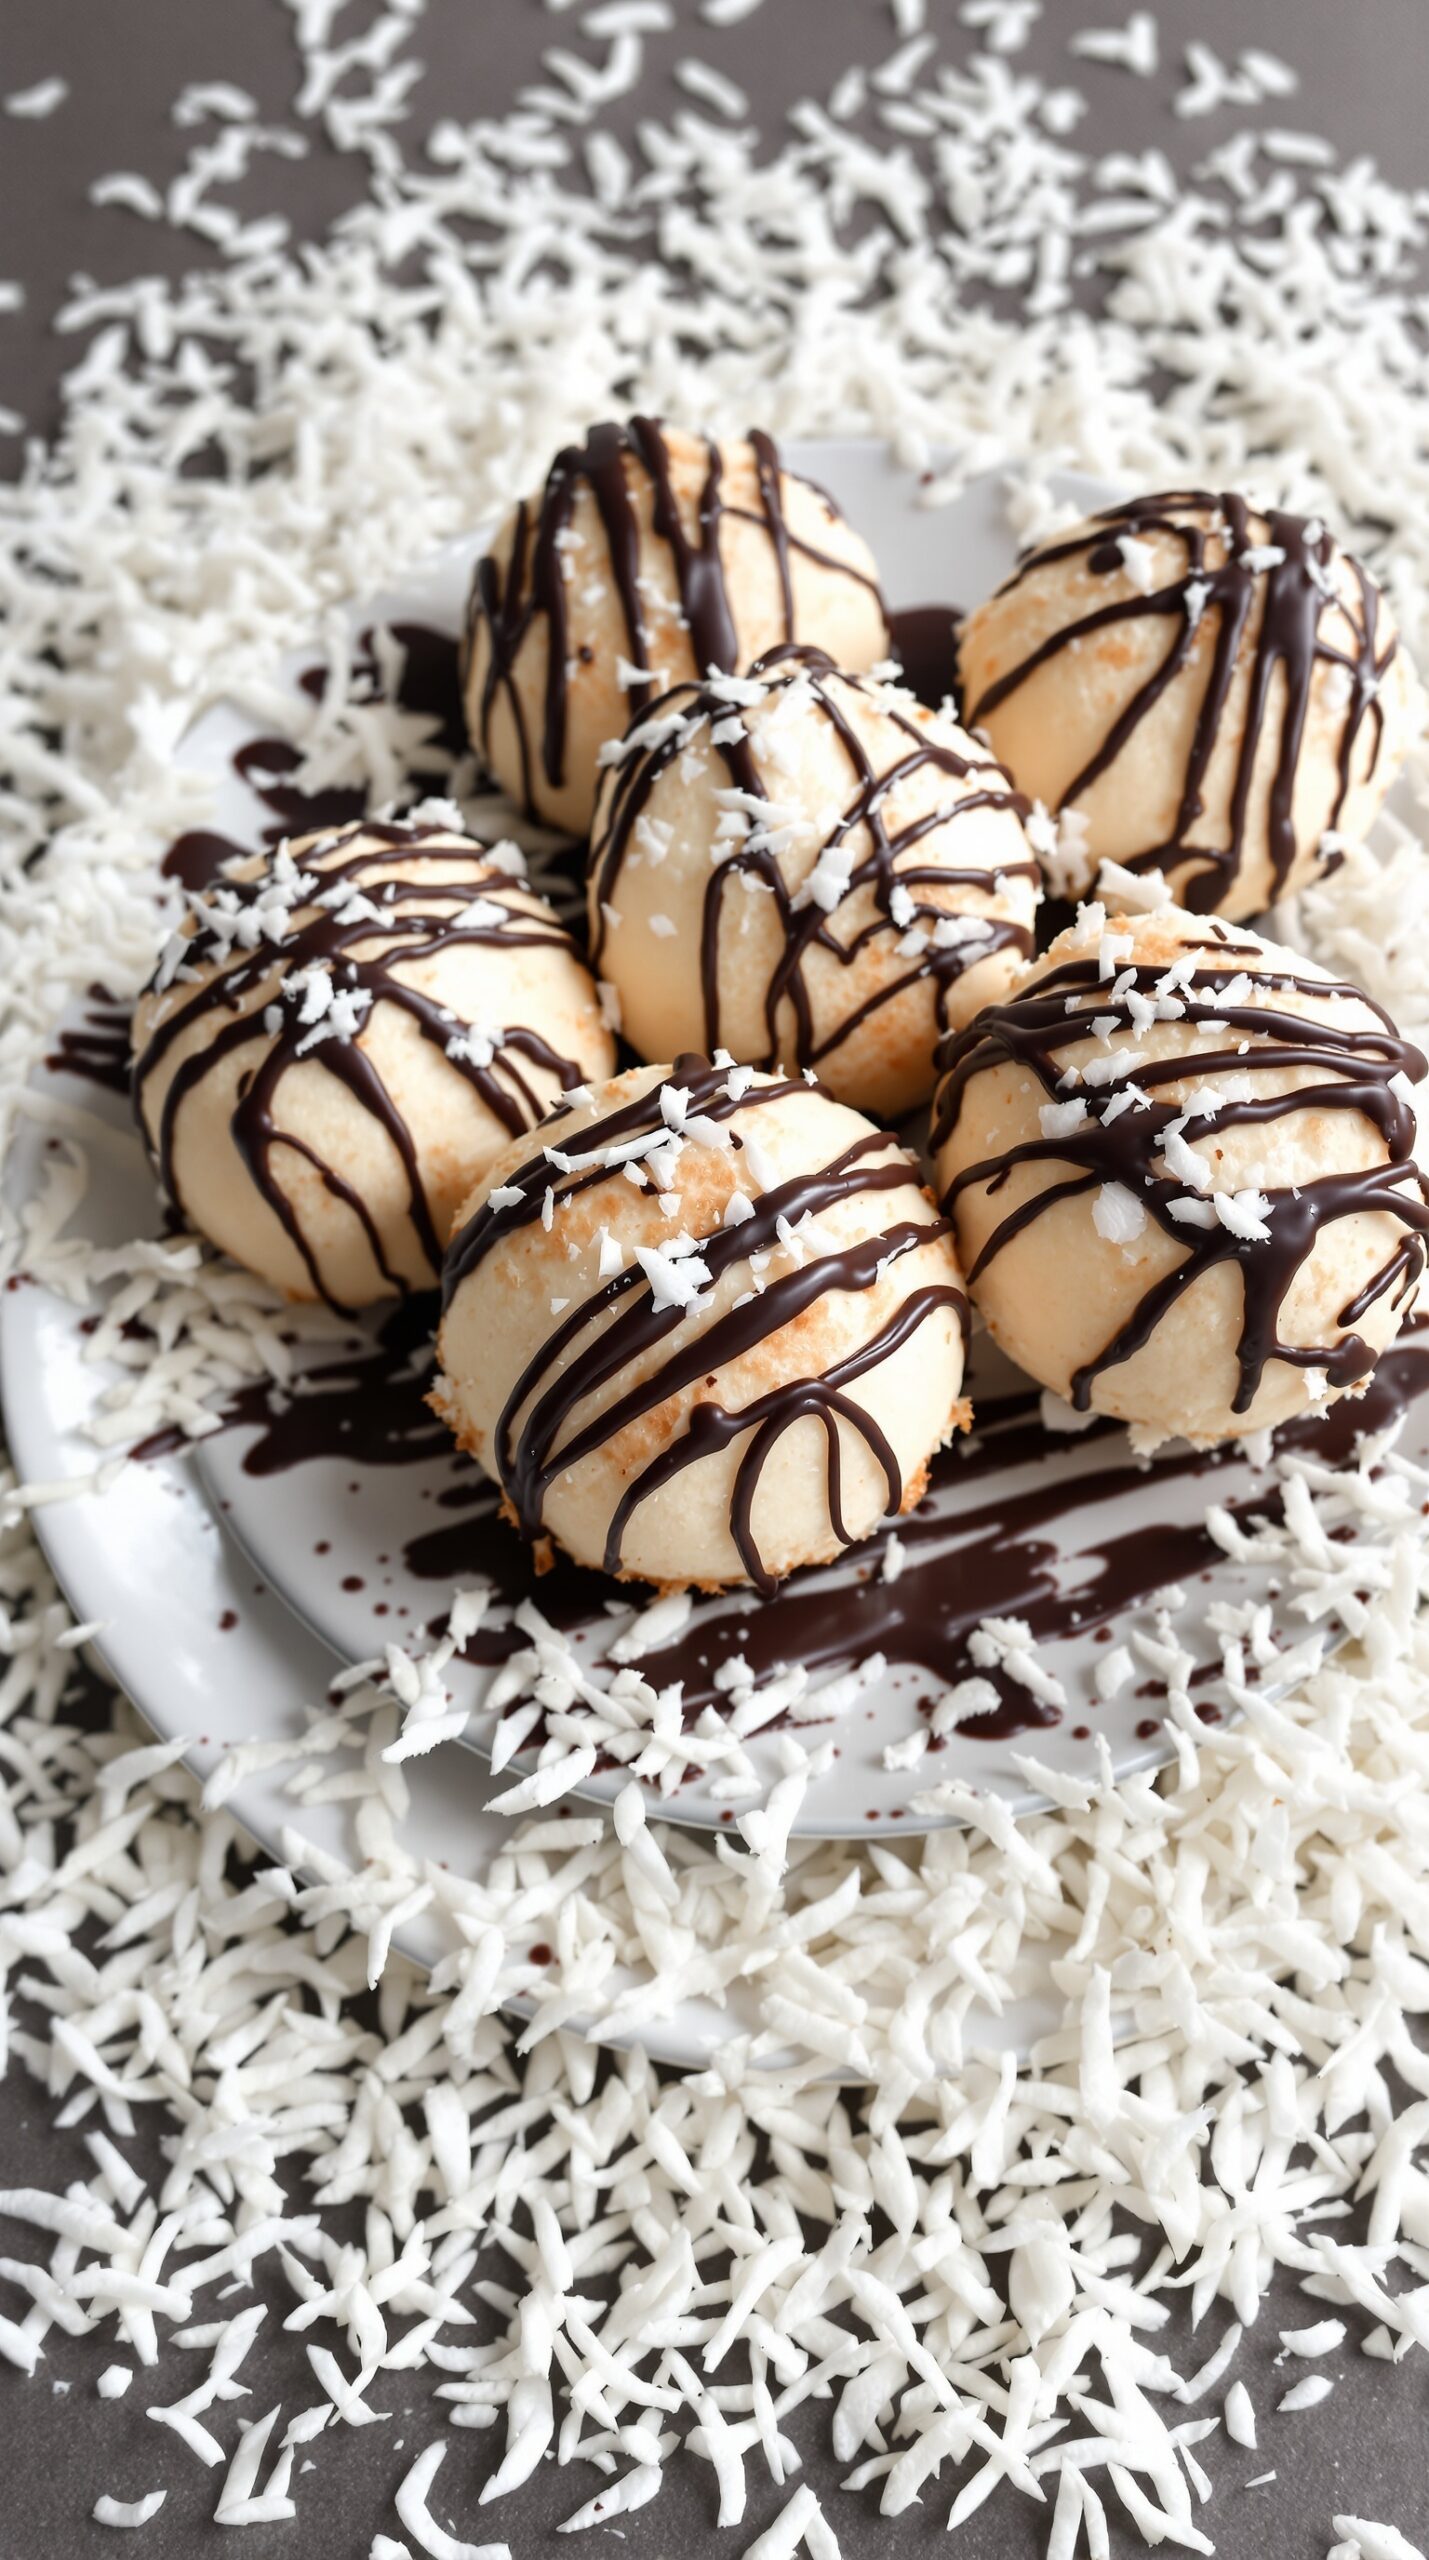
Coconut macaroons are a delightful treat that combines the sweet, chewy texture of coconut with a rich chocolate drizzle. These little bites are perfect for any occasion, whether you’re hosting a party or just craving something sweet. The contrast of the soft coconut and the smooth chocolate creates a satisfying experience that will leave you wanting more.
To make these macaroons, you’ll need a few simple ingredients. The main star is shredded coconut, which gives these treats their signature flavor. Sweetened condensed milk adds moisture and sweetness, while vanilla extract enhances the overall taste. A drizzle of melted chocolate on top not only looks appealing but also adds a delicious touch.
These macaroons are easy to prepare and bake quickly, making them a great option for last-minute dessert cravings. Once they cool, you can enjoy them right away or store them for later. They also make a lovely gift when packaged nicely!
Ingredients
- 3 cups shredded coconut
- 1 cup sweetened condensed milk
- 1 teaspoon vanilla extract
- 1/4 teaspoon salt
- 1 cup semi-sweet chocolate chips
Instructions
- Preheat your oven to 325°F (160°C) and line a baking sheet with parchment paper.
- In a large bowl, combine shredded coconut, sweetened condensed milk, vanilla extract, and salt. Mix well until everything is evenly coated.
- Using a cookie scoop or your hands, form small balls of the coconut mixture and place them on the prepared baking sheet, spacing them about 2 inches apart.
- Bake for 15-20 minutes, or until the edges are golden brown. Remove from the oven and let them cool on the baking sheet for a few minutes before transferring to a wire rack.
- While the macaroons cool, melt the chocolate chips in a microwave-safe bowl in 30-second intervals, stirring in between until smooth.
- Once the macaroons are completely cool, drizzle the melted chocolate over the top using a fork or a piping bag. Allow the chocolate to set before serving.
Rich Cheesecake with Berry Compote
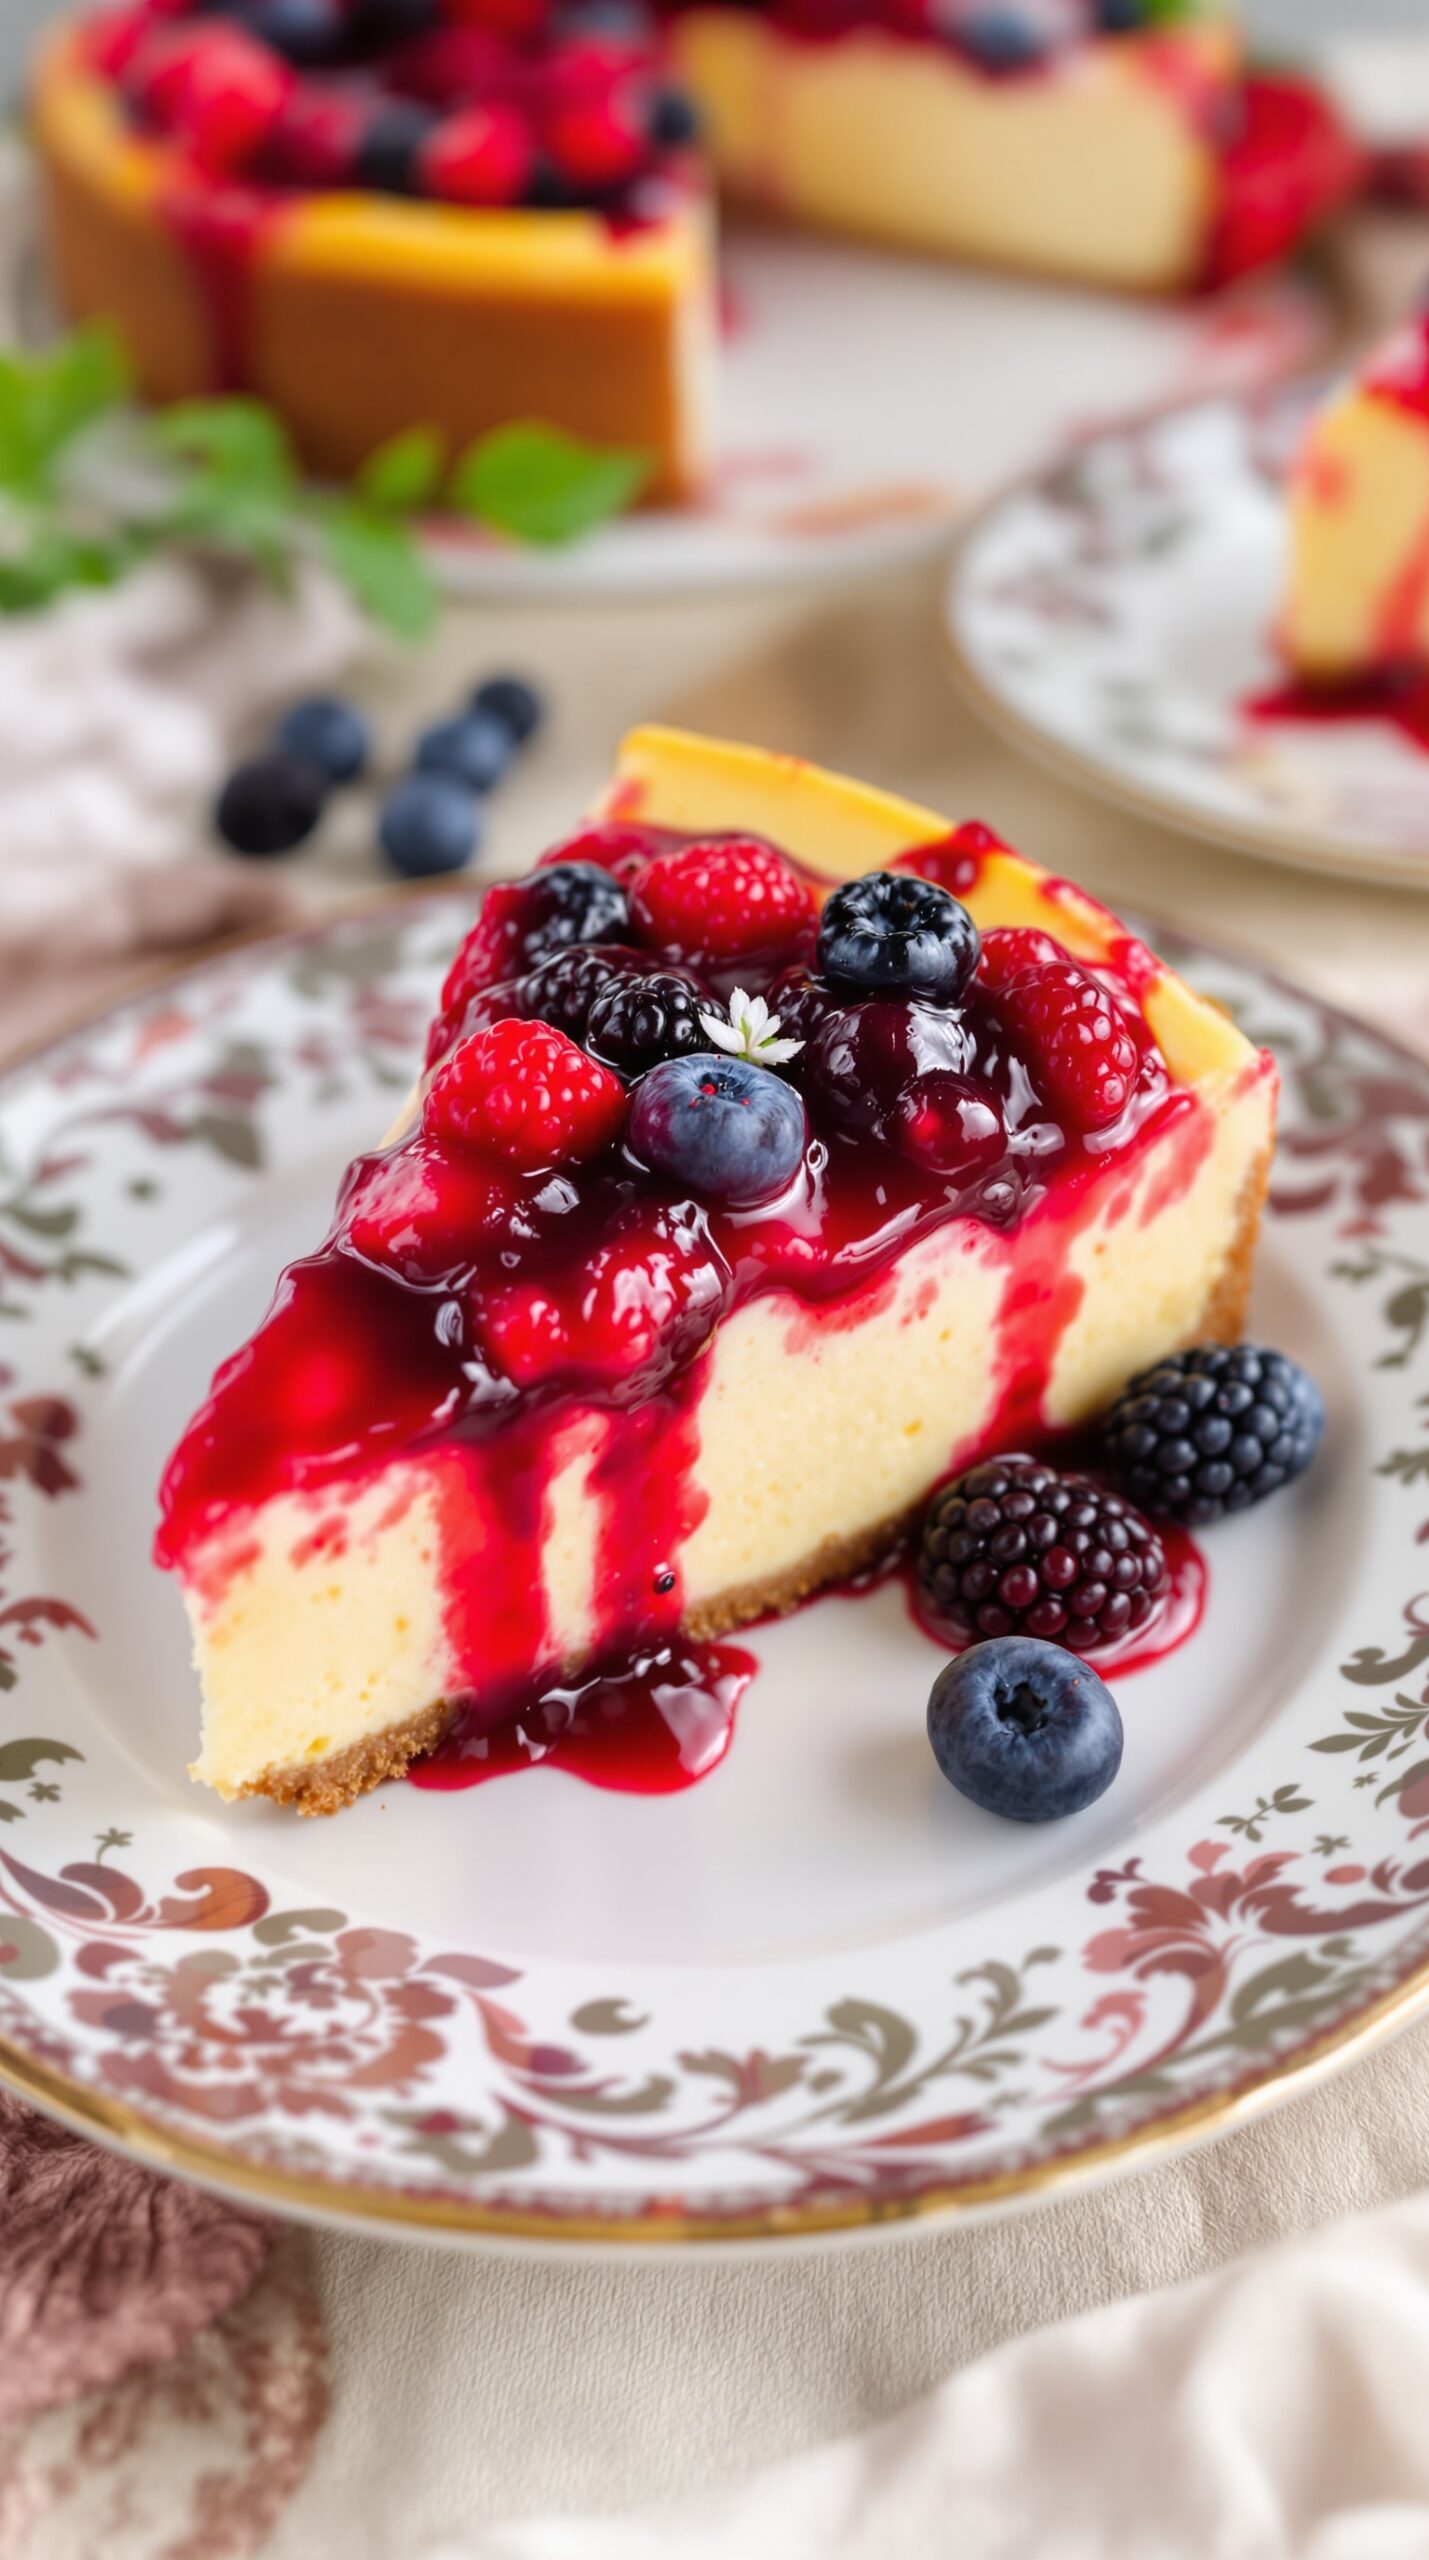
This rich cheesecake is a delightful treat that brings together creamy goodness and a burst of fruity flavor. The cheesecake itself is smooth and velvety, making each bite a pleasure. Topped with a vibrant berry compote, it adds a refreshing twist that balances the richness of the cake.
The compote is made from a mix of fresh berries, providing a sweet and slightly tart contrast. This dessert is perfect for any occasion, whether it’s a family gathering or a dinner party with friends. It’s sure to impress your guests and leave them wanting more!
Now, let’s get into how to make this delicious cheesecake.
Ingredients
- 1 1/2 cups graham cracker crumbs
- 1/4 cup granulated sugar
- 1/2 cup unsalted butter, melted
- 4 (8 oz) packages cream cheese, softened
- 1 cup granulated sugar
- 1 teaspoon vanilla extract
- 4 large eggs
- 2 cups mixed berries (strawberries, blueberries, raspberries)
- 1/2 cup sugar (for compote)
- 1 tablespoon lemon juice
Instructions
- Prepare the Crust: Preheat your oven to 325°F (160°C). In a bowl, mix graham cracker crumbs, 1/4 cup sugar, and melted butter. Press this mixture into the bottom of a 9-inch springform pan.
- Bake the Crust: Bake the crust for about 10 minutes, then remove it from the oven and let it cool.
- Make the Cheesecake Filling: In a large bowl, beat the cream cheese until smooth. Gradually add 1 cup sugar and vanilla, mixing until well combined. Add the eggs one at a time, mixing on low speed until just blended.
- Pour the Filling: Pour the cheesecake mixture over the cooled crust. Smooth the top with a spatula.
- Bake the Cheesecake: Bake for 55-60 minutes or until the center is set. Turn off the oven and leave the cheesecake inside for an hour. Then, let it cool completely at room temperature.
- Prepare the Berry Compote: In a saucepan, combine mixed berries, 1/2 cup sugar, and lemon juice. Cook over medium heat until the berries break down and the mixture thickens, about 10 minutes. Let it cool.
- Serve: Once the cheesecake is cool, top it with the berry compote. Slice and enjoy!
Fruit Tart with Creamy Custard
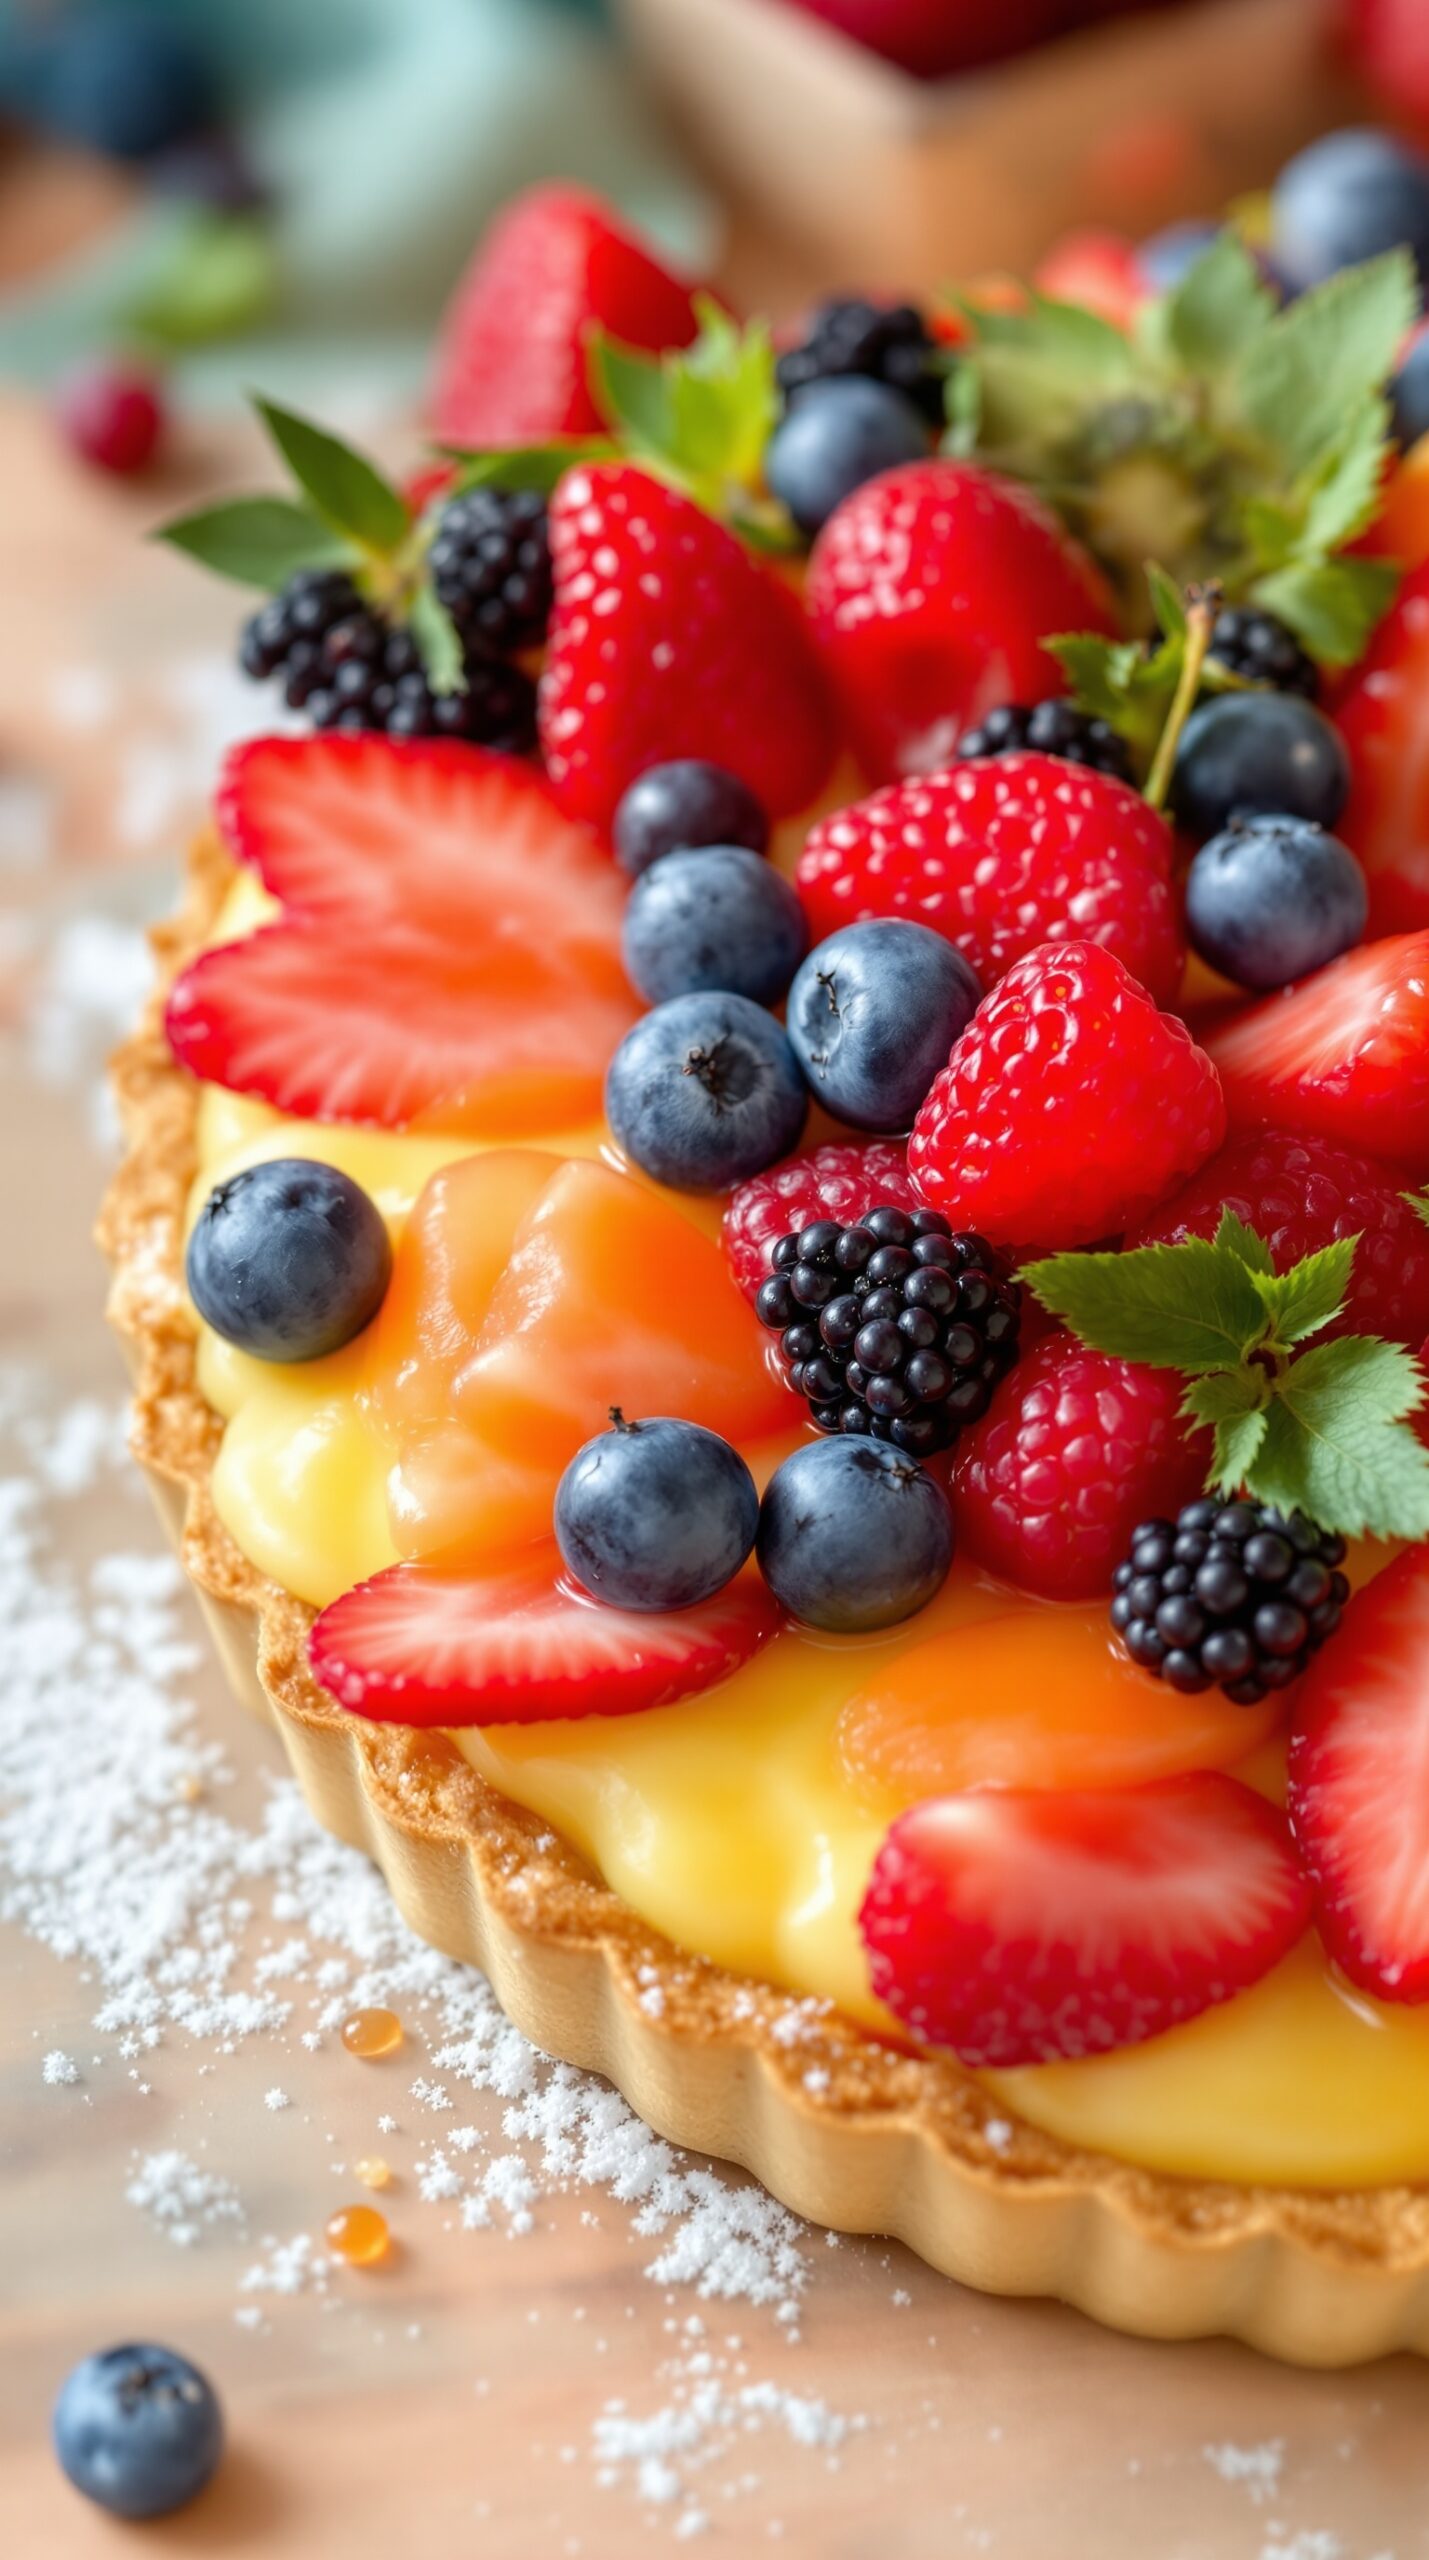
Fruit tarts are a delightful way to enjoy seasonal fruits. This tart features a buttery crust filled with creamy custard and topped with vibrant berries. The combination of textures and flavors makes it a perfect dessert for any occasion.
The tart crust is crisp and flaky, providing a lovely base for the rich custard. The custard is smooth and creamy, balancing the tartness of the fresh fruits. Strawberries, blueberries, and blackberries add a burst of color and flavor, making this dessert visually appealing and delicious.
To make this fruit tart, you’ll need a few simple ingredients. Gather your favorite fruits, some eggs, milk, sugar, and flour. The process is straightforward and rewarding. Once baked, let the tart cool before adding the fresh fruits on top. A sprinkle of powdered sugar can add a nice finishing touch.
Ingredients
- 1 pre-made tart shell
- 2 cups milk
- 1/2 cup granulated sugar
- 3 large egg yolks
- 1/4 cup cornstarch
- 1 teaspoon vanilla extract
- 1 cup strawberries, sliced
- 1 cup blueberries
- 1 cup blackberries
- Powdered sugar for dusting
Instructions
- Prepare the Custard: In a saucepan, heat the milk over medium heat until it begins to simmer. In a bowl, whisk together the sugar, egg yolks, and cornstarch until smooth. Slowly pour the hot milk into the egg mixture, whisking constantly.
- Thicken the Custard: Return the mixture to the saucepan and cook over medium heat, stirring constantly until it thickens. Remove from heat and stir in the vanilla extract. Let it cool completely.
- Assemble the Tart: Once the custard is cool, pour it into the pre-made tart shell, spreading it evenly. Arrange the sliced strawberries, blueberries, and blackberries on top of the custard.
- Finish and Serve: Dust the tart with powdered sugar before serving. Enjoy this refreshing dessert with friends and family!
Lemon Meringue Pie with Golden Peaks
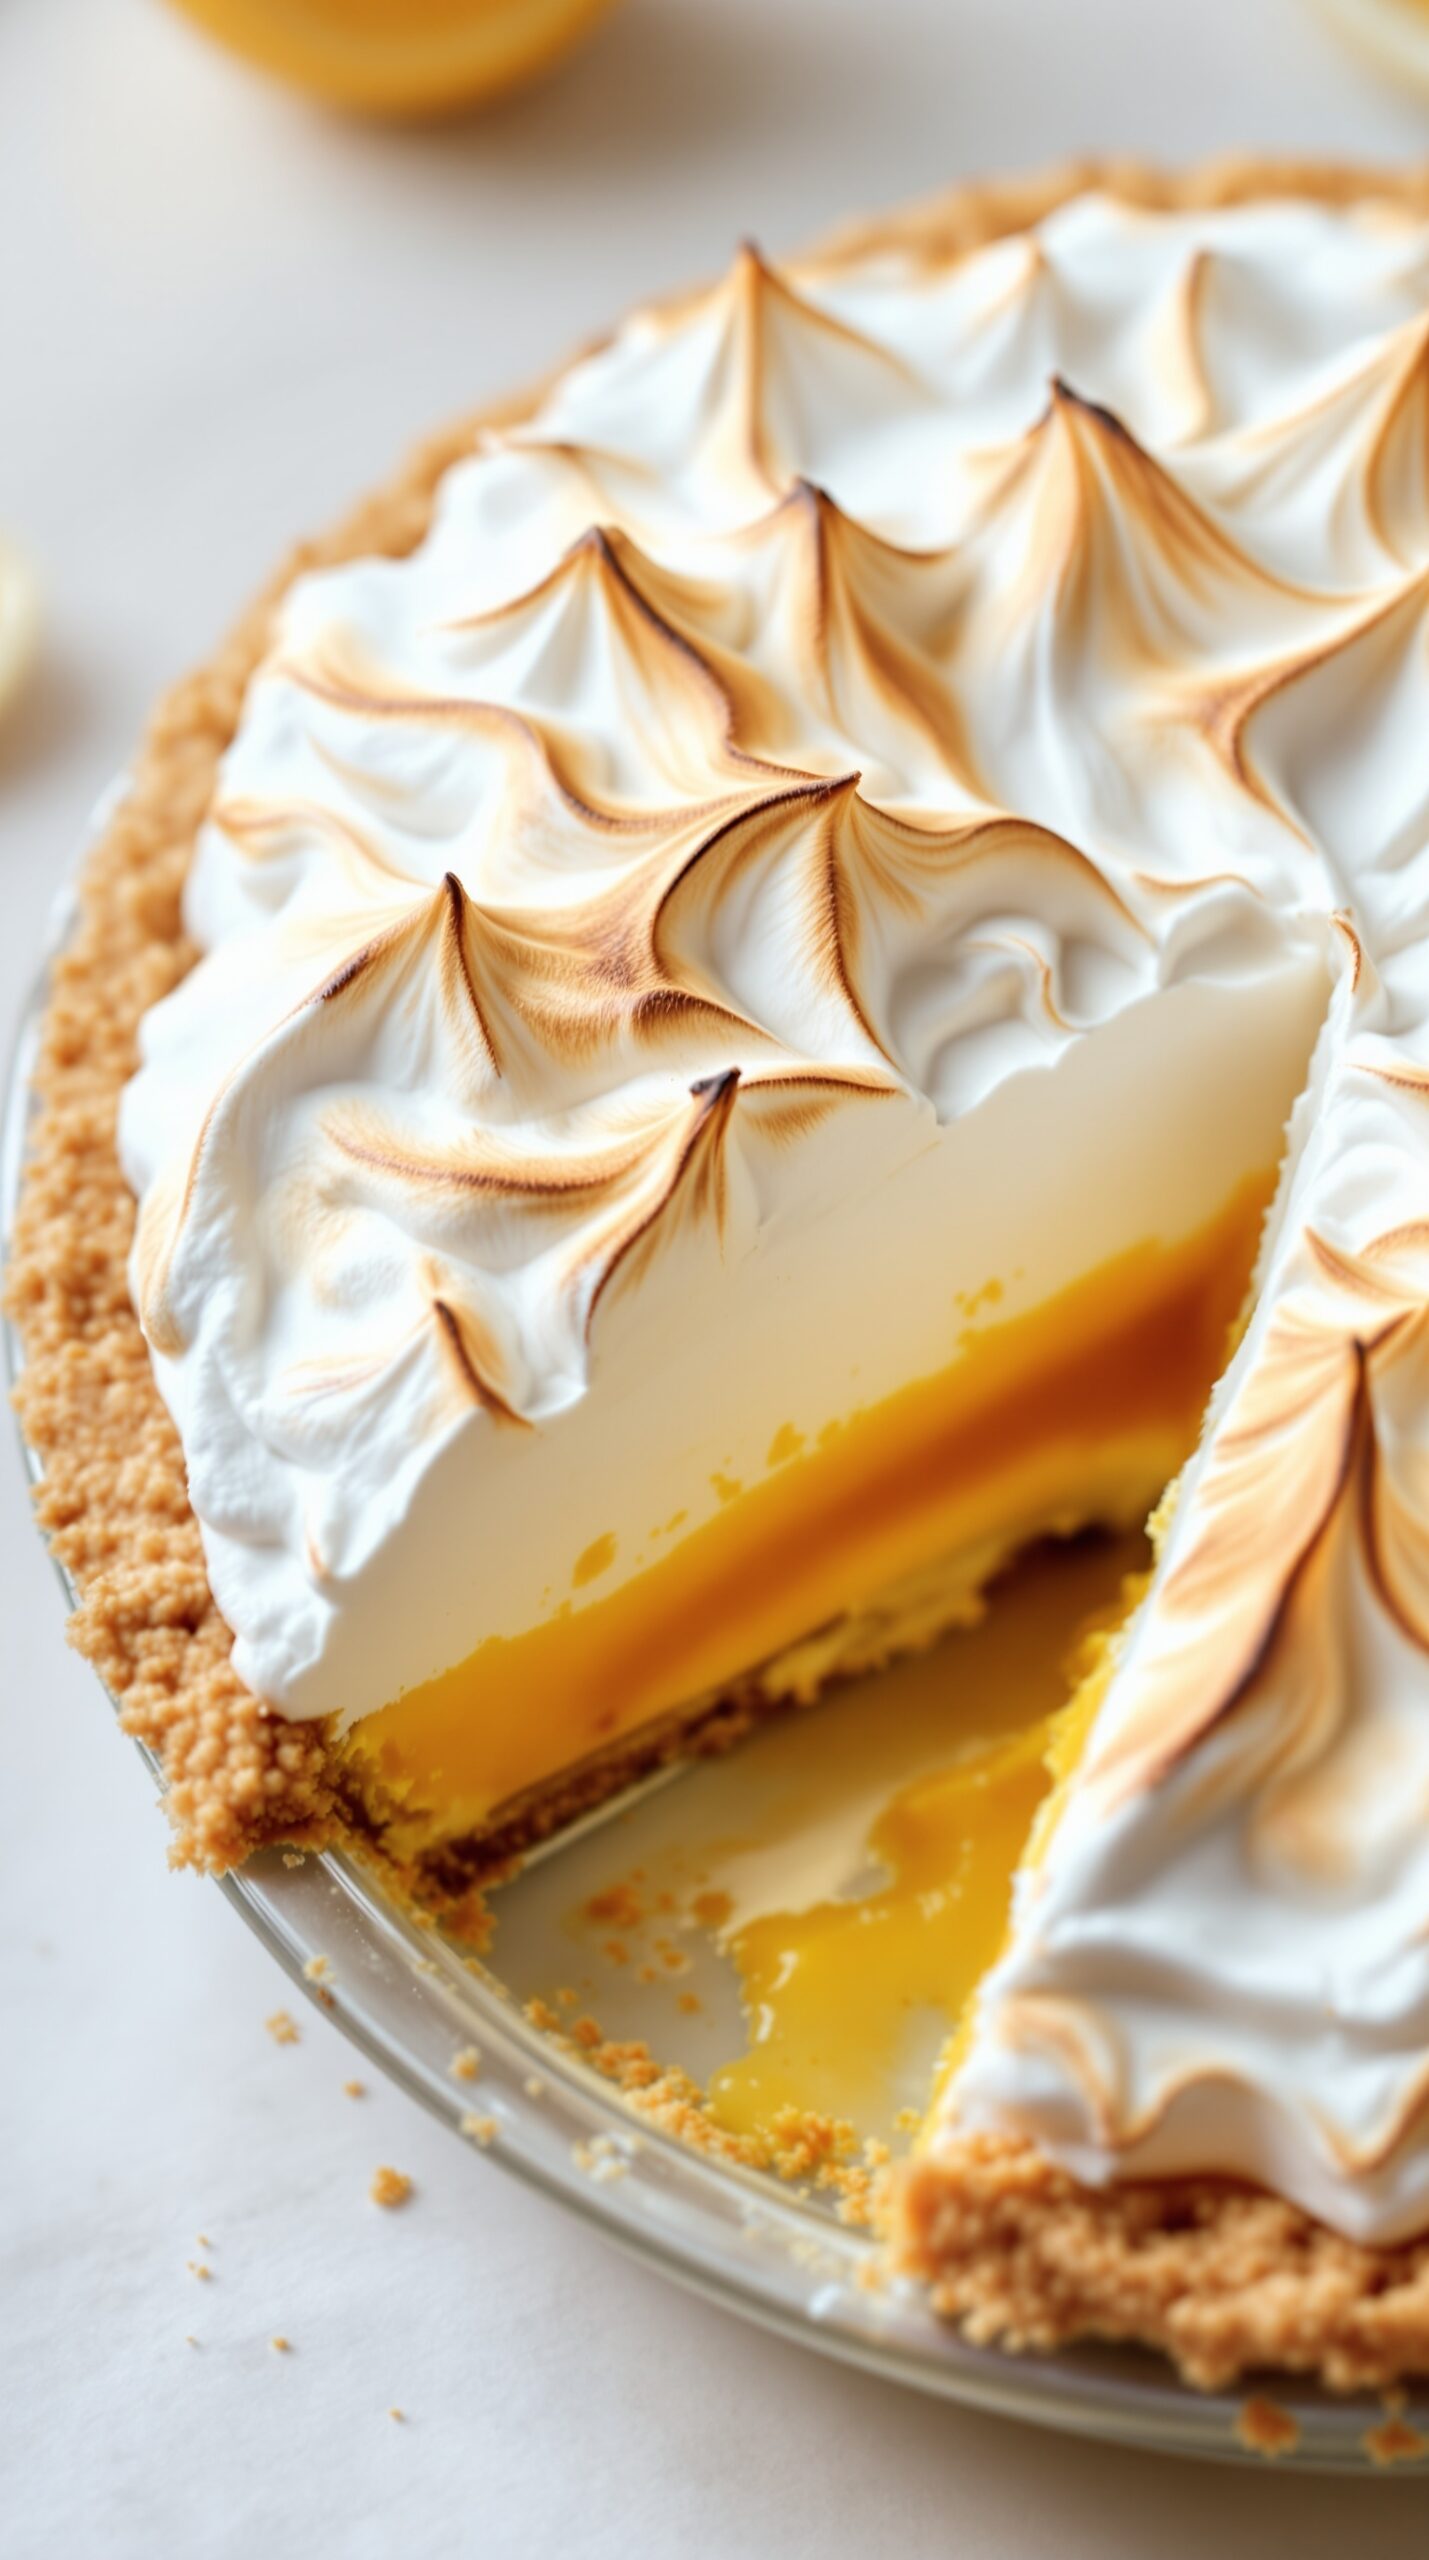
Lemon Meringue Pie is a classic dessert that brings a burst of sunshine to any table. The bright yellow filling is tangy and sweet, perfectly balanced by the fluffy meringue on top. The golden peaks of the meringue add a touch of elegance, making this pie not just delicious but also beautiful.
To make this pie, you’ll need a buttery crust that crumbles just right. The lemon filling is made from fresh lemon juice, sugar, and egg yolks, creating a smooth and zesty layer. The meringue is whipped to soft peaks, then baked until it’s lightly browned. Each slice reveals the vibrant filling, making it a showstopper at gatherings.
Here’s how you can create this delightful dessert at home!
Ingredients
- 1 pre-made pie crust (9-inch)
- 1 cup granulated sugar
- 2 tablespoons cornstarch
- 1/4 teaspoon salt
- 1 1/2 cups water
- 3 large egg yolks, beaten
- 1/2 cup fresh lemon juice
- 2 tablespoons unsalted butter
- 1 teaspoon lemon zest
- 3 large egg whites
- 1/4 teaspoon cream of tartar
- 1/2 cup granulated sugar (for meringue)
Instructions
- Preheat your oven to 350°F (175°C).
- In a saucepan, mix 1 cup sugar, cornstarch, and salt. Gradually stir in water. Cook over medium heat, stirring constantly, until thick and bubbly.
- Stir a small amount of the hot mixture into the beaten egg yolks. Return the egg yolk mixture to the saucepan, and cook for 2 more minutes. Remove from heat and stir in lemon juice, butter, and lemon zest.
- Pour the lemon filling into the pre-baked pie crust.
- In a clean bowl, beat egg whites and cream of tartar until soft peaks form. Gradually add 1/2 cup sugar, beating until stiff peaks form.
- Spread the meringue over the lemon filling, making sure to seal the edges. Create peaks with a spatula.
- Bake for 10-12 minutes or until the meringue is golden brown.
- Let the pie cool before serving. Enjoy your homemade Lemon Meringue Pie!
Classic Tiramisu with Espresso Layers
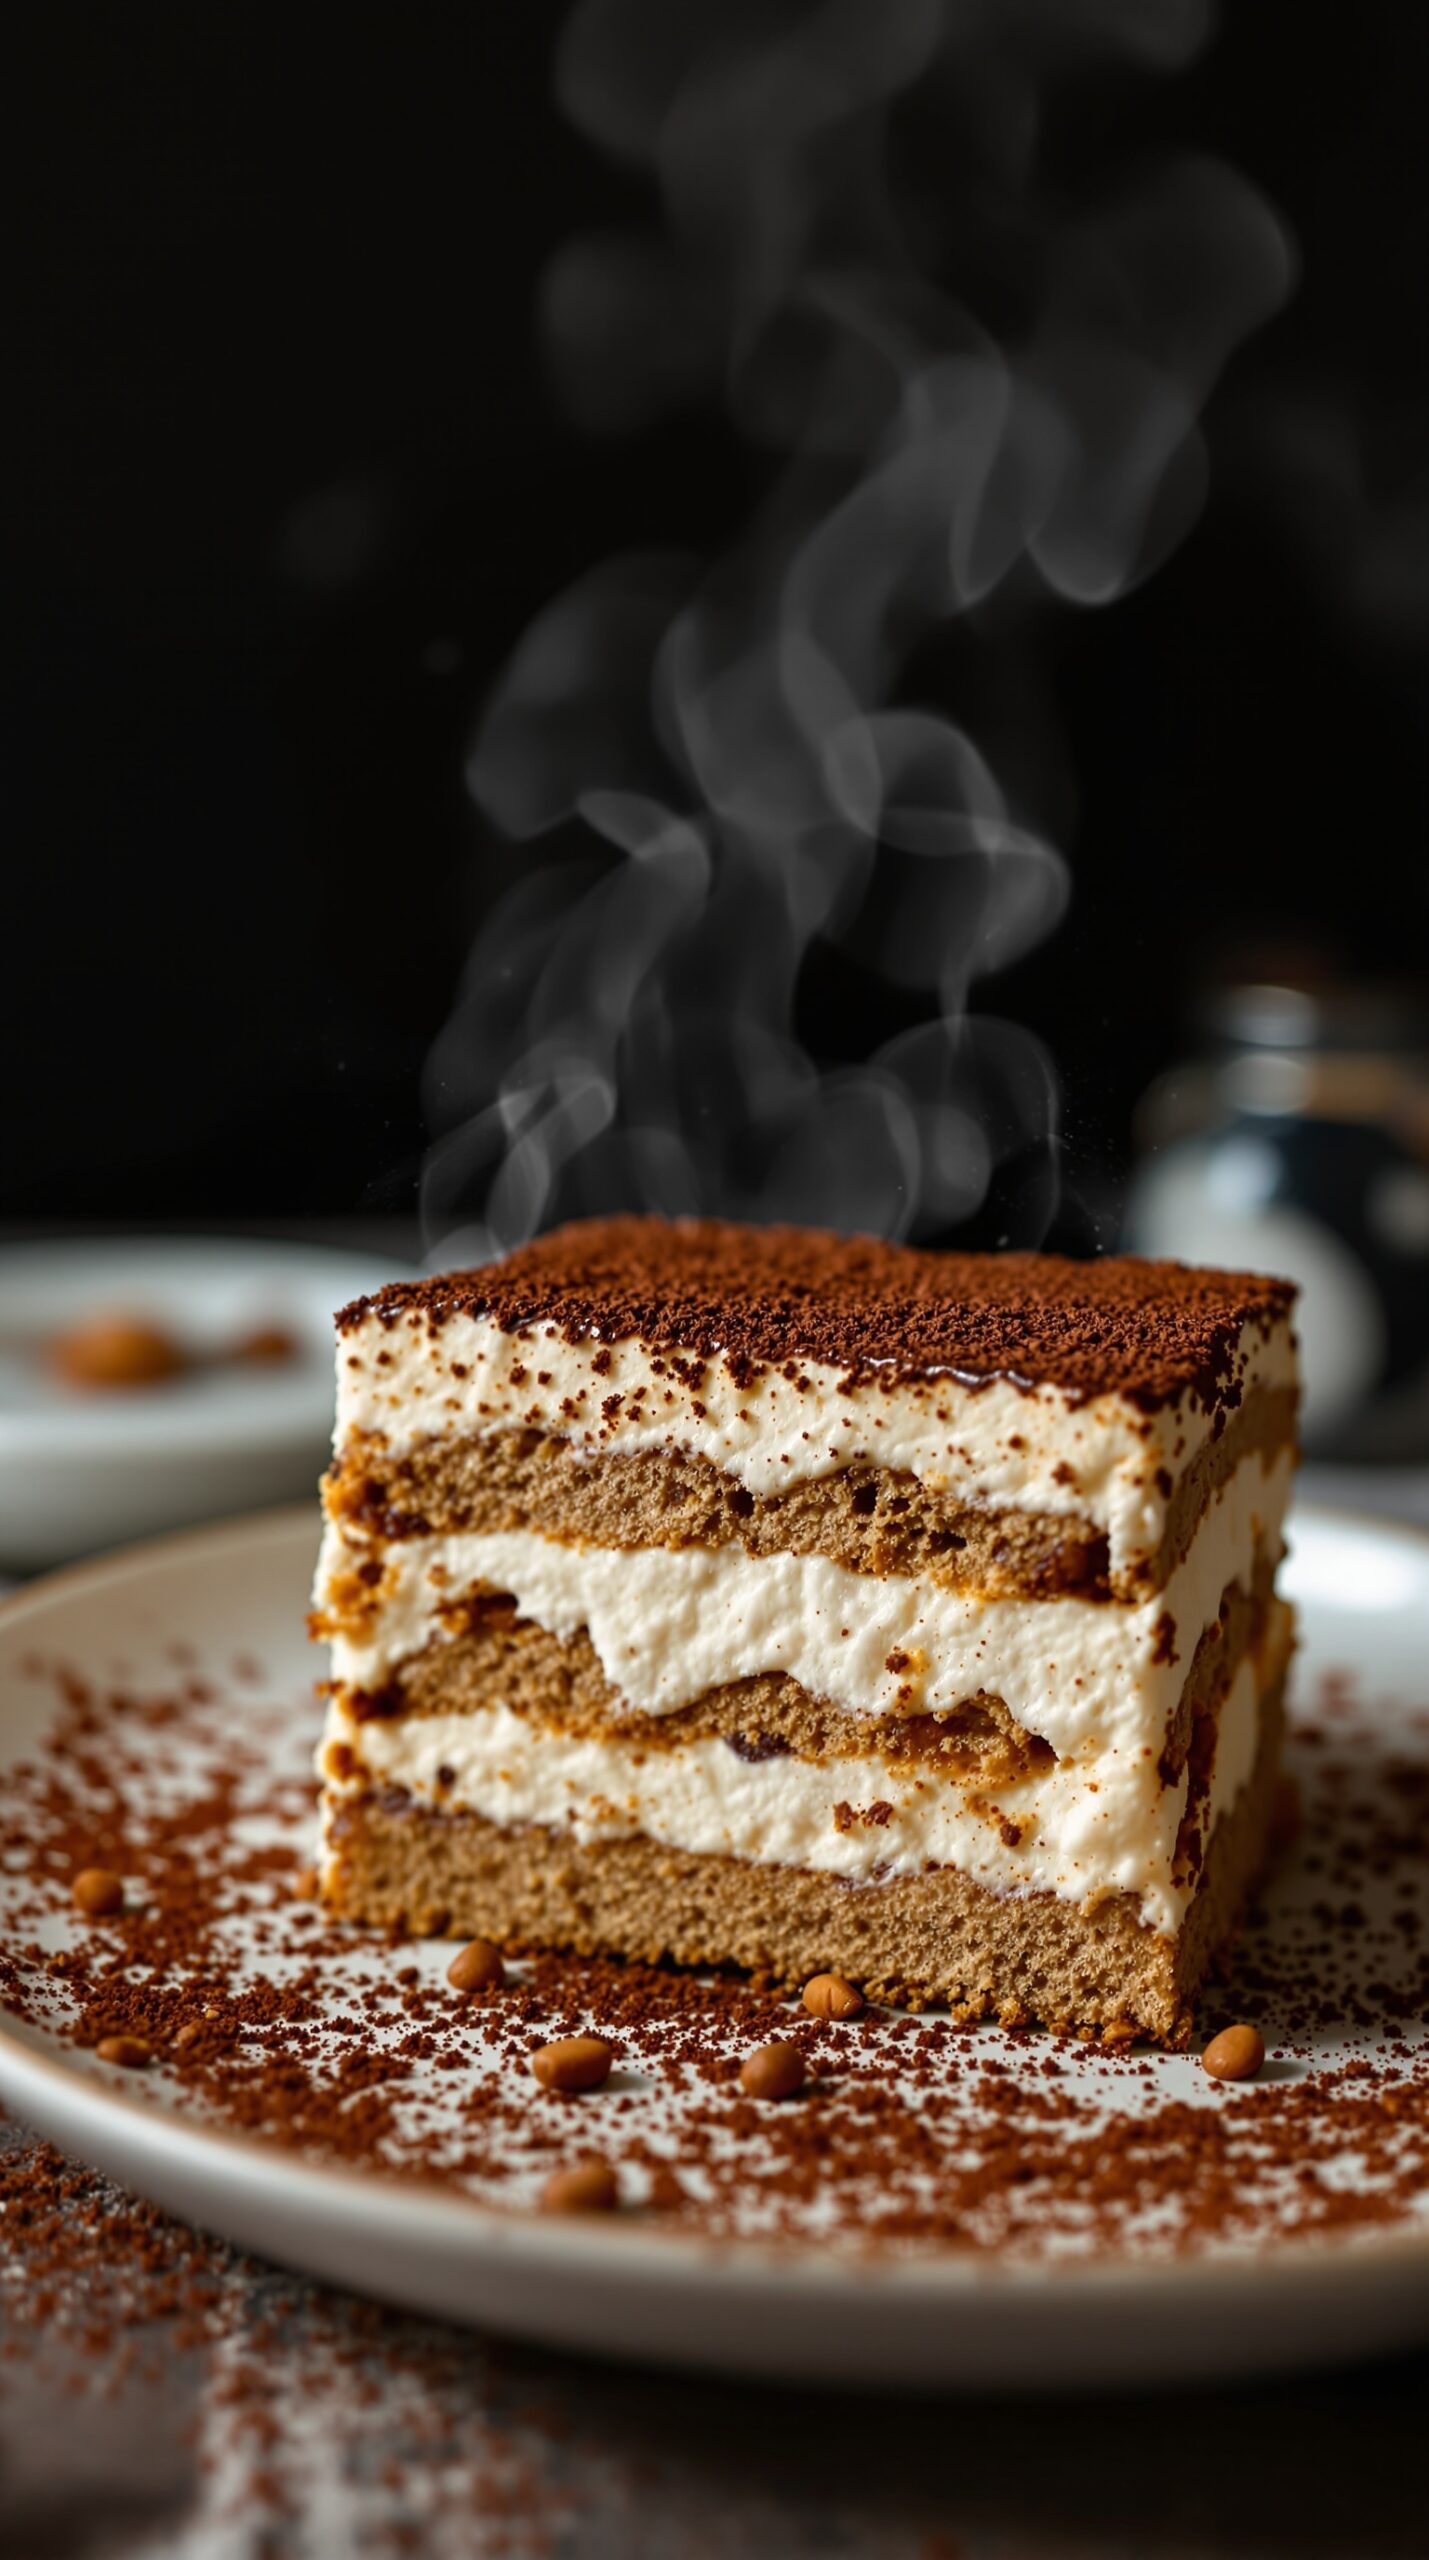
Tiramisu is a classic Italian dessert that never fails to impress. This delightful treat features layers of espresso-soaked ladyfingers and a rich mascarpone cream. The combination of coffee and creamy textures makes it a favorite for many.
The image shows a beautifully layered tiramisu, dusted with cocoa powder. The steam rising from the dessert hints at its fresh and warm appeal. Each layer is perfectly defined, showcasing the delicious contrast between the coffee-soaked biscuits and the creamy filling.
Making tiramisu at home is easier than you might think. With just a few simple ingredients, you can create this indulgent dessert that’s perfect for any occasion.
Ingredients
- 1 cup strong brewed espresso, cooled
- 3 large eggs, separated
- 1/2 cup granulated sugar
- 1 cup mascarpone cheese
- 1 cup heavy cream
- 1 teaspoon vanilla extract
- 24 ladyfingers
- Cocoa powder for dusting
Instructions
- Prepare the Espresso: Brew a strong cup of espresso and let it cool.
- Make the Cream: In a bowl, whisk the egg yolks and sugar until pale and fluffy. Add the mascarpone cheese and mix until smooth.
- Whip the Cream: In another bowl, whip the heavy cream and vanilla extract until stiff peaks form. Gently fold this into the mascarpone mixture.
- Combine: Dip each ladyfinger briefly in the cooled espresso and layer them in a dish. Spread half of the mascarpone mixture over the ladyfingers.
- Repeat: Add another layer of dipped ladyfingers followed by the remaining mascarpone mixture.
- Chill: Cover and refrigerate for at least 4 hours, or overnight for best results.
- Serve: Dust with cocoa powder before serving. Enjoy your homemade tiramisu!
Decadent Chocolate Lava Cake
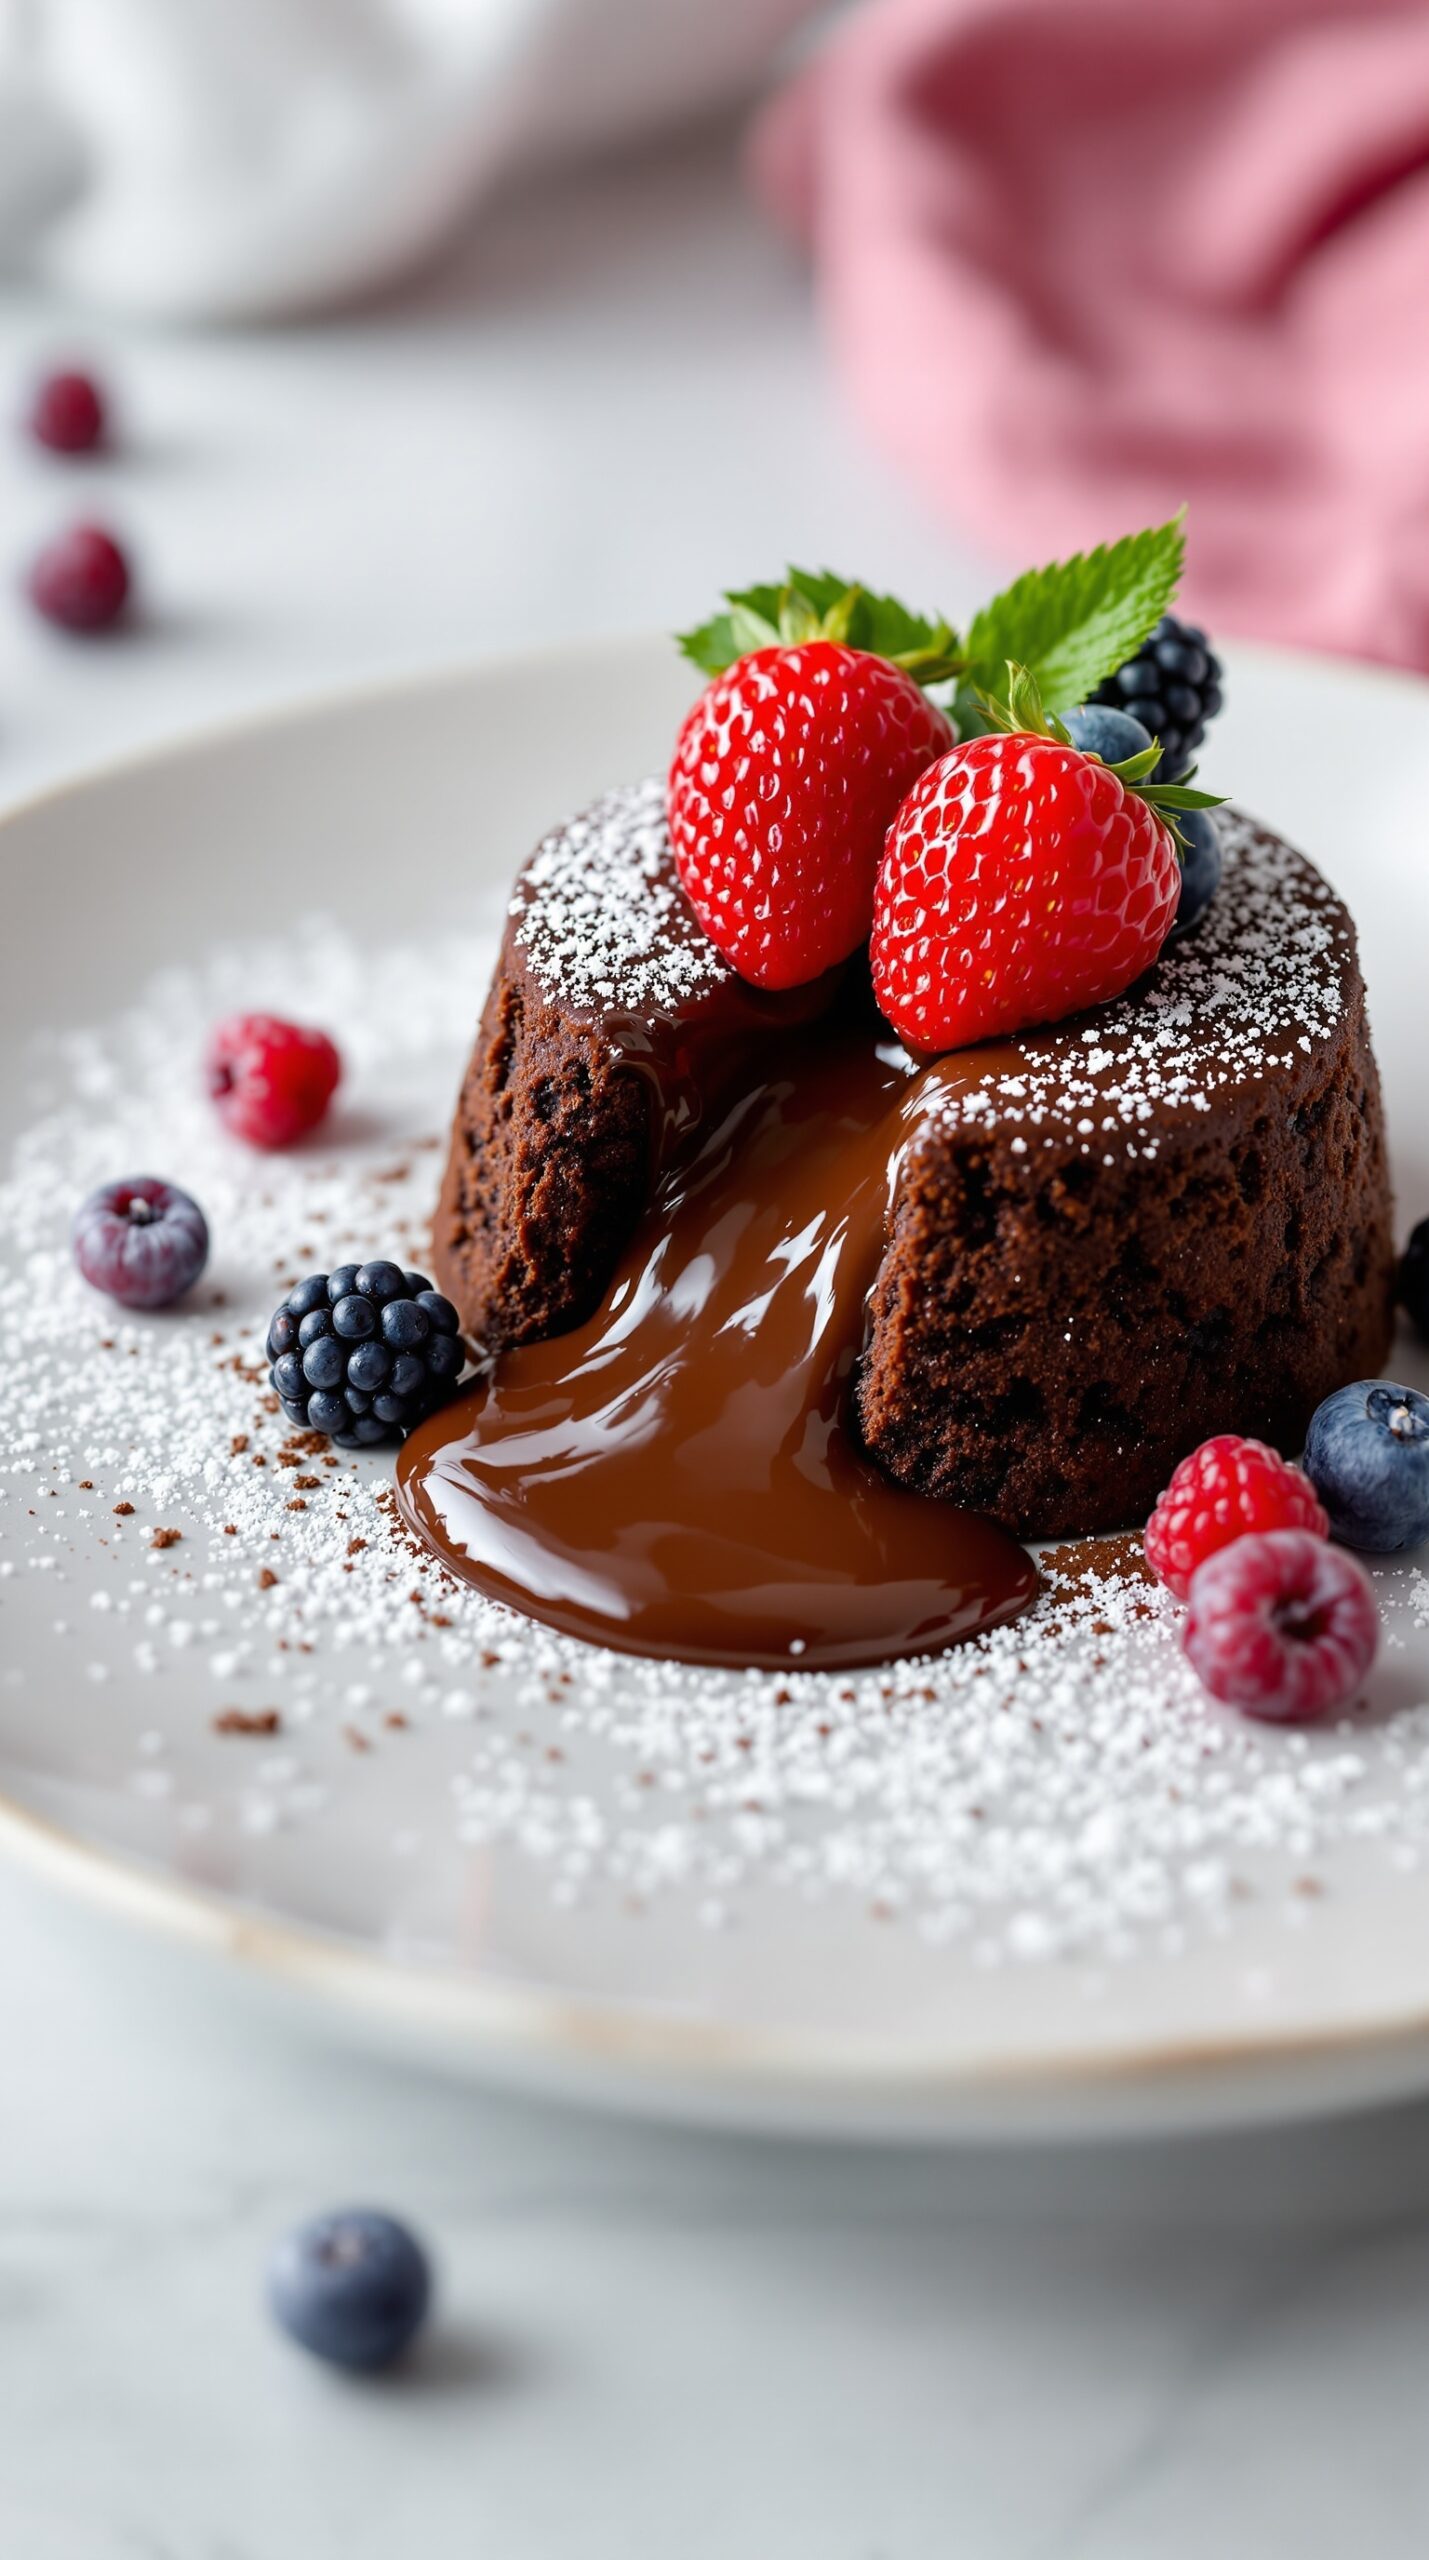
Chocolate lava cake is a true treat for chocolate lovers. This dessert features a rich, molten center that flows out when you cut into it. The exterior is soft and slightly crispy, creating a delightful contrast. Topped with fresh berries and a dusting of powdered sugar, it looks as good as it tastes!
Making this cake is easier than you might think. With just a few ingredients, you can whip up a dessert that impresses everyone. Serve it warm with a scoop of vanilla ice cream for an extra special touch.
Ingredients
- 1/2 cup unsalted butter
- 1 cup semi-sweet chocolate chips
- 2 large eggs
- 2 large egg yolks
- 1/4 cup granulated sugar
- 2 tablespoons all-purpose flour
- 1/4 teaspoon salt
- Powdered sugar for dusting
- Fresh berries for garnish
Instructions
- Preheat your oven to 425°F (220°C). Grease four ramekins with butter and dust with flour.
- In a microwave-safe bowl, melt the butter and chocolate chips together. Stir until smooth.
- In another bowl, whisk together the eggs, egg yolks, and sugar until well combined. Add the melted chocolate mixture and mix until smooth.
- Gently fold in the flour and salt until just combined.
- Pour the batter evenly into the prepared ramekins. Place them on a baking sheet.
- Bake for 12-14 minutes, until the edges are firm but the center is soft.
- Let them cool for 1 minute, then carefully invert onto plates. Dust with powdered sugar and garnish with fresh berries.
Apple Crisp with Oat Topping
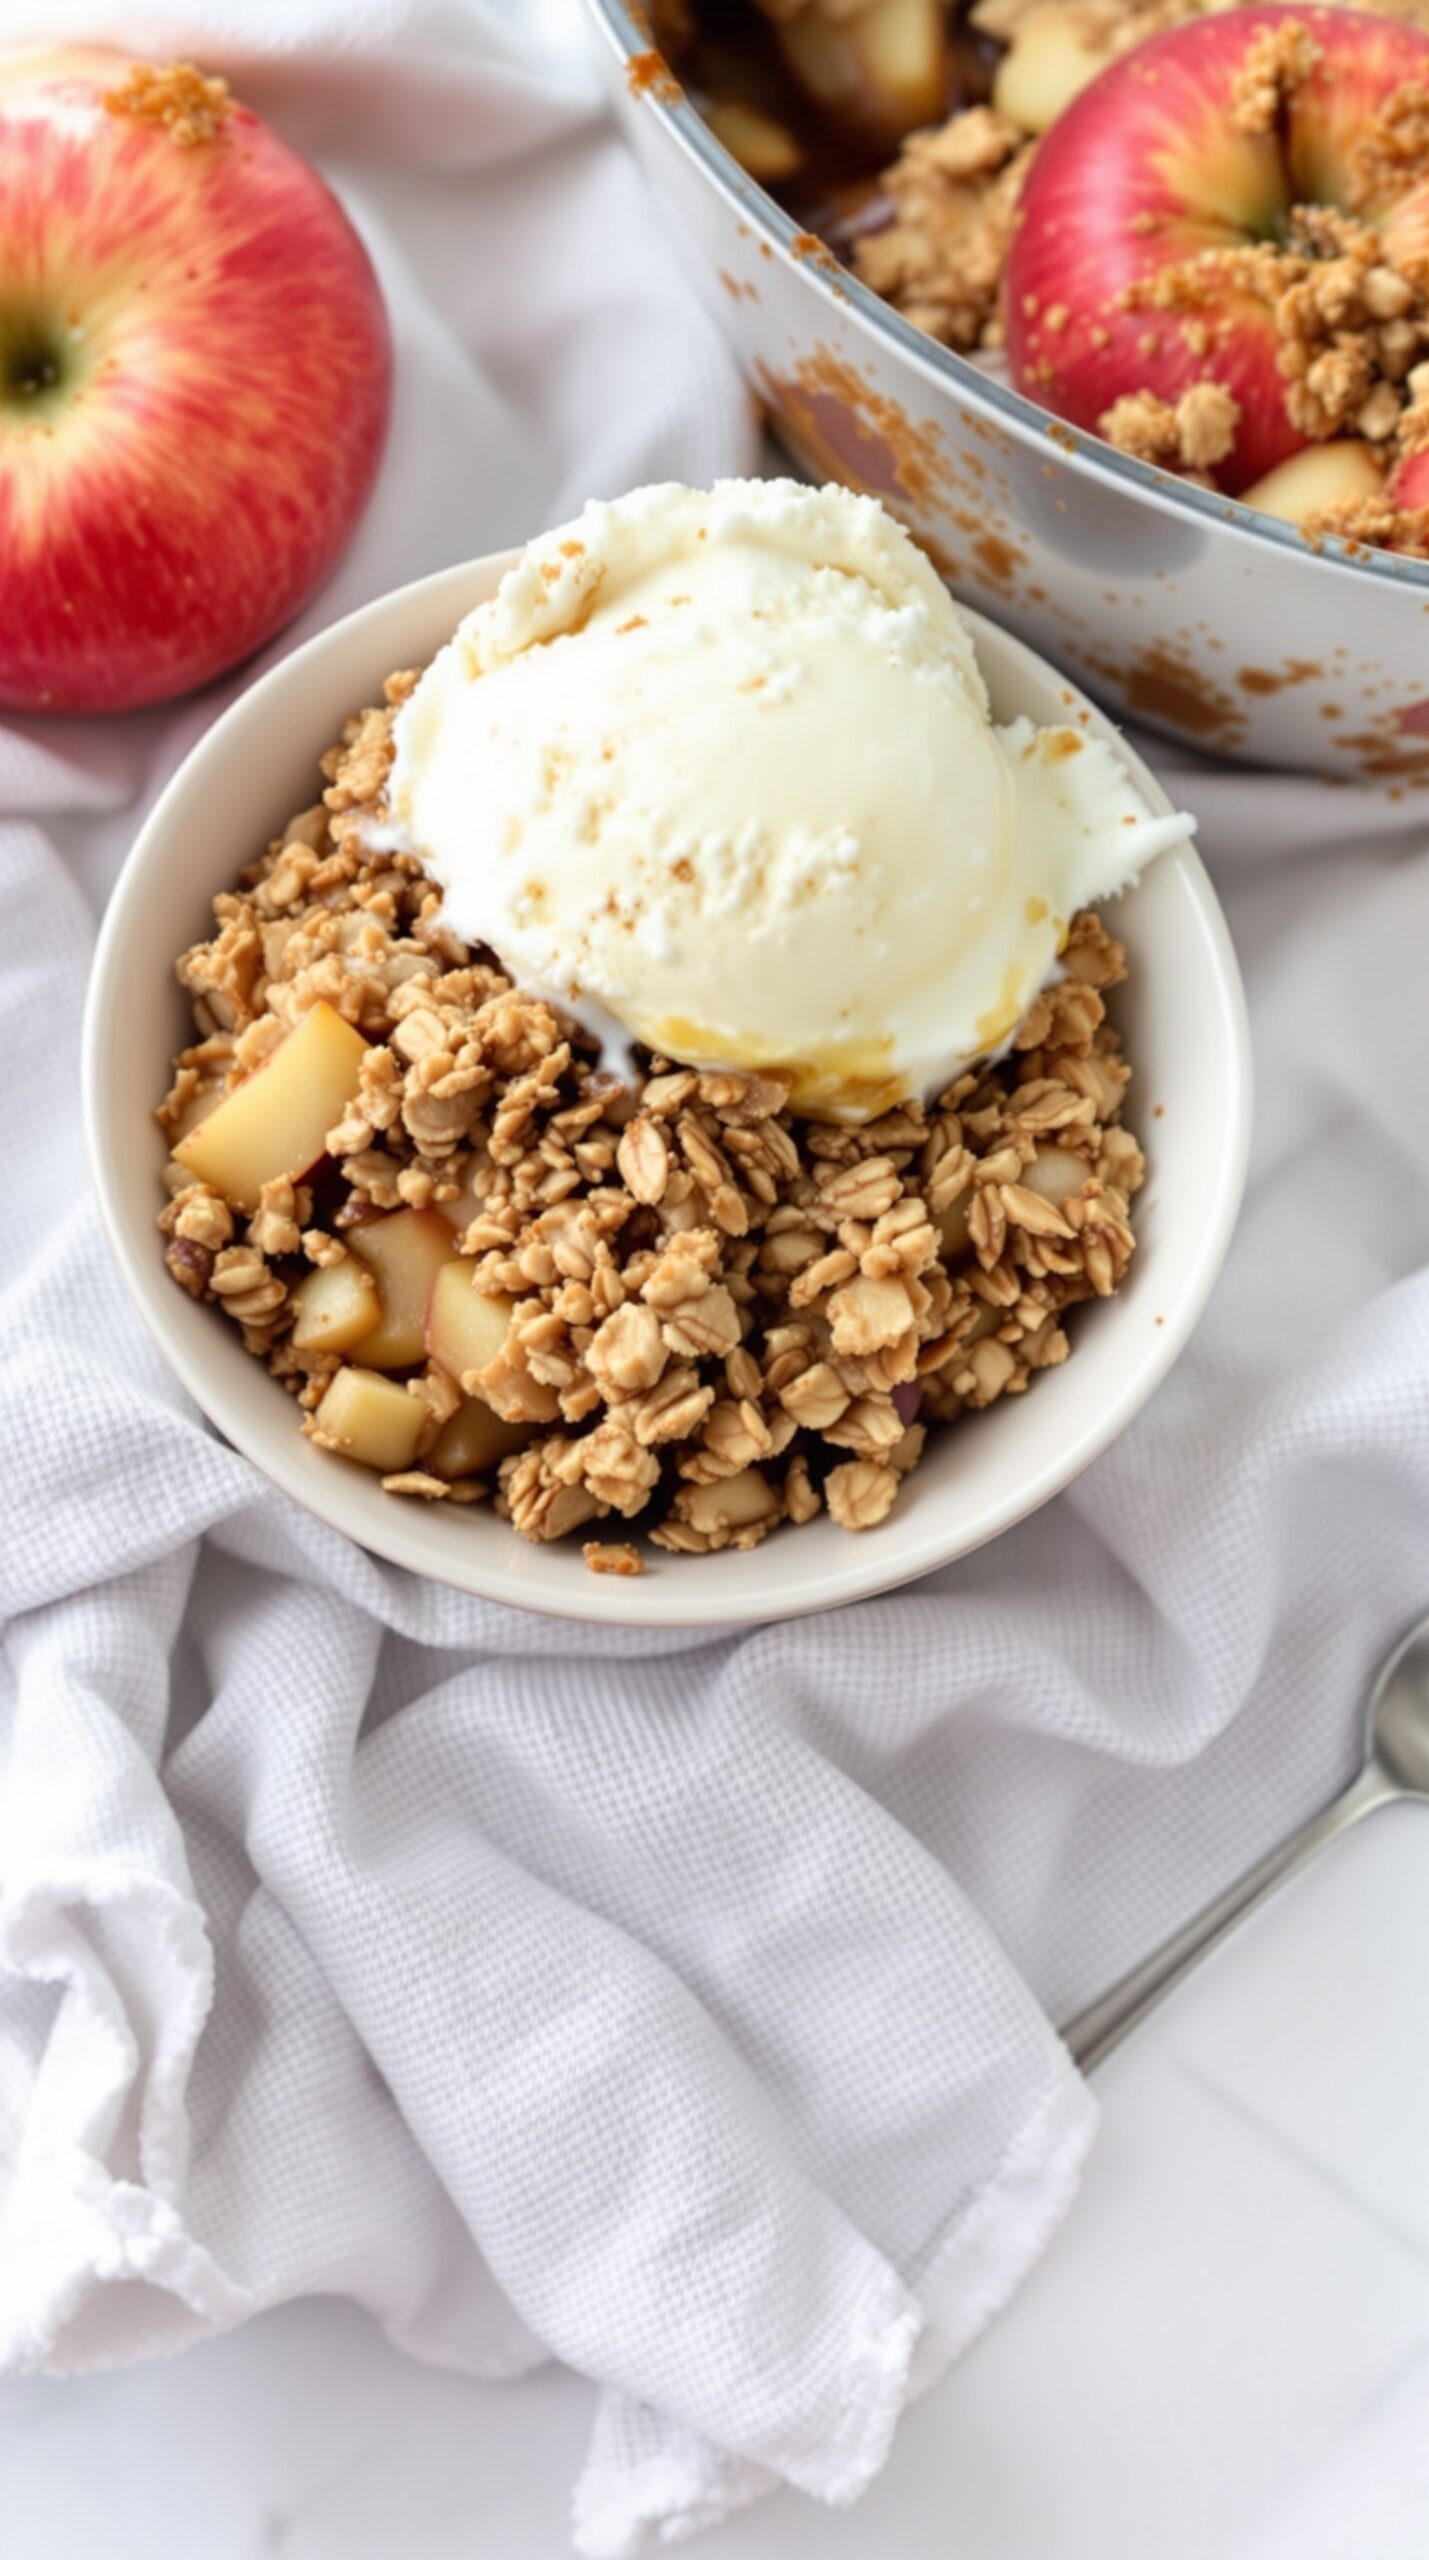
Apple Crisp with Oat Topping is a classic dessert that brings warmth and comfort. The image shows a delicious bowl filled with baked apples, topped with a crunchy oat mixture. A scoop of vanilla ice cream sits on top, melting slightly into the warm apples, making it even more inviting.
This dessert is perfect for any occasion, especially during the fall when apples are in season. The combination of sweet, soft apples and the crispy oat topping creates a delightful texture that everyone loves. Plus, it’s easy to make, so you can whip it up for family gatherings or a cozy night in.
Let’s dive into the recipe so you can enjoy this tasty treat at home!
Ingredients
- 6 cups apples, peeled and sliced
- 1 cup brown sugar
- 1 teaspoon cinnamon
- 1 tablespoon lemon juice
- 1 cup rolled oats
- 1 cup all-purpose flour
- 1/2 cup granulated sugar
- 1/2 cup unsalted butter, melted
- 1/4 teaspoon salt
Instructions
- Preheat your oven to 350°F (175°C).
- In a large bowl, combine the sliced apples, brown sugar, cinnamon, and lemon juice. Mix well and spread the mixture in a greased baking dish.
- In another bowl, mix the oats, flour, granulated sugar, melted butter, and salt until crumbly. Sprinkle this mixture evenly over the apples.
- Bake for 30-35 minutes, or until the topping is golden brown and the apples are bubbly.
- Serve warm, topped with a scoop of vanilla ice cream for the perfect finish!
Churros with Chocolate Dipping Sauce
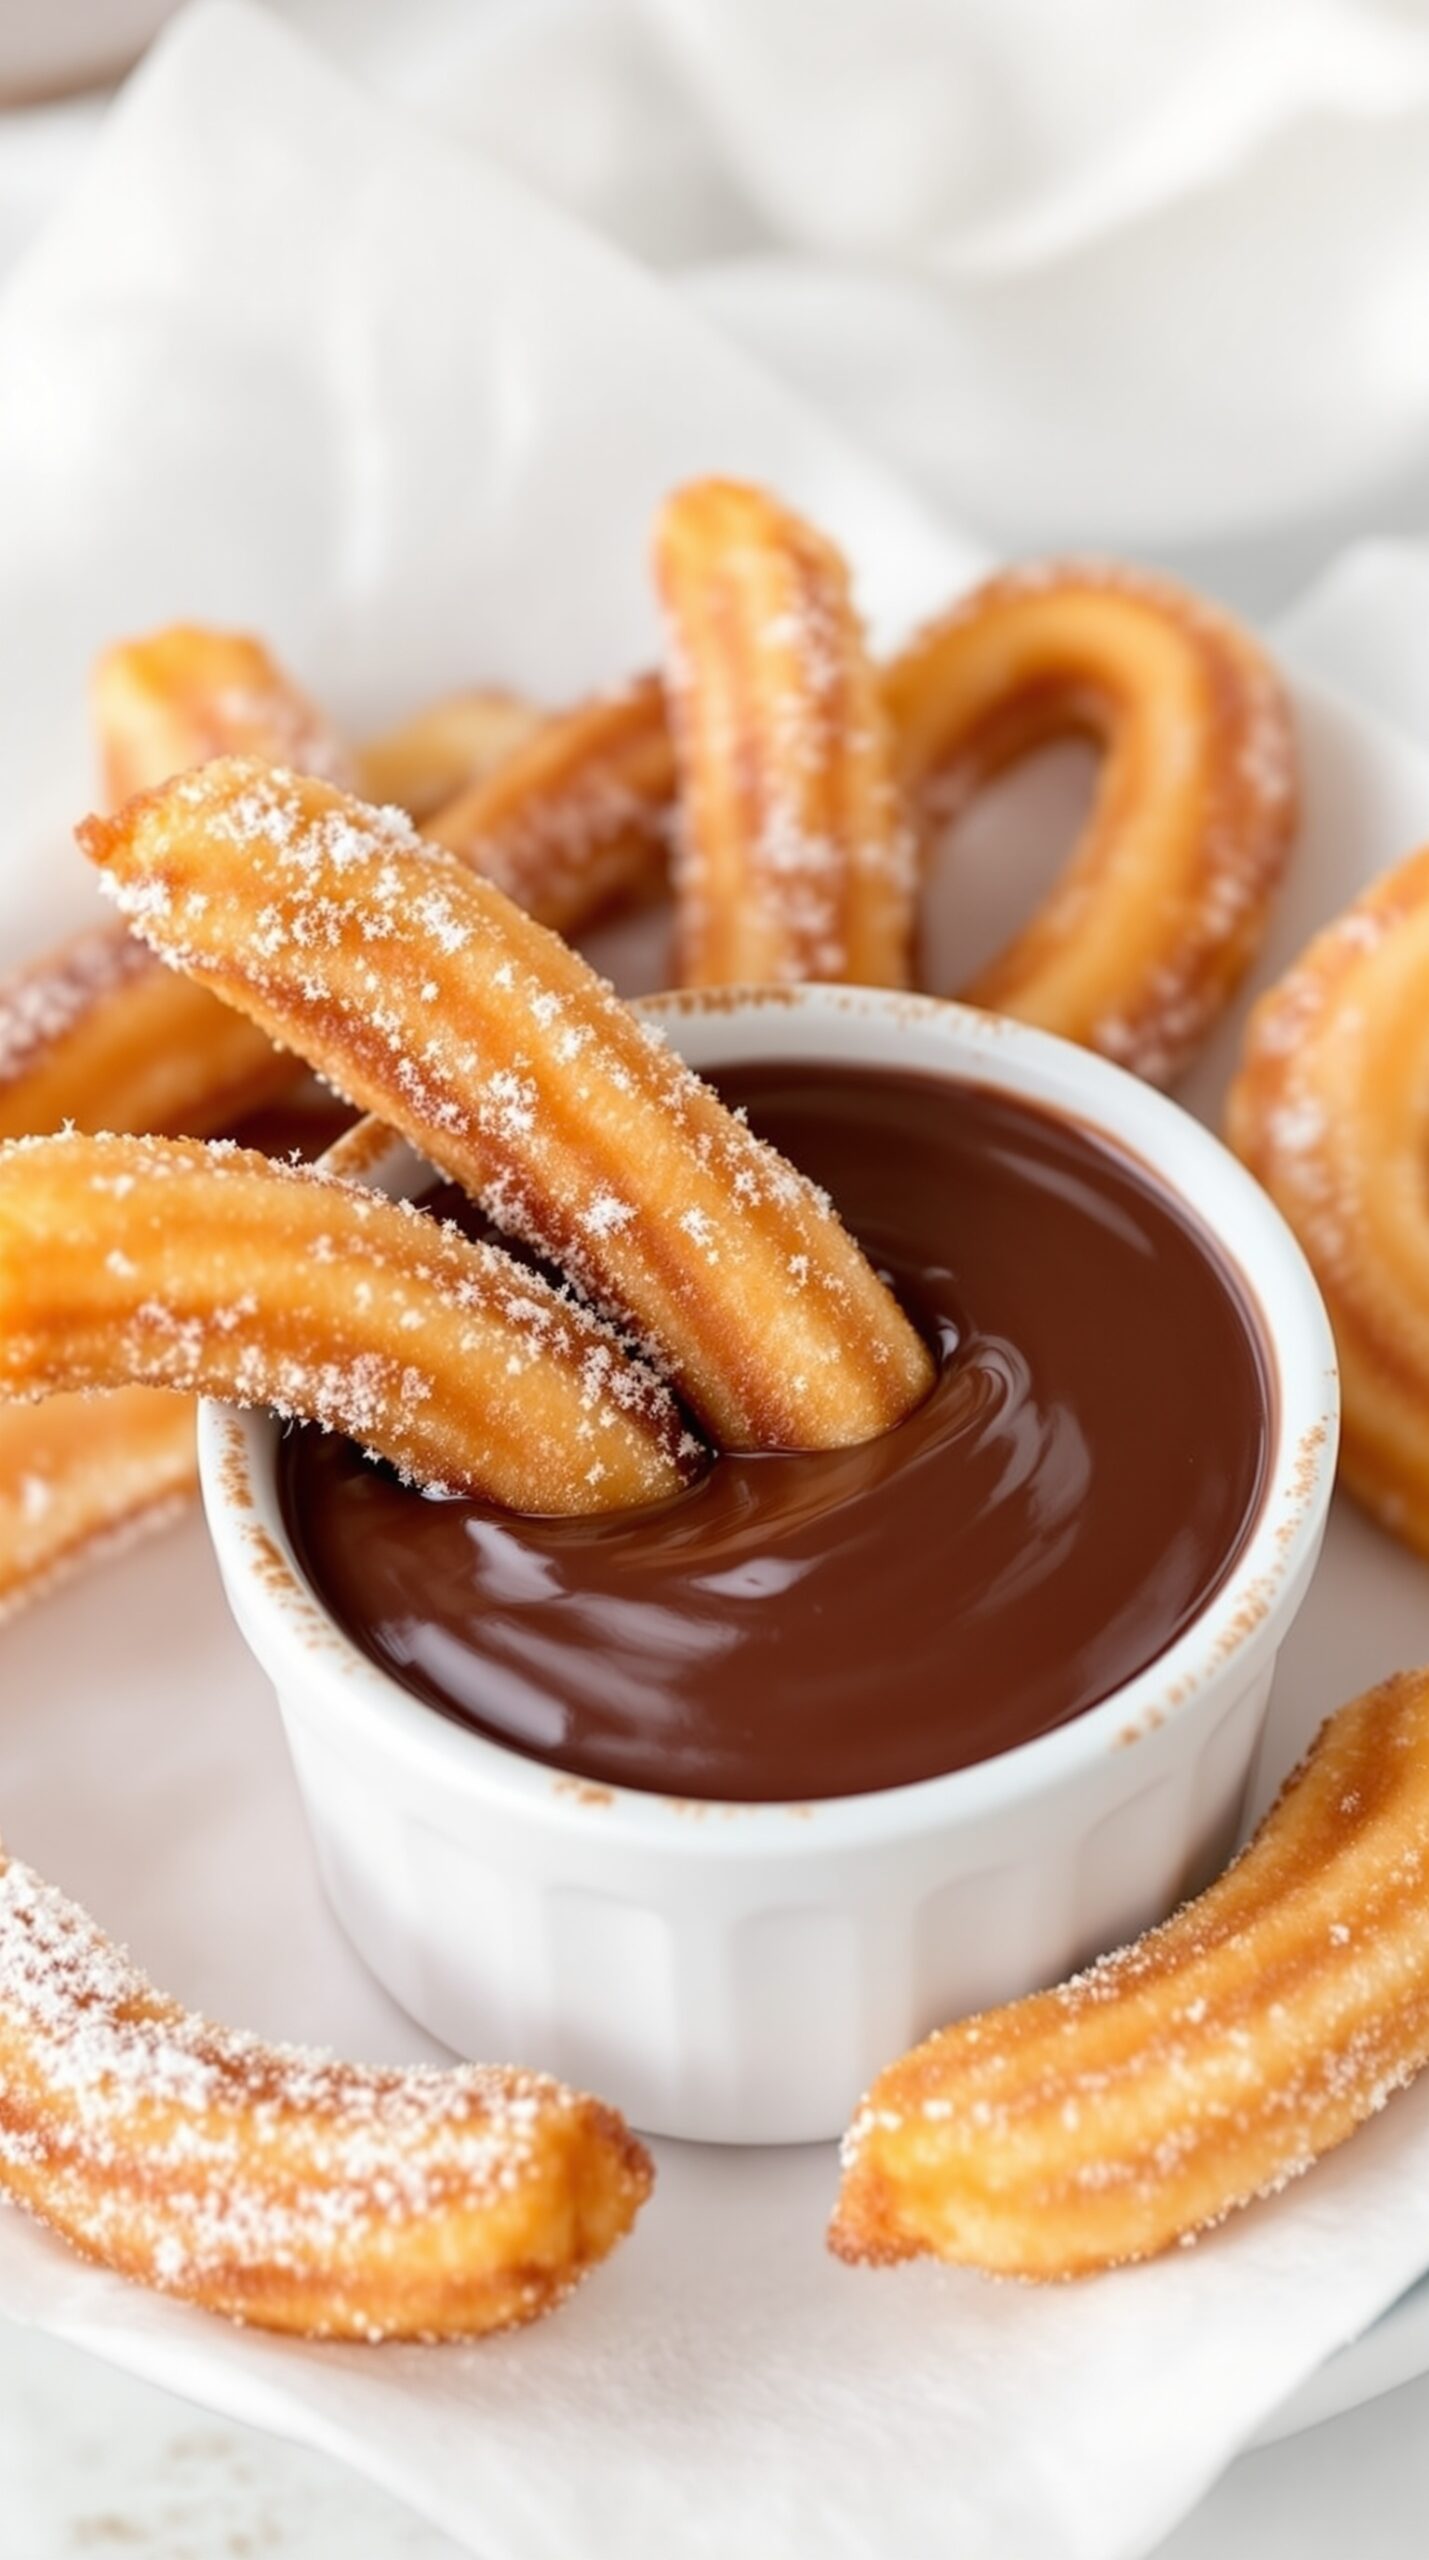
Churros are a delightful treat that brings joy to any dessert table. These crispy, golden pastries are rolled in sugar and served with a rich chocolate dipping sauce. The combination of textures is simply irresistible. The churros are crunchy on the outside and soft on the inside, making them perfect for dipping.
To make churros, you only need a few simple ingredients. The chocolate sauce is easy to whip up and complements the churros perfectly. Whether you’re hosting a gathering or just treating yourself, churros with chocolate sauce are sure to impress.
Ingredients
- 1 cup water
- 2 tablespoons granulated sugar
- 1/2 teaspoon salt
- 1 cup all-purpose flour
- 2 large eggs
- 1/4 cup vegetable oil (for frying)
- 1/2 cup granulated sugar (for coating)
- 1 teaspoon ground cinnamon
- 1 cup semi-sweet chocolate chips
- 1/2 cup heavy cream
Instructions
- Make the Churro Dough: In a saucepan, combine water, 2 tablespoons sugar, and salt. Bring to a boil. Remove from heat and stir in flour until a dough forms.
- Add Eggs: Let the dough cool slightly, then mix in the eggs one at a time until smooth.
- Heat Oil: In a deep skillet, heat vegetable oil over medium heat.
- Pipe Churros: Transfer the dough to a piping bag fitted with a star tip. Pipe strips of dough into the hot oil, cutting them to your desired length.
- Fry: Fry churros until golden brown, about 2-3 minutes on each side. Remove and drain on paper towels.
- Coat: Mix 1/2 cup sugar with cinnamon. Roll churros in the mixture while still warm.
- Make Chocolate Sauce: In a small saucepan, heat heavy cream until just simmering. Remove from heat and stir in chocolate chips until melted and smooth.
- Serve: Arrange churros on a plate with a bowl of chocolate sauce for dipping.