
Fall is the perfect time to gather around with friends and family while enjoying some tasty appetizers that reflect the season.
From comforting flavors to seasonal ingredients, these bite-sized treats are sure to warm up your gatherings and set the mood for cozy nights. Get ready to impress your guests with a variety of quick and scrumptious recipes just right for autumn!
Maple Bacon Brussels Sprouts Skewers
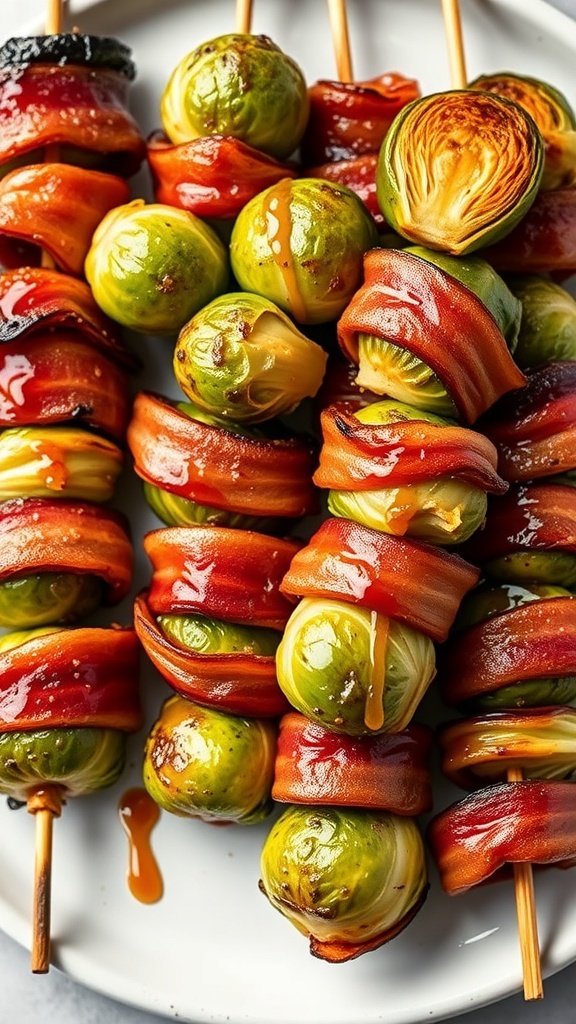
These Maple Bacon Brussels Sprouts Skewers are a perfect fall appetizer. They combine the earthy taste of Brussels sprouts with the savory goodness of bacon, all drizzled with a sweet maple glaze. The skewers not only make for easy serving but also add a fun twist to your appetizer spread.
To make these tasty bites, start by wrapping each Brussels sprout with a slice of bacon. The bacon adds a crispy texture and rich flavor that complements the sprouts beautifully. Once wrapped, thread them onto skewers for easy grilling or baking.
As they cook, the bacon crisps up and the Brussels sprouts become tender. The maple syrup adds a sweet finish that ties everything together, making these skewers irresistible. Perfect for gatherings, they are sure to impress your guests!
Ingredients
- 1 pound Brussels sprouts
- 8 slices of bacon
- 1/4 cup maple syrup
- Salt and pepper to taste
- Wooden skewers (soaked in water for 30 minutes)
Instructions
- Preheat your grill or oven to 400°F (200°C).
- Trim the ends of the Brussels sprouts and remove any outer leaves. Blanch them in boiling water for about 5 minutes, then drain and let cool.
- Wrap each Brussels sprout with a slice of bacon, securing it with a toothpick if necessary.
- Thread the wrapped sprouts onto the soaked skewers.
- Brush the skewers with maple syrup and season with salt and pepper.
- Grill or bake for 20-25 minutes, turning occasionally, until the bacon is crispy and the sprouts are tender.
- Drizzle with additional maple syrup before serving. Enjoy!
Apple and Cheddar Crostini

Apple and cheddar crostini is a delightful fall appetizer that combines sweet and savory flavors. The crispness of fresh apples pairs perfectly with the sharpness of cheddar cheese, all layered on a crunchy slice of toasted bread. This dish not only looks beautiful but also brings a cozy vibe to any gathering.
To make these crostini, start with a good quality bread. A baguette or sourdough works well. Toast it until golden brown, then spread a layer of creamy cheese. Top with thinly sliced apples, a drizzle of honey, and a sprinkle of walnuts for added crunch. This simple yet elegant appetizer is sure to impress your guests!
Ingredients
- 1 baguette, sliced into 1/2-inch pieces
- 8 oz sharp cheddar cheese, sliced
- 2 apples, thinly sliced (preferably a sweet variety)
- 1/4 cup honey
- 1/2 cup walnuts, chopped
- Olive oil for drizzling
Instructions
- Preheat your oven to 375°F (190°C).
- Arrange the baguette slices on a baking sheet and drizzle with olive oil. Toast in the oven for about 10 minutes, or until golden brown.
- Once toasted, remove the bread from the oven and let it cool slightly.
- Spread a slice of cheddar cheese on each piece of bread.
- Top with a few slices of apple, then drizzle with honey.
- Sprinkle chopped walnuts on top for added texture.
- Serve immediately and enjoy the delightful combination of flavors!
Roasted Pumpkin Hummus with Pita Chips
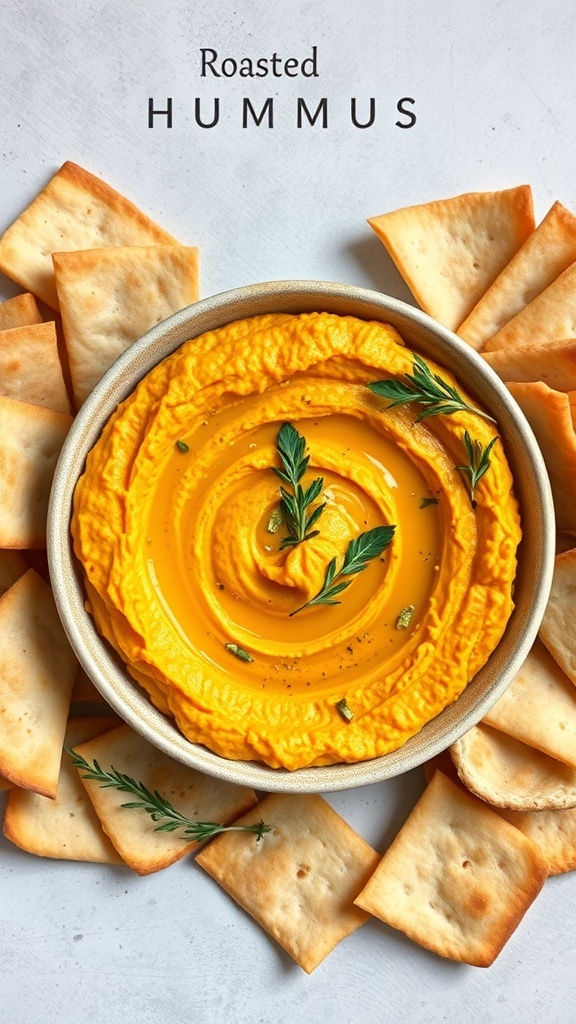
Fall is the perfect time to enjoy cozy flavors, and roasted pumpkin hummus fits right in. This creamy dip is not only delicious but also visually stunning with its vibrant orange hue. Surrounded by crispy pita chips, it makes for an inviting appetizer at any gathering.
The hummus is made from roasted pumpkin, which adds a sweet and earthy flavor. Blending it with tahini, garlic, and lemon juice creates a smooth texture that pairs perfectly with the crunch of pita chips. This dish is a crowd-pleaser, ideal for sharing with friends and family.
To make it even more appealing, you can garnish the hummus with fresh herbs or a drizzle of olive oil. The contrast of the creamy dip and crispy chips is simply delightful. So, whether you’re hosting a fall party or just enjoying a cozy night in, this roasted pumpkin hummus is a must-try!
Ingredients
- 1 cup roasted pumpkin puree
- 1/4 cup tahini
- 2 tablespoons olive oil
- 1 clove garlic, minced
- 2 tablespoons lemon juice
- 1/2 teaspoon ground cumin
- Salt and pepper to taste
- Pita chips for serving
Instructions
- Prepare the Pumpkin: If using fresh pumpkin, roast it at 400°F (200°C) for about 25-30 minutes until tender. Let it cool and scoop out the flesh.
- Blend the Ingredients: In a food processor, combine the roasted pumpkin puree, tahini, olive oil, garlic, lemon juice, cumin, salt, and pepper. Blend until smooth.
- Taste and Adjust: Check the seasoning and add more salt, pepper, or lemon juice if needed.
- Serve: Transfer the hummus to a serving bowl. Drizzle with olive oil and sprinkle with fresh herbs if desired. Serve with pita chips.
Stuffed Mini Peppers with Quinoa
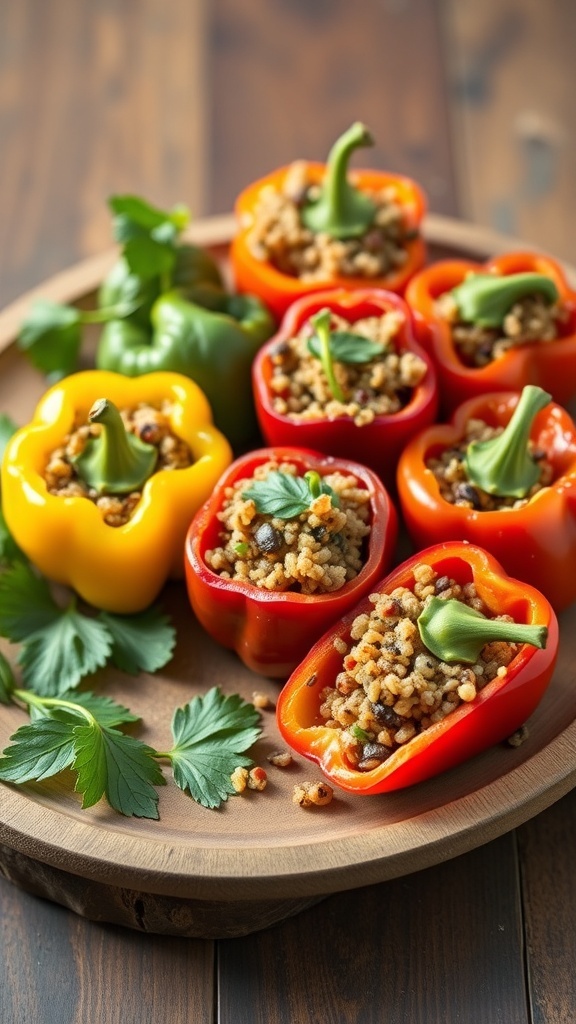
Stuffed mini peppers are a delightful way to enjoy fall flavors. These colorful little gems are not only visually appealing but also packed with nutrients. The combination of quinoa and spices creates a hearty filling that complements the sweetness of the peppers perfectly.
To make these stuffed mini peppers, you’ll need a few simple ingredients. Start with mini bell peppers in vibrant colors like red, yellow, and green. The filling consists of cooked quinoa, black beans, corn, diced tomatoes, and a mix of spices. This blend gives each bite a burst of flavor!
Preparing these appetizers is straightforward. First, cook the quinoa according to package instructions. While it cooks, slice the mini peppers in half and remove the seeds. Once the quinoa is ready, mix it with the other filling ingredients. Stuff the peppers generously and place them on a baking sheet.
After baking, these stuffed mini peppers become tender and flavorful. They make for a perfect appetizer at any gathering or a tasty snack for yourself. Enjoy them warm or at room temperature!
Ingredients
- 12 mini bell peppers (red, yellow, and green)
- 1 cup cooked quinoa
- 1 can black beans, rinsed and drained
- 1 cup corn (fresh or frozen)
- 1 cup diced tomatoes
- 1 teaspoon cumin
- 1 teaspoon chili powder
- Salt and pepper to taste
- Fresh cilantro for garnish
Instructions
- Preheat your oven to 375°F (190°C).
- Cook the quinoa according to package instructions and set aside.
- Slice the mini peppers in half and remove the seeds.
- In a large bowl, combine the cooked quinoa, black beans, corn, diced tomatoes, cumin, chili powder, salt, and pepper.
- Stuff each pepper half with the quinoa mixture.
- Arrange the stuffed peppers on a baking sheet and bake for 20-25 minutes until the peppers are tender.
- Garnish with fresh cilantro before serving.
Savory Sweet Potato Bites
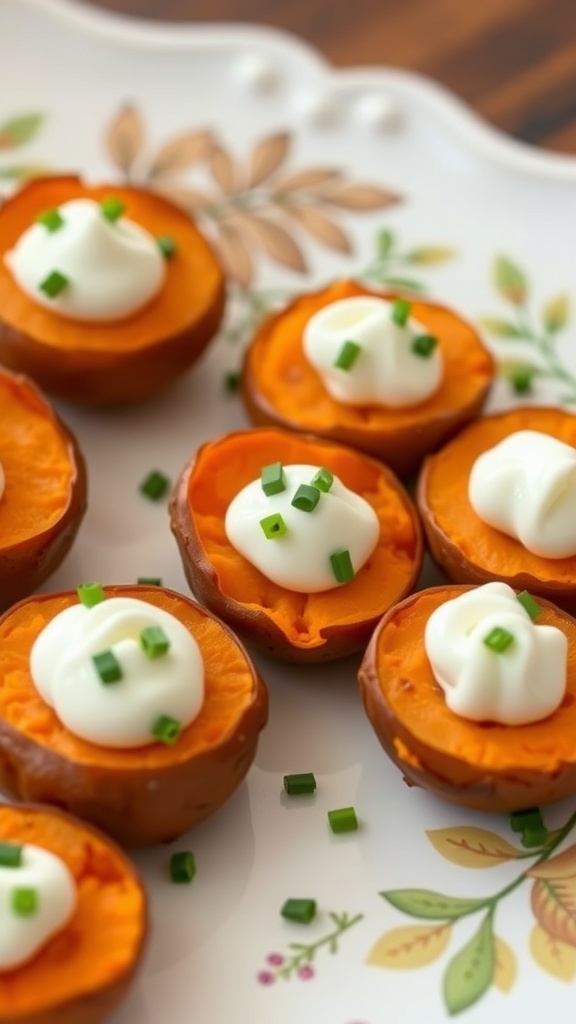
Sweet potato bites are a delightful addition to any fall gathering. These little treats combine the natural sweetness of sweet potatoes with a savory twist, making them perfect for appetizers. The image shows beautifully arranged sweet potato halves topped with a dollop of creamy goodness and a sprinkle of fresh chives. They look inviting and are sure to impress your guests.
Making these bites is simple and fun. Start by roasting sweet potatoes until they are tender. Once cooled, scoop out the insides and mix them with your favorite seasonings. Then, refill the skins with this mixture, top with sour cream or Greek yogurt, and finish with chives for that extra pop of flavor.
These savory sweet potato bites are not only tasty but also add a splash of color to your table. They are a great way to showcase seasonal ingredients while keeping things light and delicious. Perfect for parties or just a cozy night in!
Ingredients
- 2 large sweet potatoes
- 1/2 cup sour cream or Greek yogurt
- 1/4 cup shredded cheese (cheddar or your choice)
- 1 tablespoon olive oil
- Salt and pepper to taste
- Chopped chives for garnish
Instructions
- Preheat your oven to 400°F (200°C).
- Wash and pierce the sweet potatoes with a fork. Bake them for about 45 minutes, or until tender.
- Once cooled, cut the sweet potatoes in half and scoop out the insides into a bowl.
- Add sour cream, cheese, olive oil, salt, and pepper to the sweet potato flesh. Mix until smooth.
- Refill the sweet potato skins with the mixture and place them back on a baking sheet.
- Bake for an additional 10 minutes to warm through.
- Top with chopped chives before serving.
Butternut Squash and Sage Risotto Balls

Fall is the perfect time to enjoy cozy flavors, and these Butternut Squash and Sage Risotto Balls are a delightful way to celebrate the season. Imagine golden, crispy balls filled with creamy risotto, bursting with the earthy taste of butternut squash and the aromatic hint of sage. They make a fantastic appetizer for gatherings or a tasty snack while watching your favorite fall movies.
These risotto balls are not just delicious; they’re also fun to make! Start with a base of creamy risotto, then mix in roasted butternut squash and fresh sage. Once you form them into balls, a quick dip in breadcrumbs gives them that perfect crunch. Serve them with a side of marinara or your favorite dipping sauce for an extra kick!
Ingredients
- 1 cup arborio rice
- 4 cups vegetable broth
- 1 cup butternut squash, roasted and mashed
- 1 small onion, finely chopped
- 2 cloves garlic, minced
- 1/2 cup grated Parmesan cheese
- 1/4 cup fresh sage, chopped
- 1/2 cup breadcrumbs
- 1/4 cup all-purpose flour
- 2 large eggs
- Salt and pepper to taste
- Oil for frying
Instructions
- Cook the Risotto: In a saucepan, heat the vegetable broth and keep it warm. In another pot, sauté the onion and garlic until soft. Add the arborio rice and stir for a couple of minutes. Gradually add the warm broth, one ladle at a time, stirring frequently until the rice is creamy and al dente.
- Mix in Squash and Sage: Once the risotto is cooked, remove it from heat. Stir in the mashed butternut squash, chopped sage, and Parmesan cheese. Season with salt and pepper. Let it cool completely.
- Form the Balls: Once cooled, take a small amount of the risotto mixture and form it into balls. Roll each ball in flour, dip in beaten eggs, and then coat with breadcrumbs.
- Fry the Balls: Heat oil in a frying pan over medium heat. Fry the risotto balls until golden brown on all sides. Remove and drain on paper towels.
- Serve: Enjoy warm with marinara sauce or your favorite dip!
Caramelized Onion and Goat Cheese Tart
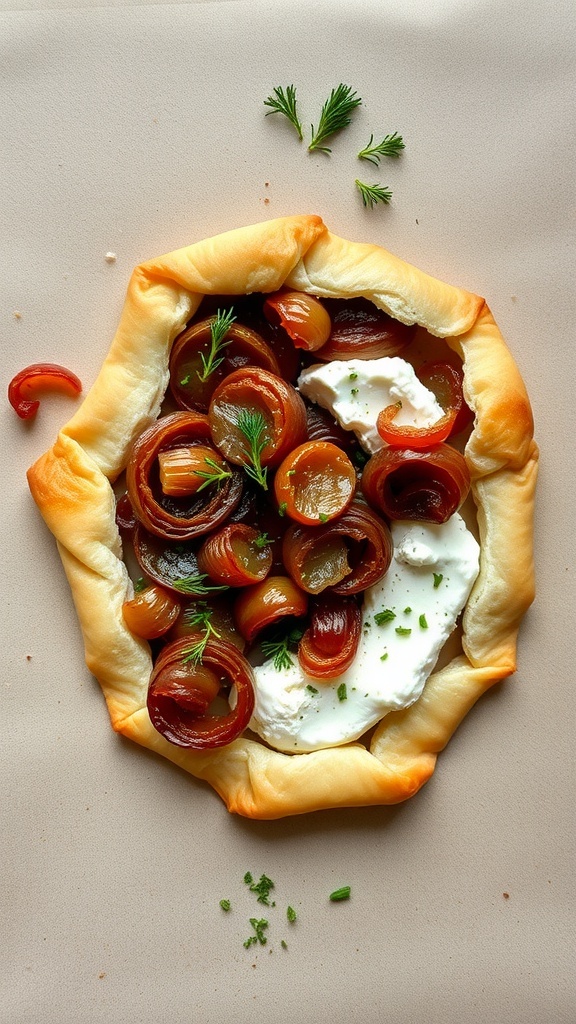
This Caramelized Onion and Goat Cheese Tart is a delightful treat for fall gatherings. The tart features a golden, flaky crust that cradles sweet, caramelized onions. These onions bring a rich flavor that pairs perfectly with the creamy goat cheese. Fresh herbs add a touch of brightness, making each bite a little celebration of autumn.
To make this tart, start by rolling out your dough into a circle. Place it on a baking sheet lined with parchment paper. Spread a layer of goat cheese in the center, leaving a border around the edges. Top it with the caramelized onions, then fold the edges of the dough over the filling. Brush the crust with an egg wash for a beautiful golden finish.
This dish is not only easy to prepare but also looks stunning on any table. It’s perfect as an appetizer or even as a light main dish. Serve it warm, and watch it disappear!
Ingredients
- 1 sheet of puff pastry, thawed
- 2 large onions, thinly sliced
- 2 tablespoons olive oil
- 1 teaspoon sugar
- 4 ounces goat cheese, softened
- 1 egg, beaten (for egg wash)
- Fresh herbs (like thyme or parsley) for garnish
- Salt and pepper to taste
Instructions
- Preheat your oven to 400°F (200°C).
- In a skillet, heat olive oil over medium heat. Add the sliced onions, sugar, salt, and pepper. Cook, stirring occasionally, until the onions are caramelized, about 20-25 minutes.
- Roll out the puff pastry on a floured surface and transfer it to a baking sheet lined with parchment paper.
- Spread the softened goat cheese in the center of the pastry, leaving a 1-inch border around the edges.
- Top the goat cheese with the caramelized onions.
- Fold the edges of the pastry over the filling, pleating as necessary to create a rustic look.
- Brush the crust with the beaten egg.
- Bake for 25-30 minutes or until the pastry is golden brown.
- Garnish with fresh herbs before serving. Enjoy!
Cranberry Brie Bites

Cranberry Brie Bites are a delightful treat for any fall gathering. These little pastries are filled with creamy brie cheese and topped with sweet cranberry sauce, creating a perfect balance of flavors. The golden, flaky crust adds a lovely texture that complements the rich filling.
These bites are not just tasty; they are also visually appealing. Imagine a plate filled with these charming little cups, each glistening with a ruby-red cranberry topping. They make a fantastic appetizer that will impress your guests and keep the festive spirit alive.
Making these bites is simple and fun. You can use store-bought pastry dough to save time. Just cut it into small circles, place them in a muffin tin, and fill each cup with brie and cranberry sauce. Bake until golden, and you’ll have a warm, gooey treat ready to serve.
Ingredients
- 1 package of puff pastry (thawed)
- 1 wheel of brie cheese
- 1 cup cranberry sauce
- 1 egg (beaten, for egg wash)
- Fresh herbs (optional, for garnish)
Instructions
- Preheat your oven to 375°F (190°C).
- Roll out the puff pastry on a floured surface and cut it into small circles, about 3 inches in diameter.
- Place the pastry circles into a greased muffin tin, pressing them down gently.
- Cut the brie into small pieces and place a piece in each pastry cup.
- Top each with a spoonful of cranberry sauce.
- Brush the edges of the pastry with the beaten egg.
- Bake for 15-20 minutes or until the pastry is golden brown.
- Remove from the oven and let cool slightly. Garnish with fresh herbs if desired.
- Serve warm and enjoy!
Roasted Beet and Goat Cheese Salad
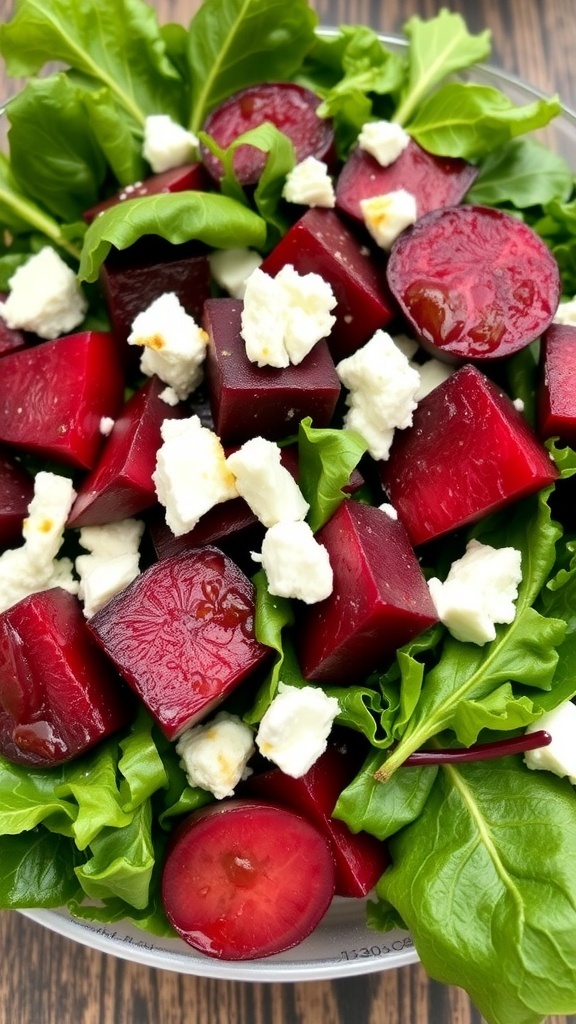
This roasted beet and goat cheese salad is a perfect fall appetizer. The vibrant colors of the beets against the fresh greens create a stunning presentation. The earthy sweetness of the beets pairs beautifully with the creamy tang of goat cheese, making each bite a delight.
To make this salad, you’ll need fresh beets, goat cheese, and a mix of greens. The beets are roasted until tender, then cut into cubes and tossed with the greens and crumbled goat cheese. A simple vinaigrette can tie everything together, adding a zesty finish.
This dish is not only visually appealing but also packed with nutrients. It’s a great way to enjoy seasonal produce while impressing your guests.
Ingredients
- 4 medium-sized beets
- 4 cups mixed greens (arugula, spinach, or your choice)
- 1/2 cup goat cheese, crumbled
- 2 tablespoons olive oil
- 1 tablespoon balsamic vinegar
- Salt and pepper to taste
Instructions
- Preheat your oven to 400°F (200°C). Wrap each beet in aluminum foil and place them on a baking sheet. Roast for about 45-60 minutes, or until tender.
- Once the beets are cool enough to handle, peel them and cut into cubes.
- In a large bowl, combine the mixed greens and roasted beet cubes.
- In a small bowl, whisk together olive oil, balsamic vinegar, salt, and pepper. Drizzle over the salad and toss gently.
- Top with crumbled goat cheese before serving.
Autumn Vegetable Platter with Dips
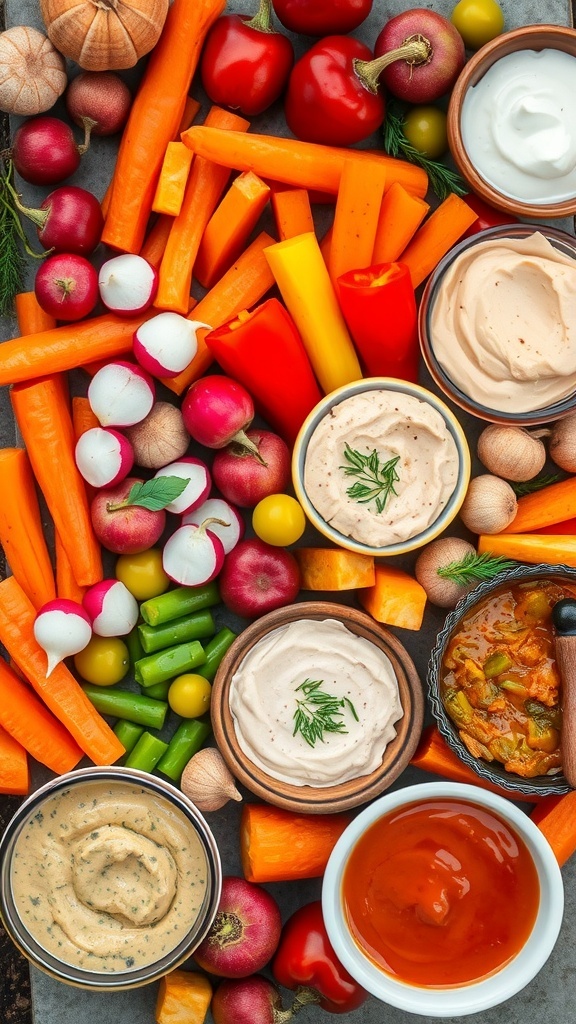
As the leaves change and the air turns crisp, an autumn vegetable platter is a perfect way to celebrate the season. This vibrant spread features a colorful array of fresh vegetables like carrots, bell peppers, radishes, and cherry tomatoes. Each veggie adds its own crunch and flavor, making it a delightful addition to any gathering.
The dips are just as important as the veggies. They add a creamy, tangy touch that complements the fresh produce beautifully. From classic ranch to zesty hummus, there’s something for everyone. This platter not only looks appealing but also offers a healthy snacking option for your guests.
Creating this platter is simple and fun. Just arrange the vegetables in a visually pleasing way and serve them alongside your favorite dips. It’s a great way to encourage everyone to munch on healthy snacks while enjoying the flavors of fall.
Ingredients
- 2 cups baby carrots
- 1 cup bell peppers, sliced (red, yellow, and orange)
- 1 cup radishes, halved
- 1 cup cherry tomatoes
- 1 cup cucumber, sliced
- 1 cup celery sticks
- 1 cup ranch dressing
- 1 cup hummus
- 1 cup tzatziki sauce
- 1 cup salsa
Instructions
- Prepare the Vegetables: Wash and cut the vegetables into bite-sized pieces. Arrange them on a large platter in groups for a colorful display.
- Prepare the Dips: In small bowls, pour the ranch dressing, hummus, tzatziki sauce, and salsa. Place the bowls around the vegetable platter.
- Serve: Enjoy the vegetable platter as a fresh appetizer at your fall gatherings. Encourage guests to mix and match veggies with different dips for a fun experience.
Spiced Pear and Gorgonzola Salad Bites
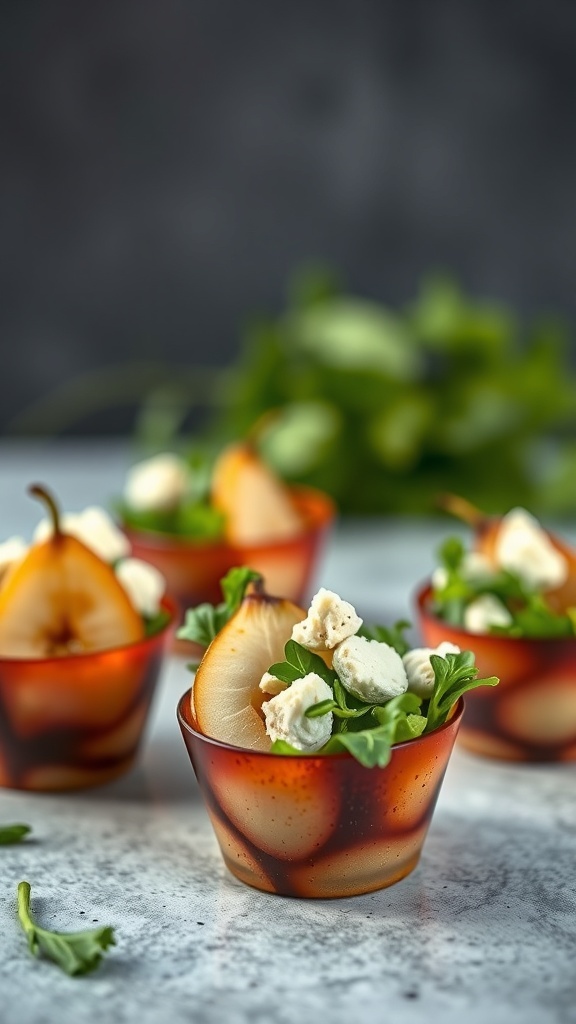
These spiced pear and Gorgonzola salad bites are a delightful way to celebrate fall flavors. The sweet, juicy pears pair perfectly with the tangy Gorgonzola cheese, creating a balance that’s hard to resist. Each bite is a mini explosion of taste, making them perfect for gatherings or cozy nights in.
The presentation is just as appealing as the taste. Served in small, elegant cups, these bites look stunning on any table. The vibrant colors of the pears and greens contrast beautifully with the creamy cheese, making them a feast for the eyes as well.
To make these bites, you’ll need fresh pears, Gorgonzola cheese, arugula, and a sprinkle of spices to enhance the flavors. They’re quick to prepare and can be assembled in no time, allowing you to enjoy more moments with your guests.
Ingredients
- 2 ripe pears, sliced
- 1 cup Gorgonzola cheese, crumbled
- 2 cups arugula
- 1 tablespoon honey
- 1 teaspoon cinnamon
- 1/2 teaspoon nutmeg
- Salt and pepper to taste
- Small cups for serving
Instructions
- Prepare the Pears: Slice the pears into thin wedges. If desired, drizzle with honey to enhance sweetness.
- Mix the Greens: In a bowl, combine arugula with a pinch of salt, pepper, cinnamon, and nutmeg. Toss gently to coat.
- Assemble the Bites: In each cup, layer arugula, a few pear slices, and top with crumbled Gorgonzola cheese.
- Serve: Arrange the cups on a platter and enjoy these tasty bites with friends and family!
Savory Cheese and Herb Scones

These savory cheese and herb scones are perfect for fall gatherings. They are golden, fluffy, and packed with flavor. The combination of cheese and fresh herbs makes them a delightful addition to any appetizer spread. Serve them warm with a side of your favorite dip or enjoy them on their own.
The scones are easy to make and require simple ingredients. You can customize them by adding your favorite cheese or herbs. They are great for brunch, a cozy evening snack, or as a starter for a dinner party.
Here’s how to whip up a batch of these tasty scones!
Ingredients
- 2 cups all-purpose flour
- 1 tablespoon baking powder
- 1/2 teaspoon salt
- 1/4 cup unsalted butter, cold and cubed
- 1 cup shredded cheese (cheddar or your choice)
- 1/4 cup fresh herbs (like chives or parsley), chopped
- 3/4 cup milk
Instructions
- Preheat your oven to 400°F (200°C). Line a baking sheet with parchment paper.
- In a large bowl, mix the flour, baking powder, and salt. Add the cold butter and mix until the mixture resembles coarse crumbs.
- Stir in the cheese and herbs. Pour in the milk and mix until just combined.
- Turn the dough onto a floured surface and gently knead it a few times. Pat it into a circle about 1 inch thick.
- Cut the dough into wedges and place them on the prepared baking sheet. Bake for 15-20 minutes or until golden brown.
- Let them cool slightly before serving. Enjoy your savory scones!
Mushroom and Spinach Stuffed Mushrooms
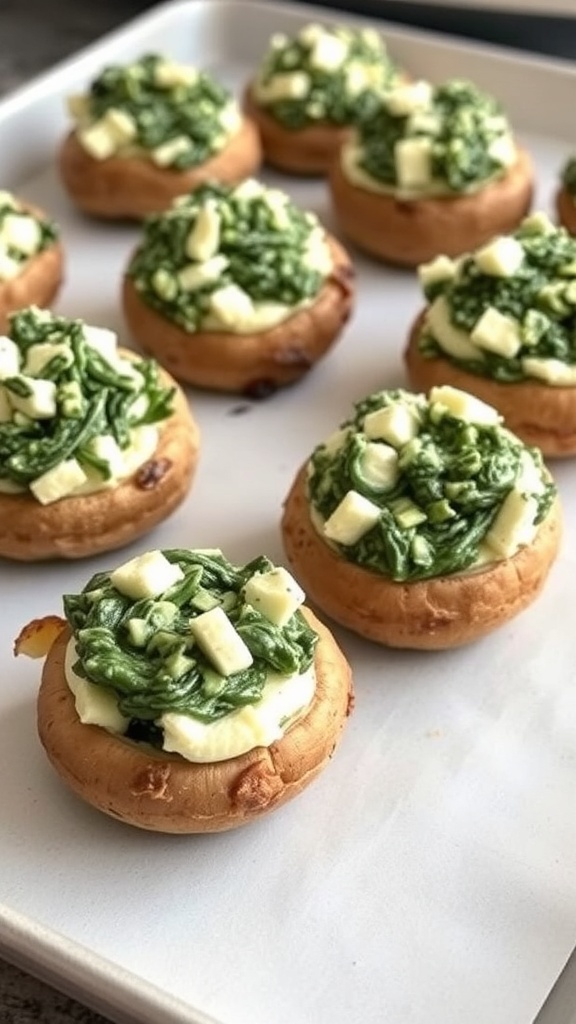
Mushroom and spinach stuffed mushrooms are a delightful treat for fall gatherings. These bite-sized appetizers are not only tasty but also visually appealing. The golden-brown mushroom caps are filled with a creamy spinach mixture, topped with small cubes of cheese that melt beautifully during baking.
These stuffed mushrooms are perfect for sharing. They bring warmth and comfort to any table, making them a great choice for your next get-together. The combination of earthy mushrooms and fresh spinach creates a wonderful flavor that everyone will enjoy.
Making these stuffed mushrooms is simple and fun. You can easily prepare them ahead of time and pop them in the oven just before your guests arrive. They are sure to impress!
Ingredients
- 12 large mushrooms, stems removed
- 2 cups fresh spinach, chopped
- 1/2 cup cream cheese, softened
- 1/4 cup grated Parmesan cheese
- 1/4 cup mozzarella cheese, cubed
- 2 cloves garlic, minced
- 1 tablespoon olive oil
- Salt and pepper to taste
Instructions
- Preheat your oven to 375°F (190°C).
- In a skillet, heat olive oil over medium heat. Add minced garlic and sauté for about 1 minute until fragrant.
- Add chopped spinach to the skillet and cook until wilted. Remove from heat and let cool slightly.
- In a bowl, mix the cooked spinach, cream cheese, Parmesan cheese, salt, and pepper until well combined.
- Stuff each mushroom cap generously with the spinach mixture. Top with cubed mozzarella cheese.
- Arrange the stuffed mushrooms on a baking sheet and bake for 20-25 minutes, or until the mushrooms are tender and the cheese is melted and bubbly.
- Serve warm and enjoy!
Pumpkin Spice Deviled Eggs

Fall is here, and what better way to celebrate than with a twist on a classic appetizer? Pumpkin Spice Deviled Eggs are a fun and festive choice for your gatherings. These delightful bites combine the creamy texture of traditional deviled eggs with the warm, cozy flavors of pumpkin spice.
The image showcases beautifully piped deviled eggs, topped with a sprinkle of paprika for that extra pop of color. The rich yellow filling hints at the pumpkin and spices, making them visually appealing and inviting. Fresh herbs in the background add a touch of greenery, enhancing the seasonal vibe.
These deviled eggs are not just tasty; they also bring a unique flavor profile that will surprise and delight your guests. Perfect for a fall party or a cozy family gathering, they are sure to be a hit!
Ingredients
- 6 large eggs
- 1/4 cup mayonnaise
- 2 tablespoons pumpkin puree
- 1 teaspoon Dijon mustard
- 1 teaspoon pumpkin pie spice
- Salt and pepper to taste
- Paprika for garnish
Instructions
- Hard boil the eggs: Place eggs in a pot and cover with water. Bring to a boil, then cover and remove from heat. Let sit for 12 minutes, then cool in ice water.
- Peel the eggs: Once cooled, peel the eggs and slice them in half lengthwise.
- Make the filling: Remove the yolks and place them in a bowl. Mash the yolks with mayonnaise, pumpkin puree, Dijon mustard, pumpkin pie spice, salt, and pepper until smooth.
- Fill the eggs: Spoon or pipe the yolk mixture back into the egg whites.
- Garnish: Sprinkle with paprika before serving.
Zucchini Fritters with Tzatziki Sauce

These zucchini fritters are a perfect fall appetizer. They are crispy on the outside and tender on the inside, making them a delightful treat for any gathering. The fritters are topped with a drizzle of sauce, adding a burst of flavor. Served alongside a creamy tzatziki sauce, they offer a refreshing contrast that everyone will love.
Making these fritters is simple and fun. Start by grating fresh zucchini and mixing it with eggs, flour, and spices. Then, pan-fry them until golden brown. The tzatziki sauce, made with yogurt, cucumber, garlic, and herbs, complements the fritters beautifully.
Ingredients
- 2 medium zucchinis, grated
- 1 teaspoon salt
- 1/2 cup all-purpose flour
- 2 large eggs
- 1/4 cup grated Parmesan cheese
- 1/2 teaspoon garlic powder
- 1/4 teaspoon black pepper
- 1/4 cup chopped fresh parsley
- Vegetable oil for frying
Instructions
- Prepare the Zucchini: Place grated zucchini in a bowl and sprinkle with salt. Let it sit for about 10 minutes, then squeeze out excess moisture.
- Mix Ingredients: In a large bowl, combine the drained zucchini, flour, eggs, Parmesan cheese, garlic powder, black pepper, and parsley. Stir until well mixed.
- Heat Oil: In a skillet, heat vegetable oil over medium heat.
- Fry Fritters: Drop spoonfuls of the zucchini mixture into the hot oil. Flatten slightly and cook for 3-4 minutes on each side until golden brown. Remove and drain on paper towels.
- Make Tzatziki Sauce: In a small bowl, mix 1 cup of Greek yogurt, 1/2 cup grated cucumber, 1 clove minced garlic, 1 tablespoon olive oil, and salt to taste.
- Serve: Arrange the fritters on a platter and serve warm with tzatziki sauce on the side.