Side dishes are the unsung heroes of any meal, adding flavor, texture, and color to our plates. From classic favorites like mashed potatoes and coleslaw to unique options such as roasted veggies or grain salads, these accompaniments can elevate your dining experience.
Whether you’re prepping for a casual family dinner or hosting a festive gathering, there’s a side dish out there to complement your main course perfectly.
Creamy Mashed Potatoes with Chives
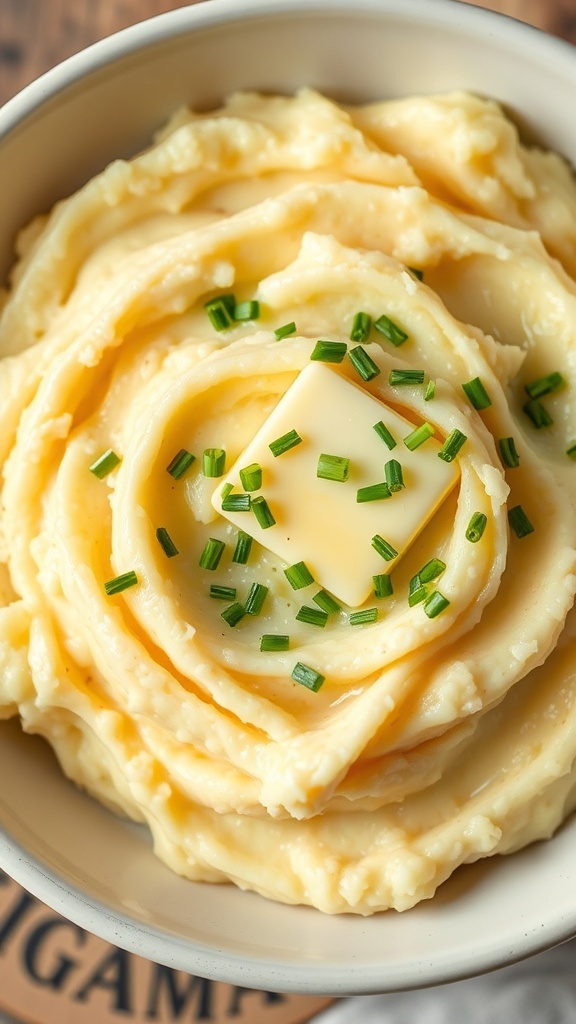
Creamy mashed potatoes are a classic side dish that never disappoints. The image shows a bowl of fluffy mashed potatoes, topped with a pat of butter and sprinkled with fresh chives. This dish is perfect for any meal, whether it’s a holiday feast or a casual dinner.
Making creamy mashed potatoes is simple and rewarding. The key is to use the right potatoes, like Yukon Gold or Russet, which give a smooth texture. Adding butter and cream makes them rich and indulgent, while chives add a fresh, mild onion flavor that brightens the dish.
Pair these mashed potatoes with your favorite protein, and you have a comforting meal that everyone will love. They’re versatile enough to complement roasted meats, grilled chicken, or even a vegetarian dish.
Ingredients
- 2 pounds Yukon Gold potatoes, peeled and cubed
- 1/2 cup unsalted butter
- 1/2 cup heavy cream
- Salt and pepper to taste
- 1/4 cup fresh chives, chopped
Instructions
- Boil the Potatoes: Place the cubed potatoes in a large pot and cover with cold water. Add a pinch of salt and bring to a boil. Cook until the potatoes are tender, about 15-20 minutes.
- Drain and Mash: Drain the potatoes and return them to the pot. Mash them using a potato masher or a ricer until smooth.
- Add Butter and Cream: Stir in the butter and heavy cream until fully incorporated. Season with salt and pepper to taste.
- Mix in Chives: Gently fold in the chopped chives for a burst of flavor.
- Serve: Transfer the mashed potatoes to a serving bowl, top with an extra pat of butter, and enjoy!
Mediterranean Quinoa Salad

This Mediterranean Quinoa Salad is a colorful and refreshing dish that brings together vibrant ingredients. The bright red cherry tomatoes pop against the fluffy quinoa, while the creamy feta adds a delightful contrast. Fresh herbs like mint and parsley elevate the flavors, making it a perfect side dish for any meal.
The salad is not only visually appealing but also packed with nutrients. Quinoa is a great source of protein, and the veggies add fiber and vitamins. Whether you’re hosting a gathering or just looking for a healthy option, this salad fits the bill.
Making this salad is simple and quick. Just cook the quinoa, chop your veggies, and mix everything together with a light dressing. It can be served chilled or at room temperature, making it versatile for any occasion.
Ingredients
- 1 cup quinoa
- 2 cups water
- 1 cup cherry tomatoes, halved
- 1 cucumber, diced
- 1/2 cup feta cheese, crumbled
- 1/4 cup black olives, sliced
- 1/4 cup fresh parsley, chopped
- 1/4 cup fresh mint, chopped
- 2 tablespoons olive oil
- 1 tablespoon lemon juice
- Salt and pepper to taste
Instructions
- Rinse the quinoa under cold water. In a pot, combine quinoa and water. Bring to a boil, then reduce heat and simmer for about 15 minutes until the quinoa is fluffy and water is absorbed.
- Let the quinoa cool. In a large bowl, combine the cooled quinoa, cherry tomatoes, cucumber, feta cheese, olives, parsley, and mint.
- In a small bowl, whisk together olive oil, lemon juice, salt, and pepper. Pour the dressing over the salad and toss to combine.
- Serve immediately or refrigerate for later. Enjoy your fresh Mediterranean Quinoa Salad!
Lemon Herb Couscous

Lemon Herb Couscous is a delightful side dish that brings a burst of freshness to any meal. The fluffy couscous, combined with zesty lemon and fragrant herbs, makes it a perfect companion for grilled meats or roasted vegetables. It’s simple to prepare and adds a vibrant touch to your dinner table.
The image showcases a bowl of light and fluffy couscous, garnished with fresh herbs. The bright yellow tones hint at the lemony flavor that elevates this dish. It’s not just about taste; it’s also visually appealing, making it a great choice for gatherings.
Making Lemon Herb Couscous is quick and easy. You can whip it up in no time, making it a go-to recipe for busy weeknights or special occasions.
Ingredients
- 1 cup couscous
- 1 1/4 cups vegetable or chicken broth
- 1 tablespoon olive oil
- 1 lemon (zest and juice)
- 1/4 cup fresh parsley, chopped
- 1/4 cup fresh mint, chopped
- Salt and pepper to taste
Instructions
- Boil the Broth: In a medium saucepan, bring the broth to a boil. Add the olive oil and a pinch of salt.
- Add Couscous: Stir in the couscous, cover, and remove from heat. Let it sit for about 5 minutes until the couscous absorbs the liquid.
- Fluff and Flavor: Use a fork to fluff the couscous. Add lemon zest, lemon juice, parsley, mint, salt, and pepper. Mix well.
- Serve: Transfer to a serving dish and enjoy warm or at room temperature.
Crispy Baked Sweet Potato Fries
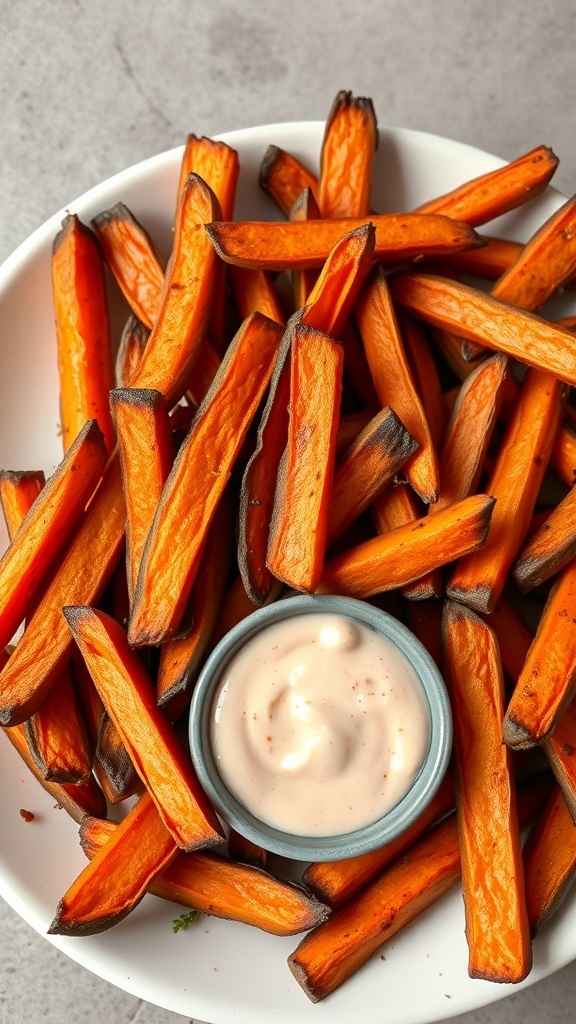
Crispy baked sweet potato fries are a fantastic side dish that brings a delightful crunch to any meal. Their vibrant orange color is not just eye-catching; it also hints at the natural sweetness and nutrition packed inside. These fries are a healthier alternative to regular fries, offering a satisfying texture without the guilt.
To make these tasty treats, you’ll want to start with fresh sweet potatoes. Slice them into even sticks to ensure they cook uniformly. Toss them in olive oil and your favorite spices for that extra kick. Baking them at a high temperature helps achieve that perfect crispiness.
These fries pair wonderfully with a variety of dips, like a zesty mayo or a tangy yogurt sauce. They’re perfect for snacking, serving at parties, or as a side for burgers and sandwiches. Once you try them, you might find yourself making them regularly!
Ingredients
- 2 large sweet potatoes
- 2 tablespoons olive oil
- 1 teaspoon paprika
- 1 teaspoon garlic powder
- Salt and pepper to taste
- Optional: your favorite dipping sauce
Instructions
- Preheat your oven to 425°F (220°C).
- Wash and peel the sweet potatoes, then cut them into thin, even sticks.
- In a large bowl, toss the sweet potato sticks with olive oil, paprika, garlic powder, salt, and pepper until evenly coated.
- Spread the fries out in a single layer on a baking sheet lined with parchment paper.
- Bake for 25-30 minutes, flipping halfway through, until they are golden brown and crispy.
- Serve hot with your favorite dipping sauce.
Garlic Parmesan Roasted Brussels Sprouts
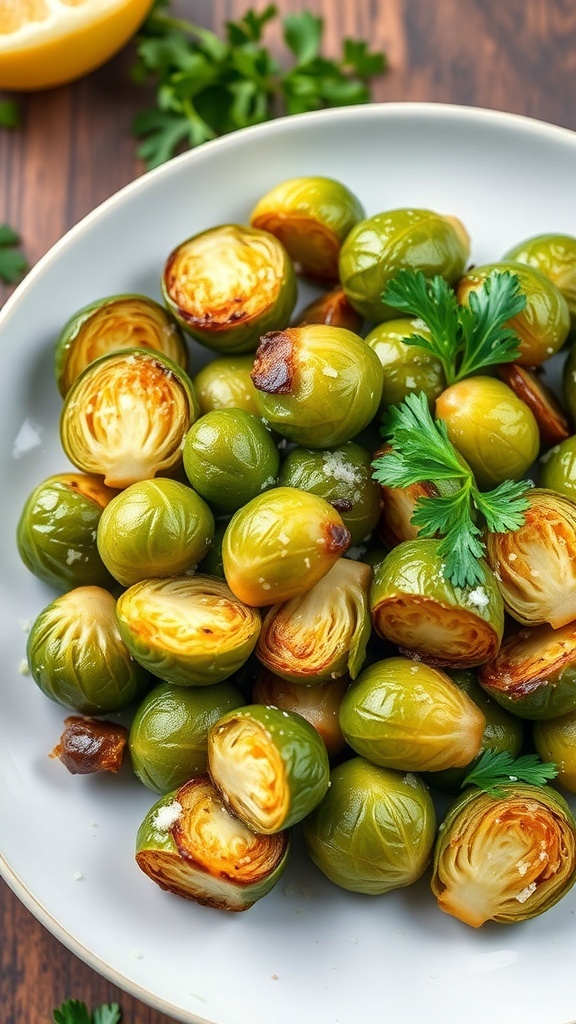
Garlic Parmesan Roasted Brussels Sprouts are a delightful side dish that brings a burst of flavor to any meal. The image shows perfectly roasted Brussels sprouts, golden brown and glistening with a hint of garlic and Parmesan cheese. They look irresistible, don’t they?
This dish is not just tasty; it’s also simple to prepare. Roasting Brussels sprouts enhances their natural sweetness and gives them a crispy texture. The garlic and Parmesan add a savory touch that makes them hard to resist.
These sprouts pair well with a variety of main dishes, from roasted chicken to grilled fish. They can easily steal the spotlight on your dinner table!
Ingredients
- 1 pound Brussels sprouts, trimmed and halved
- 3 tablespoons olive oil
- 4 cloves garlic, minced
- 1/2 cup grated Parmesan cheese
- Salt and pepper to taste
- Fresh parsley for garnish
Instructions
- Preheat your oven to 400°F (200°C).
- In a large bowl, toss the halved Brussels sprouts with olive oil, minced garlic, salt, and pepper until well coated.
- Spread the Brussels sprouts in a single layer on a baking sheet.
- Roast in the preheated oven for about 20-25 minutes, or until they are golden brown and crispy, stirring halfway through.
- Remove from the oven and sprinkle with grated Parmesan cheese. Return to the oven for an additional 5 minutes to melt the cheese.
- Garnish with fresh parsley before serving. Enjoy!
Honey Glazed Carrots with Thyme

Honey glazed carrots are a delightful side dish that brings a touch of sweetness to any meal. The vibrant orange color of the carrots makes them visually appealing on your plate. Tossed in honey and fresh thyme, these carrots are not just tasty but also easy to prepare. They complement a variety of main dishes, from roasted chicken to grilled steak.
To make honey glazed carrots, you’ll want to start with fresh, tender carrots. The natural sweetness of the carrots pairs perfectly with honey, creating a glaze that enhances their flavor. Adding thyme introduces a lovely herbal note, making this dish even more special.
Cooking the carrots until they are tender yet crisp ensures they maintain their vibrant color and nutrients. This dish is perfect for family dinners or holiday gatherings. It’s simple enough for a weeknight meal yet elegant enough for special occasions.
Ingredients
- 1 pound fresh carrots, peeled and cut into sticks
- 2 tablespoons honey
- 1 tablespoon olive oil
- 1 teaspoon fresh thyme leaves
- Salt and pepper to taste
Instructions
- Preheat your oven to 400°F (200°C).
- In a large bowl, mix the honey, olive oil, thyme, salt, and pepper.
- Add the carrot sticks to the bowl and toss until they are well coated.
- Spread the carrots on a baking sheet in a single layer.
- Bake for 20-25 minutes, or until the carrots are tender and slightly caramelized, stirring halfway through.
- Serve warm and enjoy your delicious honey glazed carrots!
Savory Mushroom Risotto
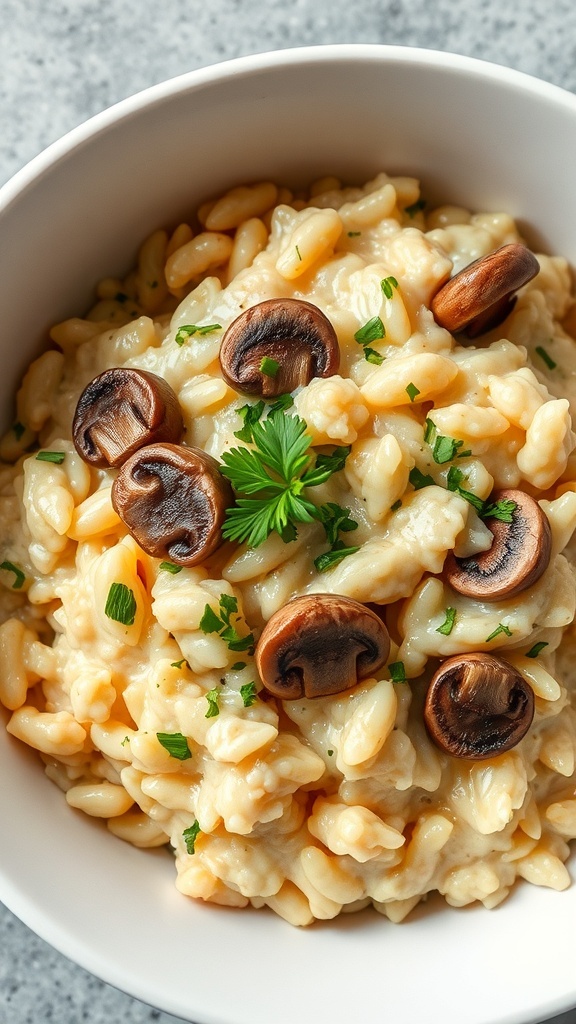
Mushroom risotto is a creamy delight that pairs well with many main dishes. The image shows a bowl of rich, creamy risotto topped with sautéed mushrooms and fresh herbs. The texture looks inviting, with each grain of rice coated in a velvety sauce.
This dish is perfect for a cozy dinner or a special occasion. The earthy flavor of mushrooms complements the creamy rice beautifully. Plus, it’s a great way to impress your guests without too much fuss.
Making mushroom risotto is straightforward. You’ll need Arborio rice, which is key for that creamy texture. The slow addition of broth while stirring helps release the starches from the rice, creating that signature creaminess.
Let’s get to the recipe so you can whip up this delicious side dish!
Ingredients
- 1 cup Arborio rice
- 4 cups vegetable or chicken broth
- 1 cup mushrooms, sliced
- 1 small onion, finely chopped
- 2 cloves garlic, minced
- 1/2 cup white wine (optional)
- 1/2 cup grated Parmesan cheese
- 2 tablespoons olive oil
- Salt and pepper to taste
- Fresh parsley for garnish
Instructions
- Prepare the Broth: In a saucepan, heat the broth over low heat. Keep it warm but not boiling.
- Sauté the Vegetables: In a large skillet, heat olive oil over medium heat. Add onions and garlic, cooking until softened. Then, add the sliced mushrooms and cook until they’re tender.
- Add the Rice: Stir in the Arborio rice, coating it with the oil and letting it toast for about 2 minutes.
- Deglaze with Wine: If using, pour in the white wine and stir until it’s mostly absorbed.
- Add Broth Gradually: Start adding the warm broth, one ladle at a time. Stir frequently, allowing the rice to absorb the broth before adding more. This should take about 18-20 minutes.
- Finish with Cheese: Once the rice is creamy and al dente, stir in the Parmesan cheese. Season with salt and pepper to taste.
- Serve: Garnish with fresh parsley and enjoy your mushroom risotto warm!
Corn on the Cob with Herb Butter
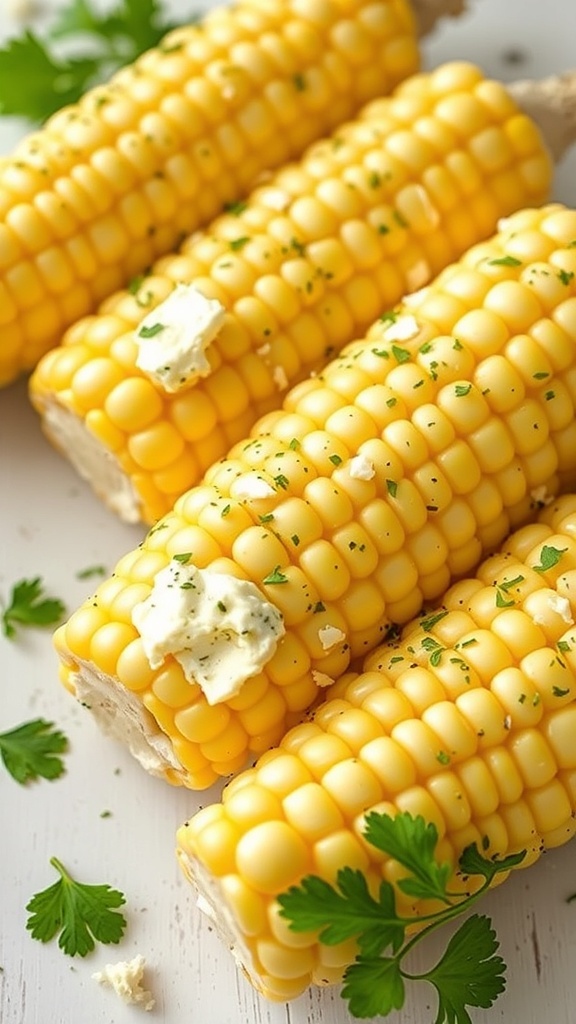
Corn on the cob is a classic side dish that brings a burst of sweetness and crunch to any meal. The image shows perfectly cooked corn, each kernel glistening with a touch of herb butter. This simple yet delightful dish is perfect for summer barbecues or cozy family dinners.
The addition of herb butter elevates the corn, adding a fresh and aromatic flavor. You can use a mix of your favorite herbs, like parsley, cilantro, or chives, to make it your own. It’s easy to prepare and will impress your guests with its vibrant look and taste.
Here’s how you can make this delicious side dish at home!
Ingredients
- 4 ears of fresh corn
- 1/2 cup unsalted butter, softened
- 2 tablespoons fresh parsley, chopped
- 2 tablespoons fresh cilantro, chopped
- 1 teaspoon garlic powder
- Salt and pepper to taste
Instructions
- Prepare the Corn: Remove the husks and silk from the corn. Rinse under cold water and set aside.
- Make the Herb Butter: In a bowl, mix the softened butter, parsley, cilantro, garlic powder, salt, and pepper until well combined.
- Cook the Corn: Boil a large pot of water. Add the corn and cook for about 5-7 minutes until tender. Alternatively, you can grill the corn for a smoky flavor.
- Spread the Butter: Once the corn is cooked, remove it from the water or grill. While still hot, spread the herb butter generously over each ear of corn.
- Serve: Garnish with extra herbs if desired and enjoy your delicious corn on the cob!
Garlic Butter Green Beans
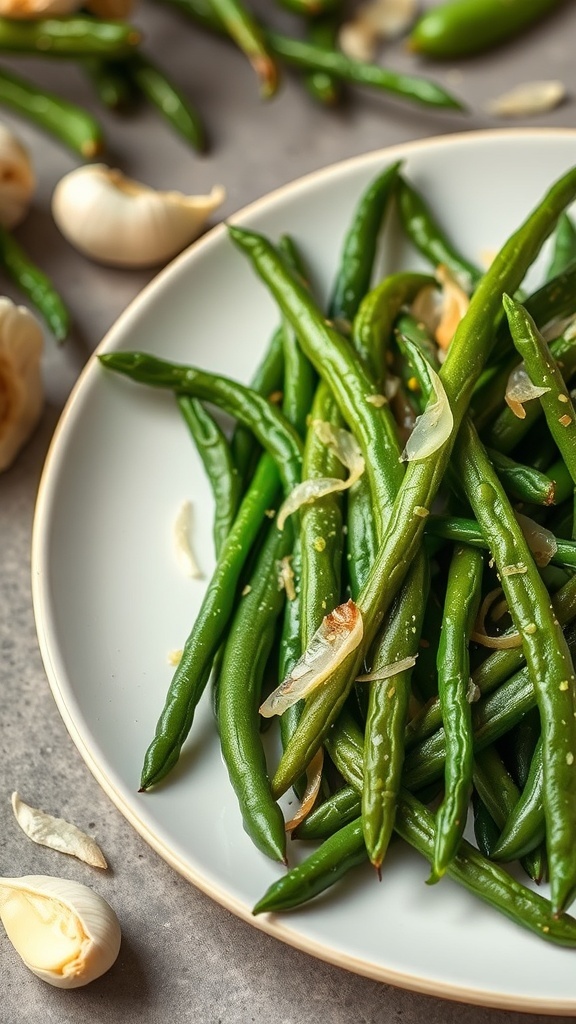
Garlic Butter Green Beans are a simple yet delicious side dish that can brighten up any meal. The vibrant green color of the beans makes them visually appealing, and the garlic butter adds a rich flavor that complements many main dishes.
To prepare this dish, you’ll want to start with fresh green beans. They should be crisp and bright. The garlic is sautéed in butter until fragrant, creating a savory base for the beans. Tossing the green beans in this mixture allows them to absorb all that wonderful flavor.
This side dish pairs well with grilled meats, roasted chicken, or even a hearty pasta. It’s quick to make, taking just about 15 minutes from start to finish, making it perfect for busy weeknights or special occasions.
Ingredients
- 1 pound fresh green beans, trimmed
- 3 tablespoons unsalted butter
- 3 cloves garlic, minced
- Salt and pepper to taste
- 1 tablespoon lemon juice (optional)
Instructions
- Blanch the Green Beans: Bring a pot of salted water to a boil. Add the green beans and cook for 3-4 minutes until bright green and tender-crisp. Drain and immediately plunge them into ice water to stop the cooking process.
- Sauté the Garlic: In a large skillet, melt the butter over medium heat. Add the minced garlic and sauté for about 1 minute until fragrant, being careful not to burn it.
- Add the Beans: Drain the green beans from the ice water and add them to the skillet. Toss to coat in the garlic butter. Season with salt and pepper to taste.
- Finish and Serve: If desired, drizzle with lemon juice before serving. Enjoy your Garlic Butter Green Beans warm!
Roasted Beet and Goat Cheese Salad
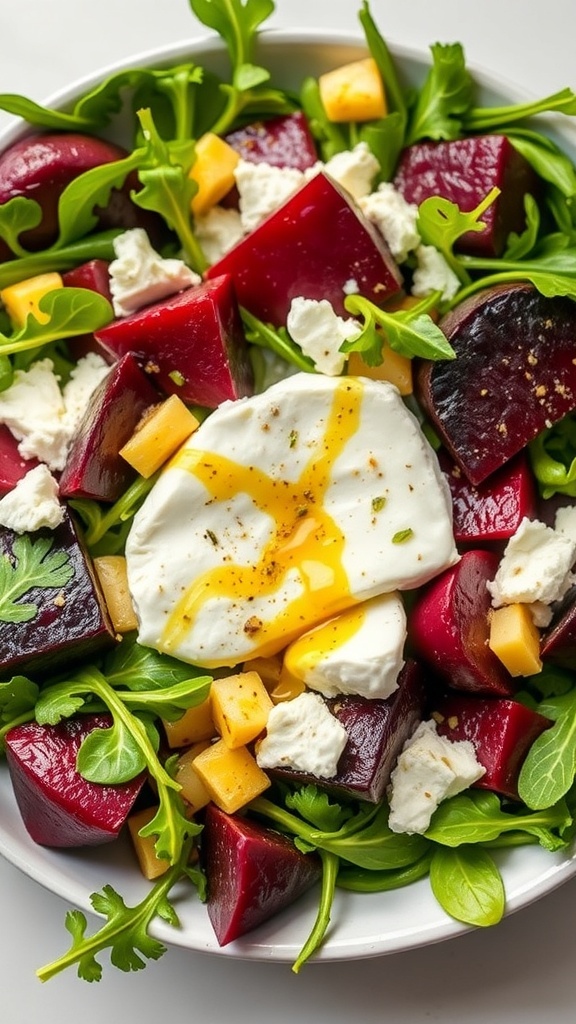
This Roasted Beet and Goat Cheese Salad is a delightful mix of flavors and textures. The vibrant colors of the beets stand out beautifully against the fresh greens. Each bite offers a balance of earthy sweetness from the beets and the creamy tang of goat cheese. The addition of crunchy nuts or seeds can elevate the salad even more.
To prepare this salad, start by roasting your beets. Once they are tender, let them cool and chop them into bite-sized pieces. Toss them with a mix of arugula and other greens. Crumble goat cheese on top for that creamy goodness. A drizzle of olive oil and a splash of balsamic vinegar will tie everything together.
This salad is perfect as a side dish or a light meal. It’s not just delicious; it’s also packed with nutrients. Enjoy it at a gathering or as a refreshing lunch option!
Ingredients
- 4 medium-sized beets
- 4 cups arugula or mixed greens
- 1 cup goat cheese, crumbled
- 1/2 cup walnuts or pecans, chopped
- 2 tablespoons olive oil
- 2 tablespoons balsamic vinegar
- Salt and pepper to taste
Instructions
- Preheat the oven to 400°F (200°C). Wrap each beet in aluminum foil and place them on a baking sheet. Roast for about 45-60 minutes, or until tender.
- Once the beets are cool enough to handle, peel them and cut into wedges.
- In a large bowl, combine the arugula and roasted beets.
- Add the crumbled goat cheese and chopped nuts.
- Drizzle with olive oil and balsamic vinegar. Season with salt and pepper. Toss gently to combine.
- Serve immediately and enjoy your fresh salad!
Cheesy Broccoli Casserole
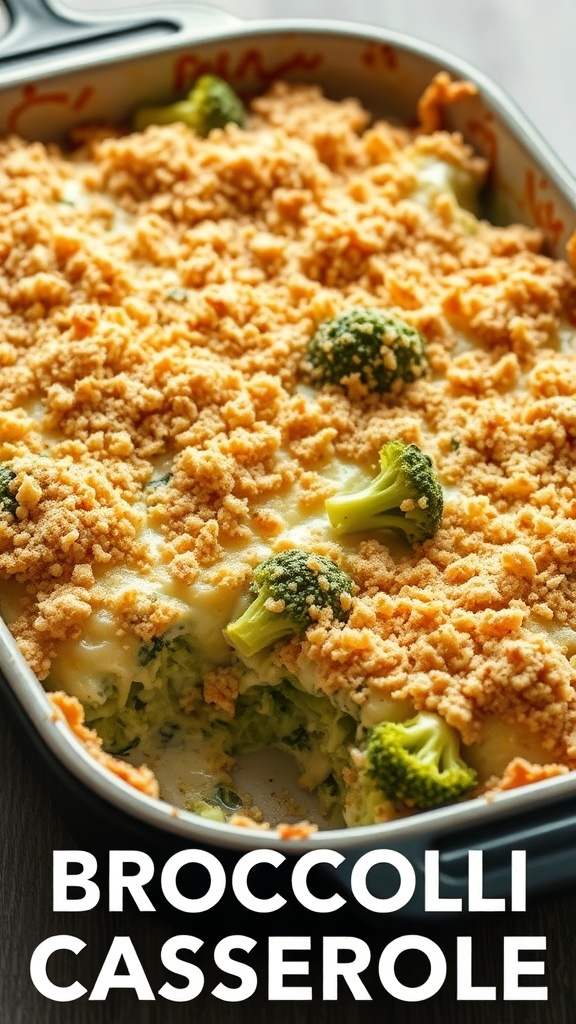
Cheesy broccoli casserole is a comforting side dish that everyone loves. It combines tender broccoli with a creamy cheese sauce, topped with a crunchy layer of breadcrumbs. This dish is perfect for family gatherings or weeknight dinners.
The vibrant green broccoli stands out beautifully against the creamy backdrop. The golden-brown topping adds a delightful crunch, making each bite satisfying. This casserole not only looks great but also packs a punch of flavor.
Making this cheesy broccoli casserole is simple and quick. It’s a great way to sneak in some veggies while keeping things delicious. Whether you’re serving it alongside roasted chicken or grilled fish, it complements a variety of main dishes.
Ingredients
- 4 cups fresh broccoli florets
- 1 cup cheddar cheese, shredded
- 1 cup cream of mushroom soup
- 1/2 cup milk
- 1 cup breadcrumbs
- 1/4 cup butter, melted
- 1 teaspoon garlic powder
- Salt and pepper to taste
Instructions
- Preheat your oven to 350°F (175°C).
- In a large pot, bring water to a boil and blanch the broccoli for about 3 minutes. Drain and set aside.
- In a mixing bowl, combine the cream of mushroom soup, milk, garlic powder, salt, and pepper. Stir in the shredded cheddar cheese.
- Add the blanched broccoli to the cheese mixture and mix until well coated.
- Transfer the mixture to a greased baking dish.
- In another bowl, combine the breadcrumbs with melted butter. Sprinkle this mixture evenly over the casserole.
- Bake for 25-30 minutes, or until the top is golden brown and bubbly.
- Let it cool for a few minutes before serving. Enjoy your cheesy broccoli casserole!
Balsamic Glazed Asparagus
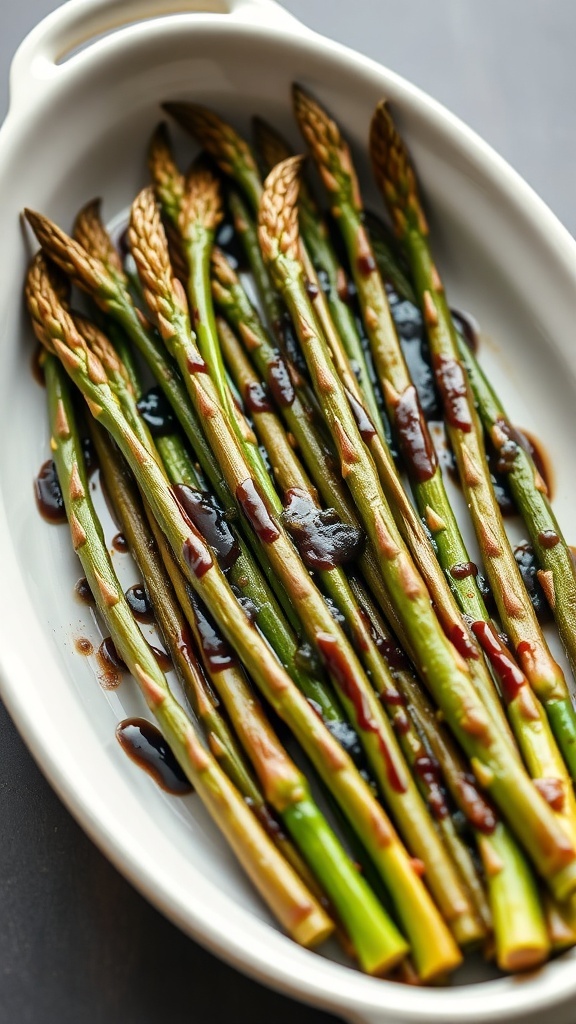
Balsamic glazed asparagus is a delightful side dish that brings a touch of elegance to any meal. The vibrant green stalks are perfectly cooked, tender yet crisp, and coated in a rich balsamic glaze. This dish not only looks appealing but also packs a punch of flavor that complements a variety of main courses.
To make this dish, you’ll want to start with fresh asparagus. Look for firm, bright green stalks. The balsamic glaze adds a sweet and tangy element that enhances the natural taste of the asparagus. It’s a simple yet impressive side that can be prepared in no time.
Whether you’re serving it at a family dinner or a special occasion, balsamic glazed asparagus is sure to impress. Pair it with grilled meats, roasted chicken, or even a hearty pasta dish for a well-rounded meal.
Ingredients
- 1 pound fresh asparagus, trimmed
- 2 tablespoons olive oil
- 1/4 cup balsamic vinegar
- 1 tablespoon honey
- Salt and pepper to taste
- Optional: grated Parmesan cheese for topping
Instructions
- Preheat your oven to 400°F (200°C).
- In a large bowl, toss the asparagus with olive oil, salt, and pepper until evenly coated.
- Spread the asparagus in a single layer on a baking sheet.
- Roast in the oven for about 10-15 minutes, until tender and slightly crispy.
- While the asparagus is roasting, combine balsamic vinegar and honey in a small saucepan over medium heat. Bring to a simmer and cook for about 5 minutes, until it thickens slightly.
- Once the asparagus is done, drizzle the balsamic glaze over the top. Toss gently to coat.
- If desired, sprinkle with grated Parmesan cheese before serving.
Stuffed Bell Peppers with Rice and Beans

Stuffed bell peppers are a colorful and delicious dish that can brighten up any meal. The image shows vibrant peppers filled with a hearty mixture of rice, beans, and cheese. Each pepper is a little package of flavor, making them perfect for a family dinner or a casual gathering with friends.
These stuffed peppers are not only tasty but also packed with nutrients. The combination of rice and beans offers a great source of protein and fiber, while the peppers add a nice crunch and sweetness. Plus, they’re super easy to customize! You can add your favorite spices, veggies, or even some ground meat if you like.
Making stuffed bell peppers is simple. Start by cooking the rice and mixing it with black beans, diced tomatoes, and spices. Then, scoop this mixture into halved bell peppers and top with cheese. Bake until the peppers are tender and the cheese is bubbly. It’s a dish that’s sure to impress!
Ingredients
- 4 large bell peppers (any color)
- 1 cup cooked rice
- 1 can black beans, rinsed and drained
- 1 cup diced tomatoes
- 1 teaspoon cumin
- 1 teaspoon chili powder
- 1 cup shredded cheese (cheddar or mozzarella)
- Fresh cilantro for garnish
Instructions
- Preheat your oven to 375°F (190°C).
- Cut the tops off the bell peppers and remove the seeds. Place them upright in a baking dish.
- In a bowl, mix together the cooked rice, black beans, diced tomatoes, cumin, and chili powder.
- Spoon the rice and bean mixture into each bell pepper, packing it down gently.
- Top each pepper with shredded cheese.
- Bake in the preheated oven for 25-30 minutes, until the peppers are tender and the cheese is melted.
- Garnish with fresh cilantro before serving.
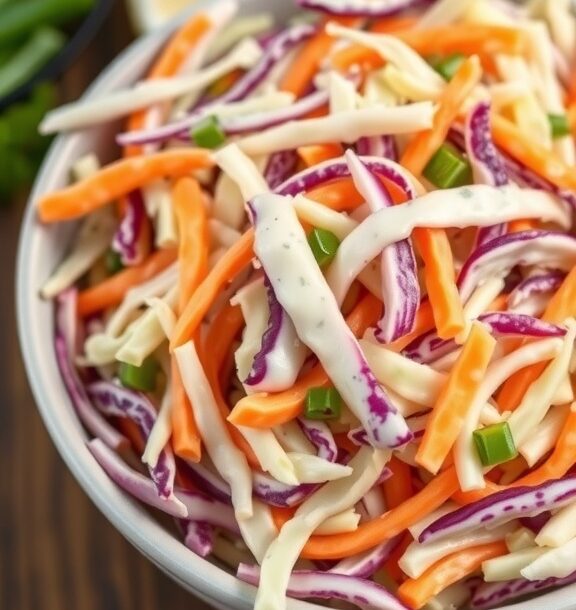
Classic Coleslaw with a Creamy Dressing
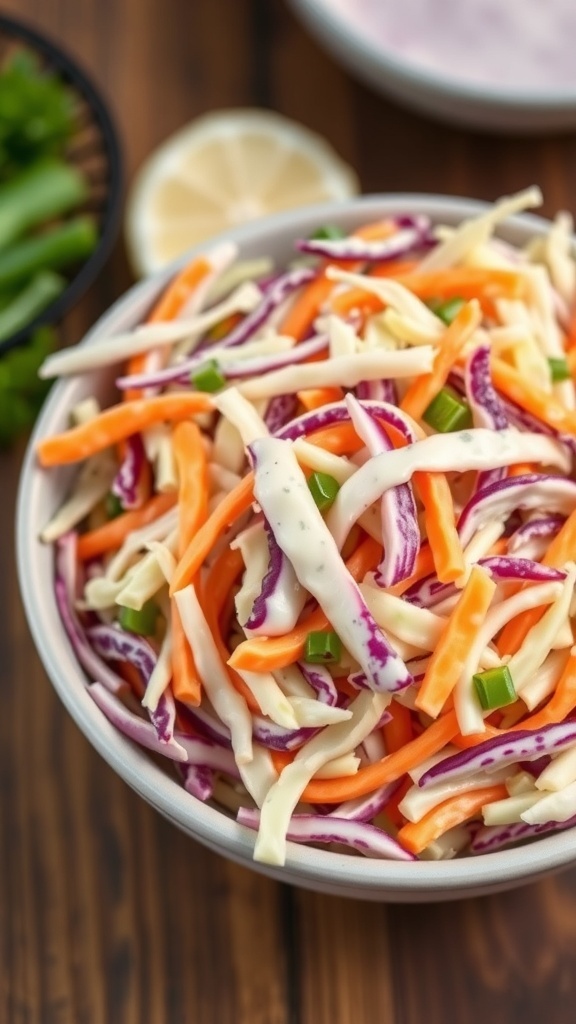
Coleslaw is a classic side dish that adds crunch and freshness to any meal. The image shows a vibrant bowl of coleslaw, featuring colorful shreds of cabbage and carrots. This dish is not only visually appealing but also packed with flavor.
The creamy dressing brings everything together, making each bite satisfying. This coleslaw is perfect for barbecues, picnics, or as a topping for sandwiches. It’s easy to make and can be prepared ahead of time, allowing the flavors to meld beautifully.
Let’s get into how to whip up this delightful side dish!
Ingredients
- 4 cups green cabbage, shredded
- 1 cup red cabbage, shredded
- 1 cup carrots, shredded
- 1/2 cup mayonnaise
- 2 tablespoons apple cider vinegar
- 1 tablespoon sugar
- 1 teaspoon celery seed
- Salt and pepper to taste
Instructions
- In a large bowl, combine the green cabbage, red cabbage, and carrots.
- In a separate bowl, whisk together the mayonnaise, apple cider vinegar, sugar, celery seed, salt, and pepper until smooth.
- Pour the dressing over the cabbage mixture and toss until everything is well coated.
- Cover and refrigerate for at least 1 hour before serving to let the flavors develop.
- Give it a good stir before serving, and enjoy your classic coleslaw!