
Looking to kick off your next gathering with some delicious bites? Here’s a list of appetizer ideas that are simple to make and guaranteed to impress your guests.
From savory to sweet, we’ve got a variety of options that’ll suit any palate and keep everyone coming back for more.

Caprese Skewers with Balsamic Drizzle
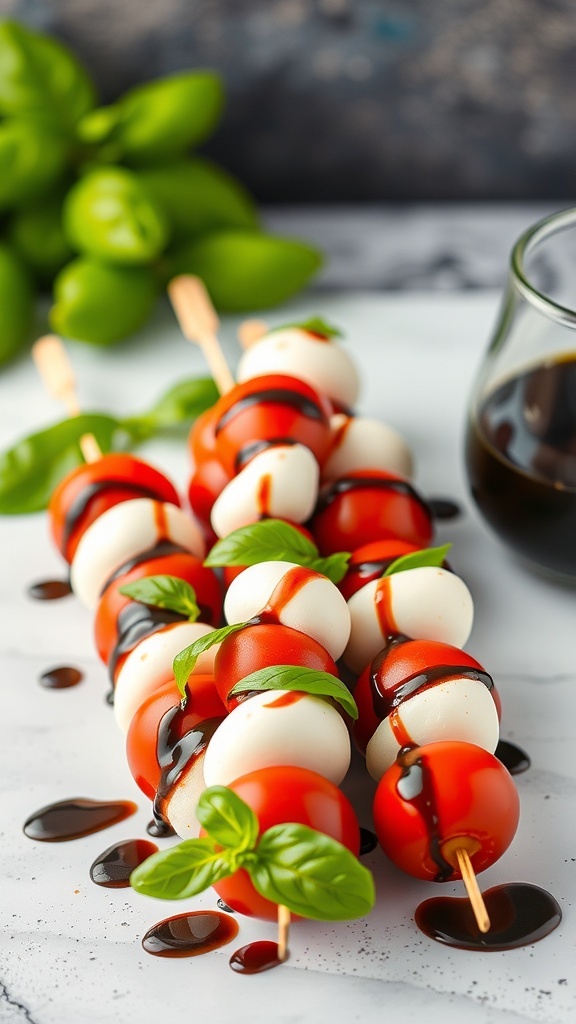
Caprese skewers are a delightful and easy appetizer that brings the fresh flavors of Italy right to your table. These colorful bites consist of juicy cherry tomatoes, creamy mozzarella balls, and fragrant basil leaves, all beautifully drizzled with balsamic reduction. The visual appeal of the skewers, with their vibrant reds and greens, makes them not only tasty but also a feast for the eyes.
Whether you’re hosting a party or enjoying a cozy evening at home, these skewers are sure to impress. They’re quick to prepare and cater to both formal gatherings and casual get-togethers. Plus, they embody the classic Italian flavor combination, making them an instant hit!
Ingredients
- 1 cup cherry tomatoes
- 1 cup fresh mozzarella balls
- 1 cup fresh basil leaves
- 1/2 cup balsamic reduction
- Salt and pepper to taste
- Skewers (wooden or metal)
Instructions
- Prep the Ingredients: Rinse cherry tomatoes and basil leaves. Drain mozzarella balls if packed in water.
- Assemble the Skewers: On each skewer, alternate between cherry tomatoes, mozzarella balls, and basil leaves. Aim for about three of each on a skewer.
- Drizzle with Balsamic: Once skewers are assembled, place them on a serving platter. Drizzle balsamic reduction generously over the top.
- Season: Sprinkle lightly with salt and pepper to enhance the flavors.
- Serve: Enjoy the skewers chilled or at room temperature. They’re perfect for sharing!
Sweet and Sour Meatballs
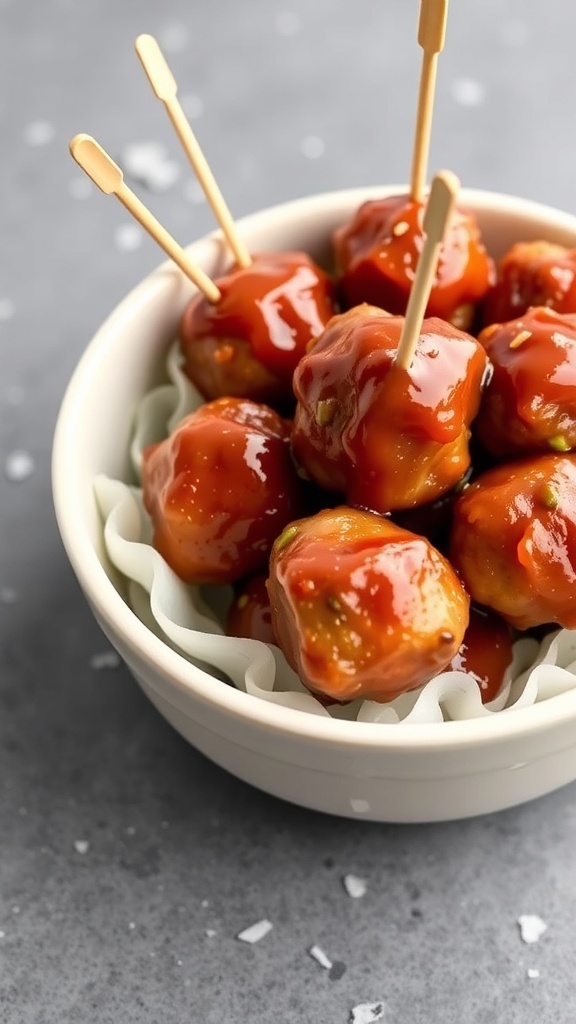
Sweet and sour meatballs are a classic appetizer that never fails to impress. The combination of tender meatballs coated in a rich, tangy sauce is simply irresistible. They offer a perfect balance of sweet and savory flavors, making them a crowd favorite for any gathering.
These little bites not only look great but also taste amazing. They can be served on toothpicks or alongside some fresh veggies for a vibrant platter. Ideal for parties, they also make a satisfying snack or a fun dinner side. Preparing them at home is simpler than you might think and will surely elevate your appetizer game.
Ingredients
- 1 pound ground beef
- 1/2 cup breadcrumbs
- 1/4 cup finely chopped onion
- 1/4 cup milk
- 1 large egg
- 1 teaspoon garlic powder
- 1/2 teaspoon salt
- 1/2 teaspoon black pepper
- 1 cup sweet and sour sauce
Instructions
- Preheat your oven to 400°F (200°C).
- In a large bowl, combine ground beef, breadcrumbs, onion, milk, egg, garlic powder, salt, and pepper. Mix until well blended.
- Shape the mixture into small meatballs, about 1 inch in diameter, and place them on a baking sheet.
- Bake the meatballs in the preheated oven for about 20 minutes or until cooked through.
- In a saucepan, heat the sweet and sour sauce over medium heat.
- Once the meatballs are done, add them to the saucepan and coat them in the sauce. Let them simmer for an additional 5 minutes.
- Serve hot, garnished with toothpicks for easy eating. Enjoy your flavorful sweet and sour meatballs!
Stuffed Mini Peppers with Cream Cheese
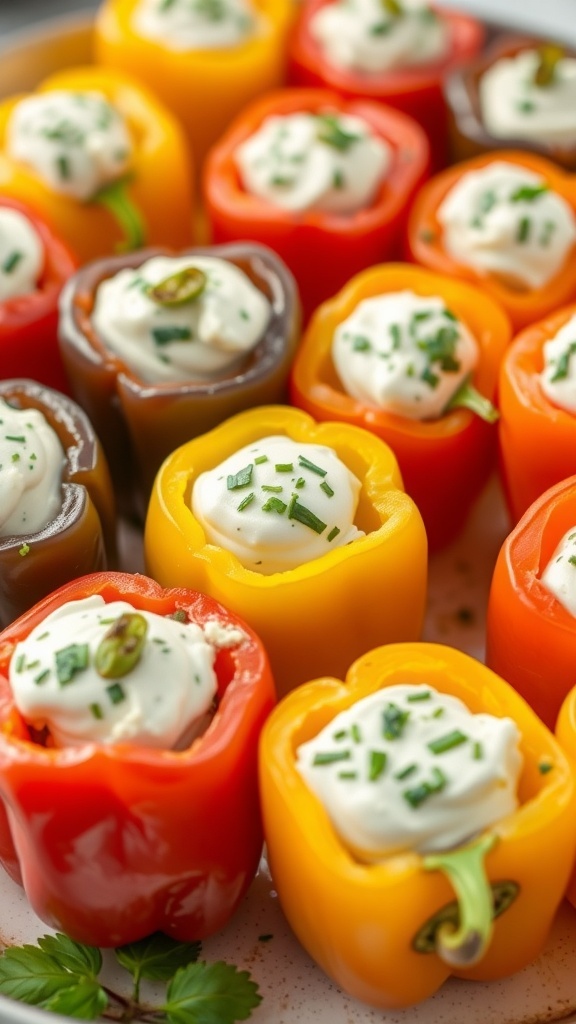
Stuffed mini peppers with cream cheese are a delightful appetizer that’s as colorful as it is tasty! These bite-sized treats are perfect for parties, gatherings, or simply a fun snack at home. With their vibrant hues of red, yellow, and orange, they add a pop of color to any platter.
The creamy filling pairs beautifully with the sweetness of the peppers, making each bite burst with flavor. They’re easy to prepare, and you can even get creative by adding different herbs or spices to the cream cheese mixture. Whether served fresh or as part of a larger spread, these stuffed mini peppers are sure to please!
Ingredients
- 12 mini sweet peppers
- 8 oz cream cheese, softened
- 1/4 cup sour cream
- 2 tablespoons chives, chopped
- 1 teaspoon garlic powder
- Salt and pepper to taste
Instructions
- Prepare the Peppers: Cut the mini sweet peppers in half lengthwise and remove the seeds. Set them aside.
- Make the Filling: In a bowl, combine the softened cream cheese, sour cream, chopped chives, garlic powder, salt, and pepper. Mix until smooth and fluffy.
- Fill the Peppers: Spoon the cream cheese mixture into each half of the mini peppers, filling them generously.
- Garnish: Optionally, sprinkle some extra chives on top for added flair.
- Chill and Serve: Place the stuffed peppers on a platter and chill in the refrigerator for about 30 minutes before serving. Enjoy!
Spicy Buffalo Cauliflower Bites
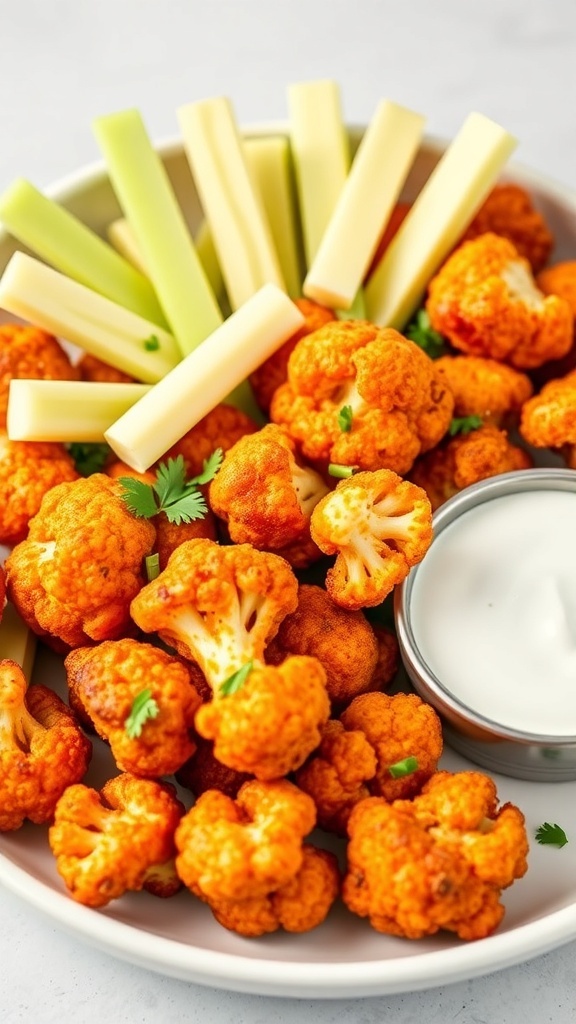
These Spicy Buffalo Cauliflower Bites are a fantastic addition to your list of appetizer ideas. Not only are they visually appealing with their fiery orange color, but they also pack a serious punch in terms of flavor. Crispy on the outside and tender inside, they’re the perfect snack for game day or any casual get-together.
Served with a cool ranch dressing and crunchy celery sticks, they balance the heat of the spices perfectly. The cauliflower bites are not just delicious; they’re also a healthy alternative to traditional buffalo wings.
Ingredients
- 1 head of cauliflower, cut into florets
- 1 cup all-purpose flour
- 1 cup water
- 1 teaspoon garlic powder
- 1 teaspoon paprika
- 1 teaspoon cayenne pepper
- 1/2 teaspoon salt
- 1 cup buffalo sauce
- 2 tablespoons olive oil
- Ranch dressing, for serving
- Celery sticks, for serving
Instructions
- Preheat your oven to 450°F (230°C). Line a baking sheet with parchment paper.
- In a bowl, whisk together flour, water, garlic powder, paprika, cayenne pepper, and salt until smooth.
- Dip each cauliflower floret into the batter, ensuring it’s fully coated.
- Place the coated cauliflower on the prepared baking sheet and drizzle with olive oil.
- Bake for 20-25 minutes, flipping halfway through, until they are golden and crispy.
- Remove from the oven and toss the baked cauliflower in buffalo sauce.
- Return to the oven for an additional 5 minutes to caramelize the sauce.
- Serve hot with ranch dressing and celery sticks on the side.
Savory Spinach and Feta Puff Pastry Bites

Spinach and feta puff pastry bites are a delightful option for appetizers. Their flaky, golden crust encases a creamy filling that perfectly balances the richness of feta with the freshness of spinach. Whether you’re hosting a party or just looking for a tasty snack, these little bites are sure to impress your guests.
To make these savory treats, you’ll need just a handful of ingredients. The combination of spinach and feta offers not just great flavor but also a healthy twist to your snacks. Simply prepare the filling, fill the puff pastry, and bake until golden and crispy. Serve these warm, and watch how quickly they disappear!
Ingredients
- 1 sheet of puff pastry, thawed
- 2 cups fresh spinach, chopped
- 1 cup feta cheese, crumbled
- 1 egg, beaten
- 1 tablespoon olive oil
- Salt and pepper to taste
Instructions
- Preheat the oven to 400°F (200°C).
- In a skillet, heat olive oil over medium heat. Add the chopped spinach and sauté until wilted, about 2-3 minutes. Season with salt and pepper.
- In a bowl, combine sautéed spinach with crumbled feta cheese and mix well.
- On a lightly floured surface, roll out the puff pastry and cut it into squares.
- Place a spoonful of the spinach and feta mixture in the center of each square. Fold the edges of the pastry over the filling to create little cups.
- Brush the tops of the pastry with beaten egg for a golden finish.
- Place the pastry bites on a baking sheet lined with parchment paper. Bake for 15-20 minutes or until golden brown.
- Remove from the oven and let cool slightly before serving.

Classic Bruschetta with Tomato and Basil
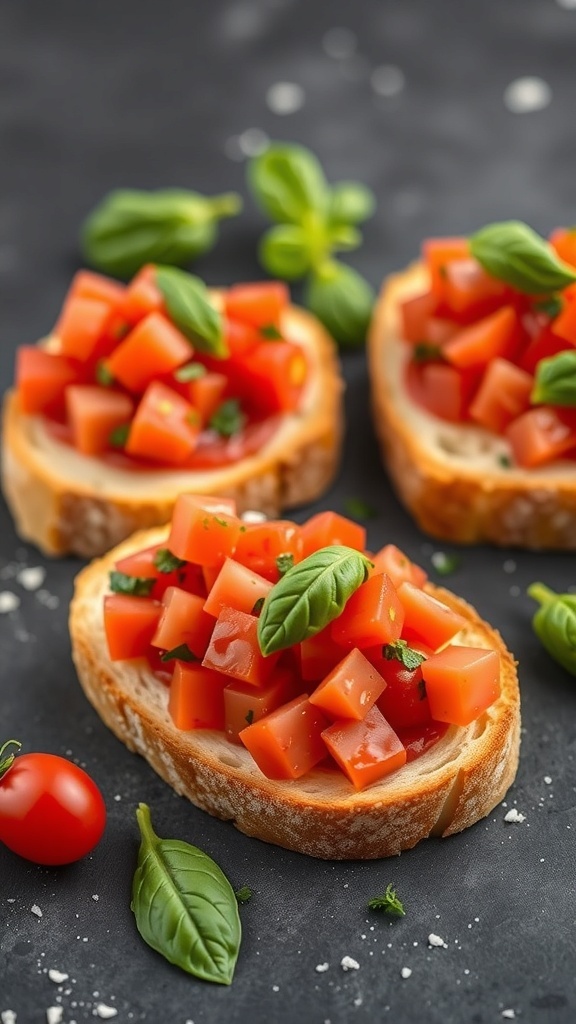
Classic bruschetta with tomato and basil is a timeless appetizer that never fails to impress. The vibrant colors of diced tomatoes and fresh basil on crispy toasted bread create an appealing sight. This dish is simple yet bursting with flavor.
The key to great bruschetta lies in using fresh ingredients. The combination of juicy, ripe tomatoes and aromatic basil makes each bite a delightful experience. Add a drizzle of olive oil, and you’ve got yourself an appetizer that’s both sophisticated and satisfying.
This dish is perfect for gatherings or a cozy night in. Serve it as a starter before your main dish, or enjoy it as a snack with friends. Either way, it’s bound to be a hit!
Ingredients
- 1 baguette, sliced
- 4-5 ripe tomatoes, diced
- 1/4 cup fresh basil leaves, chopped
- 2 cloves of garlic, minced
- 2 tablespoons olive oil
- Salt and pepper to taste
- Balsamic glaze (optional, for drizzling)
Instructions
- Prep the Bread: Preheat your oven to 400°F (200°C). Arrange the baguette slices on a baking sheet and brush one side with olive oil. Toast in the oven for about 5-7 minutes, until golden brown.
- Make the Topping: In a bowl, mix diced tomatoes, basil, minced garlic, olive oil, salt, and pepper. Stir gently to combine and allow the flavors to meld for about 10-15 minutes.
- Assemble the Bruschetta: Spoon the tomato mixture generously onto the toasted side of the baguette slices. Make sure to distribute evenly for the best flavor.
- Serve: If desired, drizzle with balsamic glaze for a touch of sweetness. Enjoy immediately while the bread is warm and crispy!
Mediterranean Hummus Platter
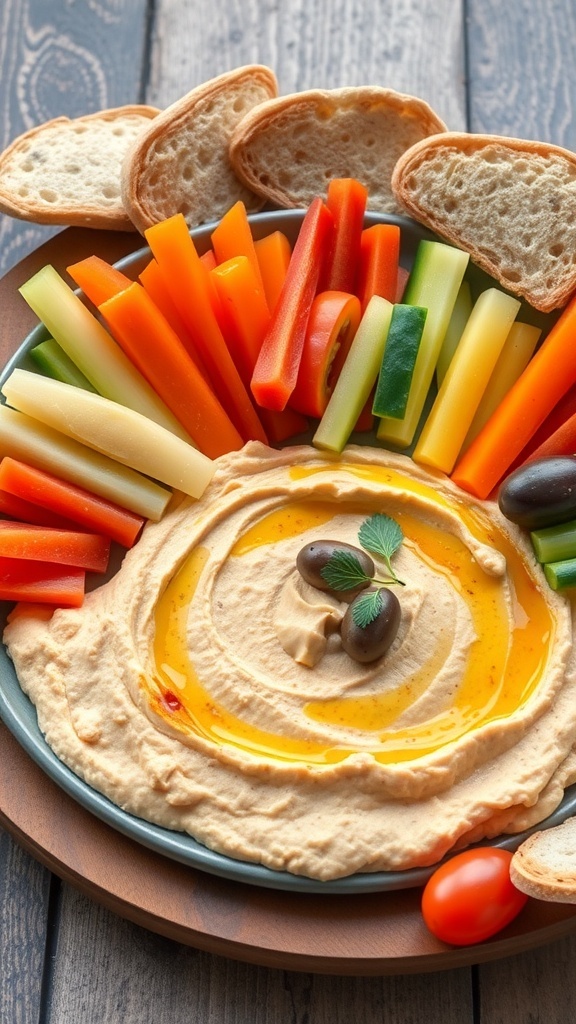
When it comes to appetizers, nothing beats the charm of a Mediterranean hummus platter. This spread is not only vibrant and colorful but also totally delicious. The creamy hummus serves as the perfect base, while fresh veggies and crispy bread add crunch and flavor. Picture a beautiful arrangement of colorful bell peppers, cucumbers, and crunchy bread all surrounding that smooth, inviting hummus. It’s a feast for both the eyes and the taste buds!
The best part? This platter is not just fun to look at; it’s incredibly easy to put together. Simply chop up an assortment of fresh vegetables and arrange them around a bowl of your favorite hummus. Don’t forget a drizzle of olive oil on top of the hummus for that extra touch of richness!
This dish is perfect for parties, gatherings, or even just a cozy night in. Everyone loves dipping fresh veggies into hummus, making this appetizer a real crowd-pleaser.
Ingredients
- 1 cup cooked chickpeas
- 1/4 cup tahini
- 2 tablespoons olive oil
- 2 tablespoons lemon juice
- 1 garlic clove
- Salt to taste
- Water, as needed
- Assorted fresh vegetables (like carrots, bell peppers, and cucumbers)
- Pita bread or chips for dipping
Instructions
- Make the Hummus: In a food processor, combine chickpeas, tahini, olive oil, lemon juice, garlic, and salt. Blend until smooth.
- Adjust Consistency: If the hummus is too thick, add water a tablespoon at a time until you reach your desired consistency.
- Prepare the Platter: Spread the hummus on a large platter or in a bowl. Drizzle with a little olive oil and garnish with some paprika if you like.
- Chop the Veggies: Cut your assorted vegetables into sticks or bite-sized pieces and arrange them around the hummus.
- Serve: Add pita bread or chips to the platter, and get ready to dip!
Crispy Parmesan Zucchini Fries
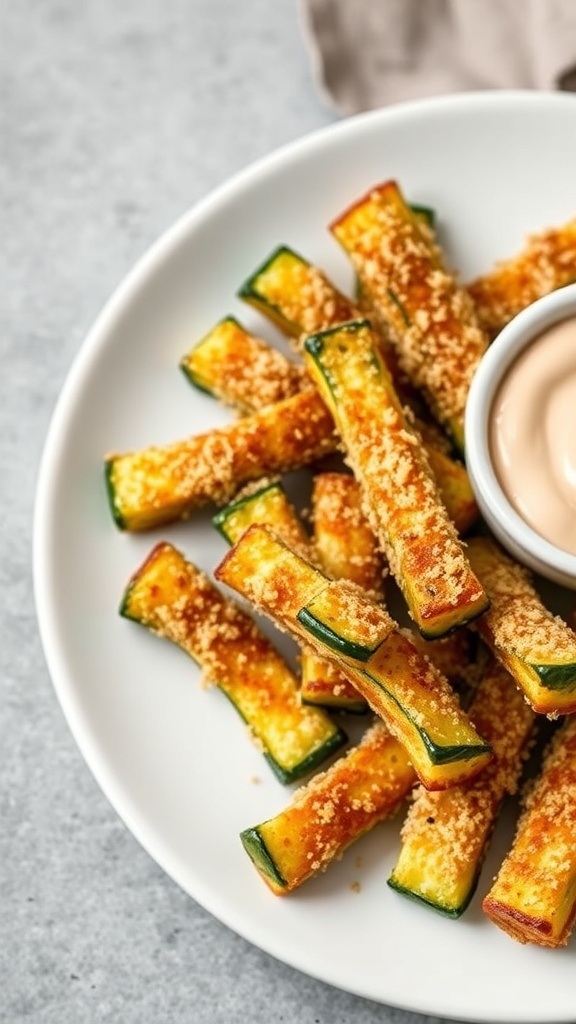
Crispy Parmesan Zucchini Fries are an exciting appetizer that add a delightful crunch to your meal. These fries are a healthier twist on traditional fries, making them perfect for any gathering or simply a snack at home. The golden, crunchy exterior comes from a delicious coating of Parmesan cheese and breadcrumbs, giving each bite a burst of flavor.
These zucchini fries are easy to whip up and are sure to impress your guests. Pair them with your favorite dipping sauce—something creamy or tangy will really enhance the experience. Plus, they’re a great way to incorporate more veggies into your diet without sacrificing taste!
Ingredients
- 2 medium zucchinis, cut into fry shapes
- 1 cup breadcrumbs
- 1/2 cup grated Parmesan cheese
- 1 teaspoon garlic powder
- 1 teaspoon onion powder
- 1 teaspoon salt
- 1/2 teaspoon pepper
- 1 egg, beaten
- Cooking spray or olive oil for drizzling
Instructions
- Preheat your oven to 425°F (220°C). Line a baking sheet with parchment paper.
- In a bowl, mix together the breadcrumbs, Parmesan cheese, garlic powder, onion powder, salt, and pepper.
- Dip each zucchini fry into the beaten egg, then roll it in the breadcrumb mixture until fully coated.
- Place the coated fries on the prepared baking sheet in a single layer. Lightly spray with cooking spray or drizzle with olive oil.
- Bake for 20-25 minutes, flipping halfway through, until the fries are golden brown and crispy.
- Serve warm with your favorite dipping sauce!
Baked Brie with Honey and Nuts
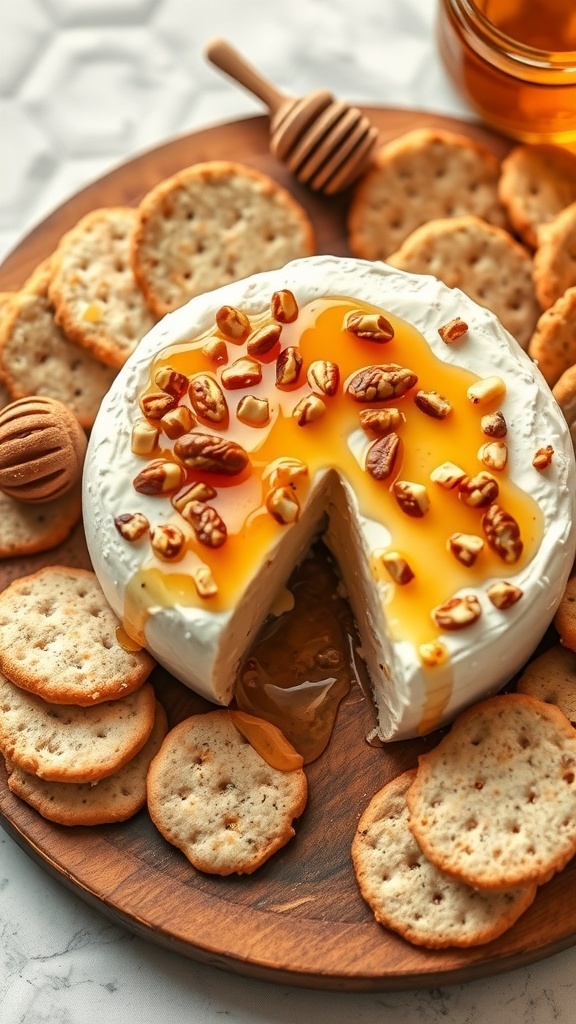
Baked Brie with honey and nuts is a delightful appetizer that brings a touch of elegance to any gathering. The creamy, melted cheese pairs perfectly with the rich sweetness of honey and the crunch of nuts, making it a crowd-pleaser.
To make it even more irresistible, serve the baked Brie with a variety of crackers. They add texture and are perfect for dipping into that gooey goodness. The combination of flavors and the inviting presentation make this dish a must-try!
Now, let’s dive into how to whip up this deliciousness at home!
Ingredients
- 1 round Brie cheese
- 1/3 cup honey
- 1/2 cup assorted nuts (like pecans and walnuts)
- 1 tablespoon fresh rosemary, chopped (optional)
- Crackers or sliced baguette for serving
Instructions
- Preheat your oven to 350°F (175°C).
- Place the Brie on a baking dish. Drizzle honey generously over the top.
- Sprinkle the assorted nuts on top of the honey. Add the chopped rosemary if you’re using it.
- Bake for about 10-15 minutes, or until the cheese is melted and bubbly.
- Serve warm with crackers or sliced baguette. Enjoy the creamy, sweet, and nutty flavors!
Loaded Nachos with Jalapeños and Cheese
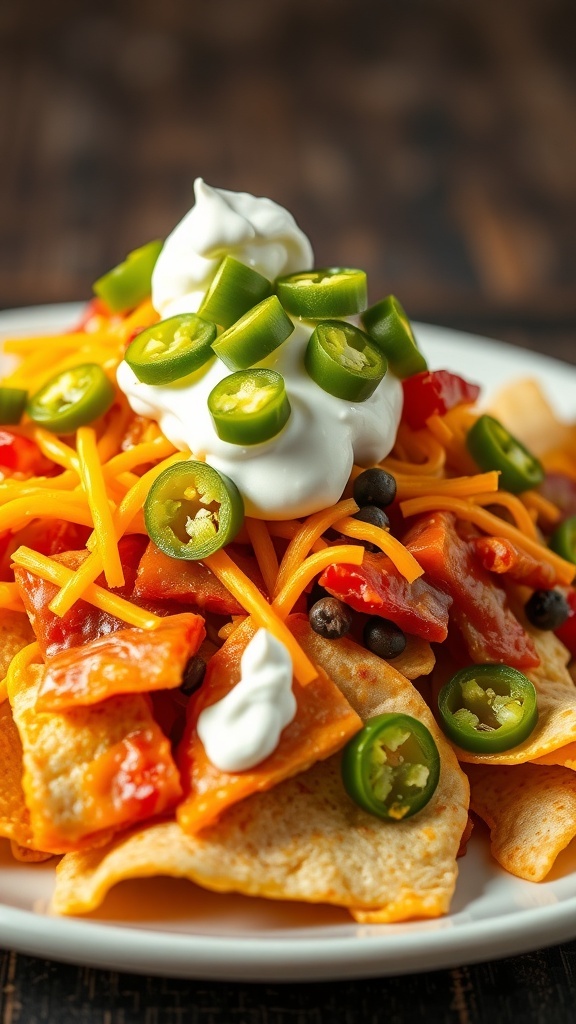
Loaded nachos are the ultimate crowd-pleaser, perfect for any gathering or a cozy night in. Just picture a plate piled high with crispy tortilla chips, melted cheese, fresh jalapeños, and a dollop of sour cream to top it off. It’s a delightful combo of flavors and textures that everyone loves.
To make your own loaded nachos, you can get creative with the toppings! Black beans, diced tomatoes, and a sprinkle of green onions can take this dish to the next level. Just imagine the spicy kick from the jalapeños mixed with the gooey cheddar cheese—divine!
Now, let’s get straight to how you can whip up this delicious appetizer at home!
Ingredients
- 1 bag tortilla chips
- 2 cups shredded cheddar cheese
- 1/2 cup sliced jalapeños (fresh or pickled)
- 1 cup black beans, drained and rinsed
- 1 cup diced tomatoes
- 1/2 cup sour cream
- 1/4 cup chopped green onions (optional)
Instructions
- Preheat your oven to 350°F (175°C).
- On a baking sheet, spread out a layer of tortilla chips.
- Sprinkle a generous amount of shredded cheddar cheese on top of the chips.
- Add the sliced jalapeños, black beans, and diced tomatoes evenly over the cheese.
- Bake in the oven for about 10-15 minutes, or until the cheese is melted and bubbly.
- Once done, remove from the oven and drizzle with sour cream and top with green onions if using.
- Serve immediately and enjoy your nacho feast!
Garlic Butter Shrimp Skewers
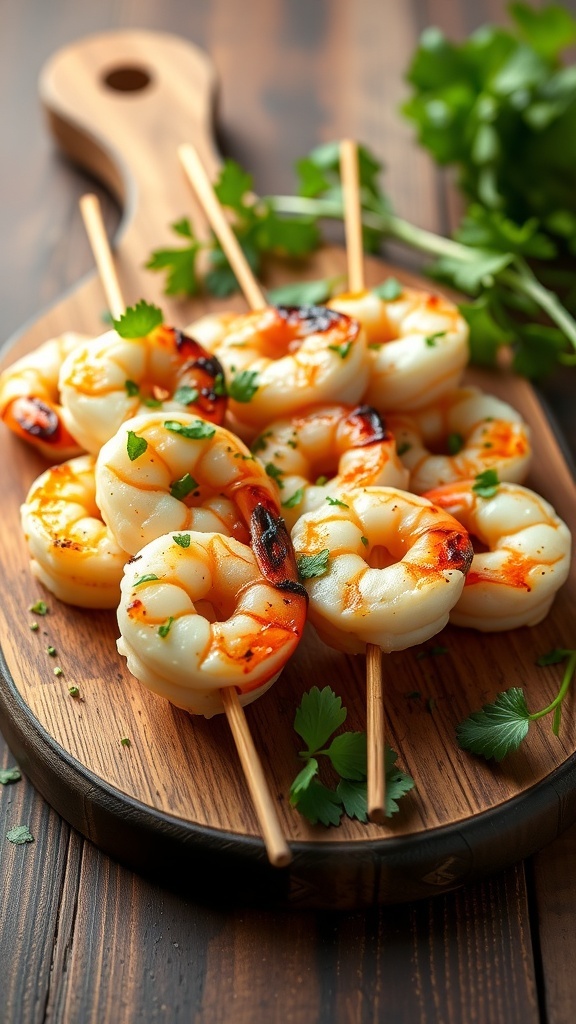
Garlic butter shrimp skewers are a fantastic appetizer that combines savory flavors and easy preparation. Imagine juicy shrimp, marinated in garlic, butter, and herbs, grilled to perfection. They’re not only delicious but also visually appealing when served on a platter, making them a delightful addition to any gathering.
These skewers are perfect for a summer barbecue or even a cozy dinner at home. The combination of garlic and butter enhances the natural sweetness of the shrimp, while a sprinkle of fresh parsley adds a pop of color and fresh flavor. It’s an appetizer that everyone will love, and it’s sure to be the star of the show!
Ingredients
- 1 pound large shrimp, peeled and deveined
- 1/4 cup unsalted butter, melted
- 4 cloves garlic, minced
- 2 tablespoons fresh parsley, chopped
- 1 tablespoon lemon juice
- 1 teaspoon paprika
- Salt and pepper to taste
- Skewers (wooden or metal)
Instructions
- Prep the Skewers: If you’re using wooden skewers, soak them in water for about 30 minutes to prevent burning.
- Make the Marinade: In a bowl, mix together melted butter, minced garlic, chopped parsley, lemon juice, paprika, salt, and pepper.
- Marinate the Shrimp: Add the shrimp to the marinade, ensuring they are well coated. Let them marinate for at least 15-30 minutes.
- Assemble: Thread the marinated shrimp onto the skewers, leaving some space between each piece for even cooking.
- Grill: Preheat your grill to medium-high heat. Place the skewers on the grill and cook for about 2-3 minutes on each side, or until the shrimp are opaque and cooked through.
- Serve: Remove from the grill and garnish with a little extra parsley. Enjoy your delicious garlic butter shrimp skewers while they’re hot!
Vegetable Spring Rolls with Dipping Sauce
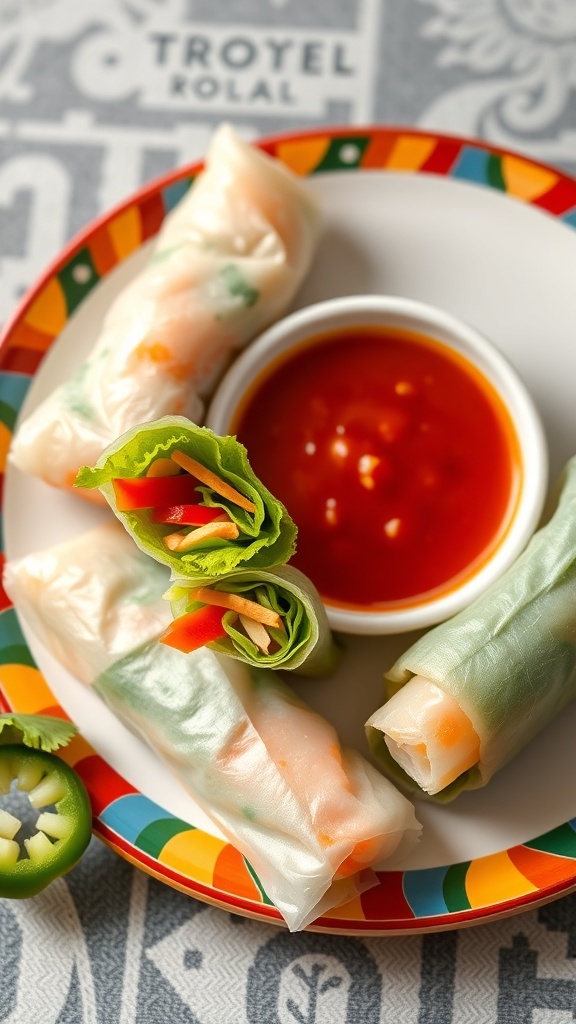
Vegetable spring rolls are a vibrant and healthy appetizer that can brighten any gathering. Wrapped in delicate rice paper, these rolls often burst with fresh veggies and a delicious dipping sauce on the side. They are not only appealing to the eye but also to the taste buds!
In the image, you can see a plate filled with freshly made spring rolls, accompanied by a bowl of tangy dipping sauce. The colorful vegetables peeking from the rolls promise a crunchy texture and a burst of flavor in every bite. These rolls are perfect for sharing and can be customized according to your preferences.
Whether you’re serving them at a party or enjoying them as a light snack, they are sure to please. Plus, they are quick to prepare, making them an excellent choice for last-minute appetizers!
Ingredients
- 8 rice paper wrappers
- 1 cup shredded carrots
- 1 cup cucumber, julienned
- 1 cup bell peppers, sliced
- 1 cup lettuce leaves, torn
- 1/2 cup fresh herbs (mint, cilantro, basil)
- 1 tablespoon soy sauce
- 1 tablespoon lime juice
- 1 tablespoon honey or agave syrup
- Sriracha or chili sauce, for dipping
Instructions
- Prepare the Dipping Sauce: In a small bowl, mix soy sauce, lime juice, and honey. Adjust sweetness to your liking and set aside.
- Soak the Rice Paper: Fill a shallow dish with warm water. Dip a rice paper wrapper in the water for about 10-15 seconds until softened. Lay it flat on a clean surface.
- Add the Filling: Place a small handful of carrots, cucumber, bell peppers, lettuce, and herbs in the center of the wrapper.
- Roll It Up: Carefully fold the sides of the wrapper over the filling, then roll it away from you tightly. Repeat with remaining wrappers and filling.
- Serve: Arrange the spring rolls on a platter with the dipping sauce in the middle. Enjoy this fresh and flavorful appetizer with friends and family!
Mini Quiches with Spinach and Cheese

Mini quiches are the ultimate appetizer that brings a smile to every gathering. Picture these delightful little bites, golden brown on the outside and filled with creamy goodness on the inside. The beautiful mix of vibrant spinach and rich cheese creates a flavor explosion that is both satisfying and elegant.
These mini quiches are great for parties, brunches, or even a casual snack. Their charming size makes them easy to pick up, and they can be enjoyed hot or at room temperature. Plus, they’re incredibly simple to make, meaning you can whip them up in no time!
Ingredients
- 1 pre-made pie crust (or puff pastry)
- 3 large eggs
- 1 cup milk
- 2 cups fresh spinach, chopped
- 1 cup shredded cheese (cheddar, mozzarella, or your choice)
- 1/2 teaspoon salt
- 1/4 teaspoon black pepper
- 1/4 teaspoon garlic powder (optional)
Instructions
- Preheat your oven to 375°F (190°C).
- Roll out the pie crust and cut it into small circles. Place each circle in a muffin tin, pressing them into the bottom and up the sides.
- In a mixing bowl, whisk together the eggs, milk, salt, pepper, and garlic powder. Add the chopped spinach and shredded cheese, stirring until combined.
- Fill each pastry shell with the egg and spinach mixture, being careful not to overfill.
- Bake for 20-25 minutes, or until the quiches are set and lightly browned on top.
- Let them cool for a few minutes before removing from the muffin tin. Serve warm or at room temperature.
These mini quiches are sure to be a hit at your next gathering. They’re quick, tasty, and perfect for sharing!