Looking for a quick and delightful way to satisfy your sweet tooth? Easy desserts are the perfect solution! Whether you’re in the mood for something fruity, chocolaty, or creamy, there’s a simple recipe out there for everyone.
Let’s dive into some deliciously effortless treats that will impress without the stress!
Peanut Butter Cookies
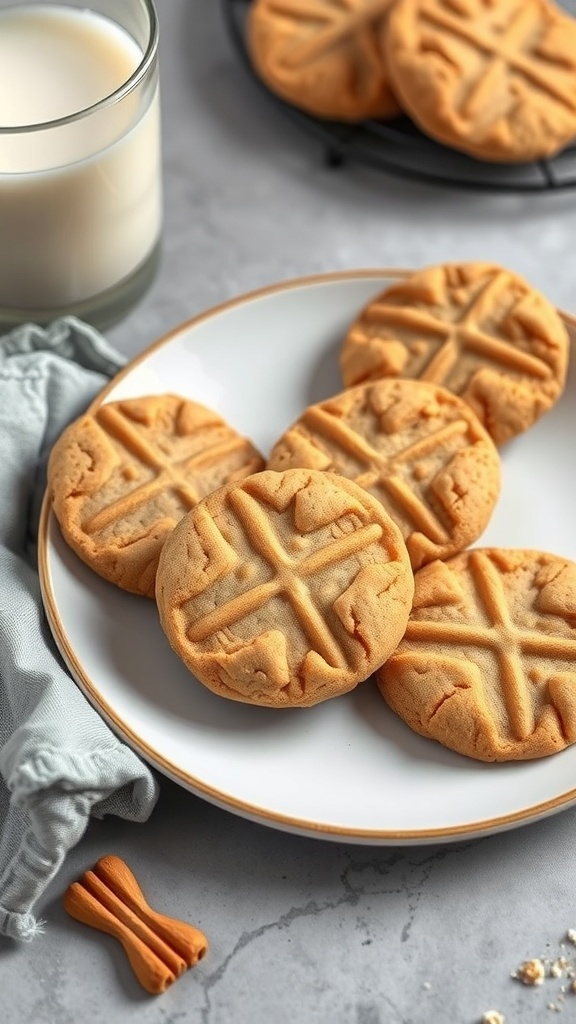
Peanut butter cookies are a classic treat that bring comfort and delight to any dessert table. The blend of peanut butter creates a rich, nutty flavor that pairs perfectly with milk or coffee. In the image, you can see beautifully baked peanut butter cookies arranged on a white plate. Their golden-brown color and the distinct fork marks on top hint at the soft, chewy texture waiting inside. They’re perfect for an easy dessert, whether for weekday snacks or special occasions.
Making these cookies is an enjoyable experience. All you need are a few simple ingredients, and they come together quickly. With just a bit of mixing and baking, you’ll have a warm batch ready in no time. Make sure to share them with friends, or enjoy them all yourself!
Ingredients
- 1 cup creamy peanut butter
- 1 cup granulated sugar
- 1 large egg
- 1 teaspoon baking soda
- 1 teaspoon vanilla extract
- 1/4 teaspoon salt
Instructions
- Preheat the oven to 350°F (175°C) and line a baking sheet with parchment paper.
- In a large bowl, mix together peanut butter and sugar until smooth.
- Add the egg, baking soda, vanilla extract, and salt. Stir until fully combined.
- Using a tablespoon, scoop out dough and place it on the prepared baking sheet, spacing them about 2 inches apart.
- Flatten each cookie with a fork, creating a crisscross pattern on top.
- Bake for about 10-12 minutes, until the edges are golden. Let cool on the baking sheet for a few minutes before transferring them to a wire rack.
Chocolate-Dipped Strawberries

Chocolate-dipped strawberries are a delightful treat that combines the sweetness of fresh strawberries with smooth, rich chocolate. These treats are perfect for a variety of occasions, from date nights to celebrations. They look gorgeous on a platter and taste even better!
The first step is to pick ripe, juicy strawberries with vibrant green stems. Dipping them in chocolate not only enhances their flavor but also makes them visually appealing. You can get creative by using white chocolate for drizzling or adding sprinkles on top.
This dessert is incredibly simple to make. You only need a few ingredients and a small amount of time.
Ingredients
- 1 pound fresh strawberries
- 8 ounces dark chocolate (or your choice of chocolate)
- 2 ounces white chocolate (for drizzling, optional)
- Wax paper (for cooling)
Instructions
- Prepare the Strawberries: Rinse the strawberries thoroughly and dry them completely with a paper towel. Make sure they are dry; otherwise, the chocolate won’t stick.
- Melt the Chocolate: In a microwave-safe bowl, heat the dark chocolate in 30-second intervals, stirring in between until it’s fully melted and smooth.
- Dip the Strawberries: Hold each strawberry by the green stem and dip it into the melted chocolate. Let any excess chocolate drip off.
- Cool the Strawberries: Place the dipped strawberries on a sheet of wax paper. If using white chocolate, melt it separately and drizzle it over the chocolate-covered strawberries.
- Chill: Put the strawberries in the refrigerator for about 30 minutes or until the chocolate hardens.
Enjoy your delicious chocolate-dipped strawberries as a simple yet elegant treat!
Classic Rice Pudding
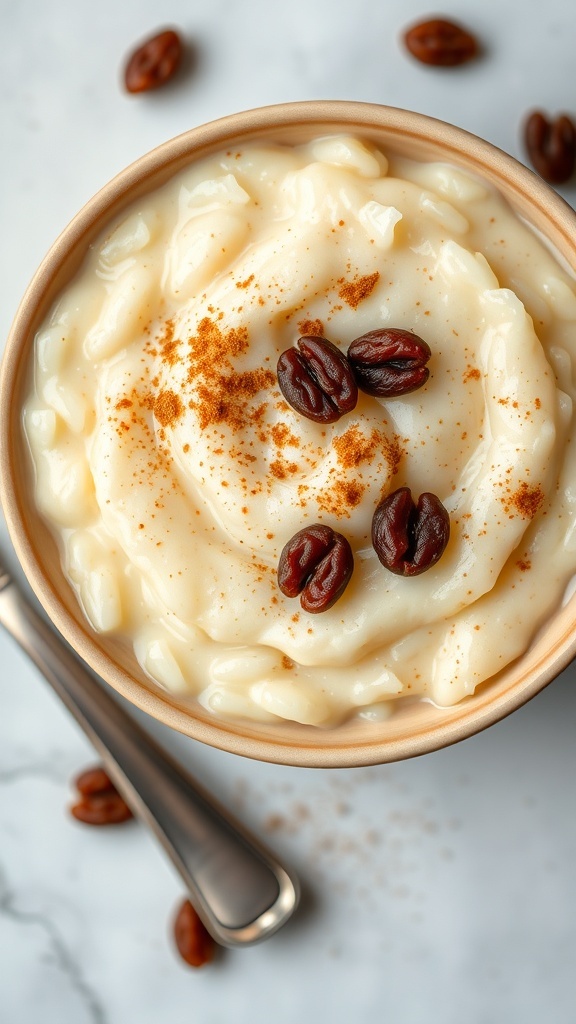
Rice pudding is one of those classic desserts that brings warmth and comfort. This creamy dish is often served in a lovely bowl, topped with a sprinkle of cinnamon or nutmeg. You might notice the rich texture, making it an inviting treat. The subtle sweetness combined with the creamy rice creates a delightful harmony.
If you’re on the hunt for a simple yet satisfying dessert to make at home, you’ve come to the right place. Perfect for a cozy night in or family gatherings, rice pudding is a favorite for all ages. Plus, it’s incredibly easy to whip up with just a handful of ingredients!
Ingredients
- 1 cup Arborio rice
- 4 cups milk (you can use whole or almond milk)
- 1/2 cup sugar
- 1 teaspoon vanilla extract
- 1/2 teaspoon cinnamon (plus extra for topping)
- 1/4 teaspoon salt
- 1/2 cup raisins (optional)
Instructions
- Cook the Rice: In a medium pot, combine rice, milk, sugar, and salt. Bring to a gentle boil over medium heat.
- Simmer: Once boiling, reduce the heat to low and let it simmer. Stir occasionally to prevent sticking, and cook for about 20-25 minutes until the rice is tender and the mixture thickens.
- Add Flavors: Stir in vanilla, cinnamon, and raisins if you’re using them. Let it cook for another 5 minutes.
- Cool and Serve: Remove from heat and let it cool slightly before serving. You can enjoy it warm or chilled. Top with extra cinnamon for a nice finish.
Banana Ice Cream

Banana ice cream is one of those treats that brings a smile to anyone’s face. It’s creamy, sweet, and packed with the natural goodness of bananas. Perfect for a warm day, this dessert is both refreshing and easy to whip up. Plus, you only need a few simple ingredients!
The beauty of this banana ice cream lies in its simplicity. All you need are ripe bananas and a few additional ingredients to elevate the flavor. The bananas give it a rich sweetness, while the optional add-ins can make it even more delightful. You can enjoy it on its own or dress it up with toppings like chopped nuts or drizzle a bit of honey.
Making banana ice cream is a fun activity that invites everyone to join in. Whether you’re looking for a quick dessert after dinner or a fun treat for a gathering, this recipe fits the bill!
Ingredients
- 4 ripe bananas
- 1 cup heavy cream
- 1/2 cup milk
- 1 teaspoon vanilla extract
- 1/4 cup chopped nuts (optional)
Instructions
- Prepare the Bananas: Peel the ripe bananas and slice them into small pieces. Place them in the freezer for about 2 hours or until completely frozen.
- Blend the Ingredients: In a blender or food processor, combine the frozen bananas, heavy cream, milk, and vanilla extract. Blend until the mixture is smooth and creamy.
- Add Nuts: If you’d like to include nuts, stir them into the blended mixture.
- Freeze Again: Pour the mixture into a container and freeze for another 2 hours to firm up.
- Serve and Enjoy: Scoop out your homemade banana ice cream into bowls and enjoy your delicious treat!
Mini Cheesecakes with Berry Topping
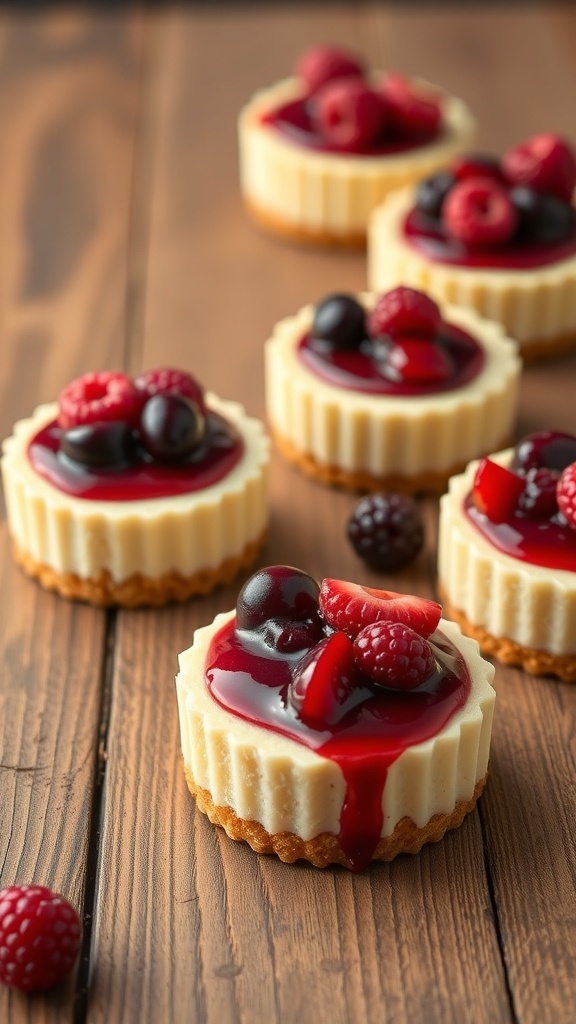
Nothing says sweet indulgence quite like mini cheesecakes! These delightful bites are creamy, smooth, and topped with a vibrant berry mixture. Perfect for any gathering or simply a treat for yourself, mini cheesecakes have become a favorite for those with a sweet tooth.
The base is a buttery graham cracker crust that complements the cream cheese filling beautifully. When you add a colorful topping of berries, it not only makes them visually appealing but also adds a burst of flavor that balances the richness of the cheesecake. Whether you’re hosting a party or enjoying them at home, these mini cheesecakes bring joy with every bite!
Ingredients
- 1 ½ cups graham cracker crumbs
- ½ cup unsalted butter, melted
- 2 cups cream cheese, softened
- ¾ cup granulated sugar
- 1 teaspoon vanilla extract
- 2 large eggs
- 1 cup mixed berries (raspberries, blueberries, strawberries)
- ½ cup berry sauce (store-bought or homemade)
Instructions
- Preheat your oven to 325°F (160°C).
- In a bowl, mix graham cracker crumbs and melted butter until well combined. Press this mixture firmly into the bottom of a muffin tin lined with cupcake liners to form the crust.
- In another bowl, beat the cream cheese and granulated sugar until smooth. Add in vanilla, then mix in the eggs one at a time until just combined.
- Pour the cream cheese mixture over the graham cracker crust in the muffin tin, filling each cup about ¾ full.
- Bake for 15-20 minutes until set. Allow them to cool at room temperature and then refrigerate for at least 2 hours before serving.
- Before serving, top each mini cheesecake with a spoonful of berry sauce and fresh berries. Enjoy your delicious mini cheesecakes!
No-Bake Chocolate Mousse
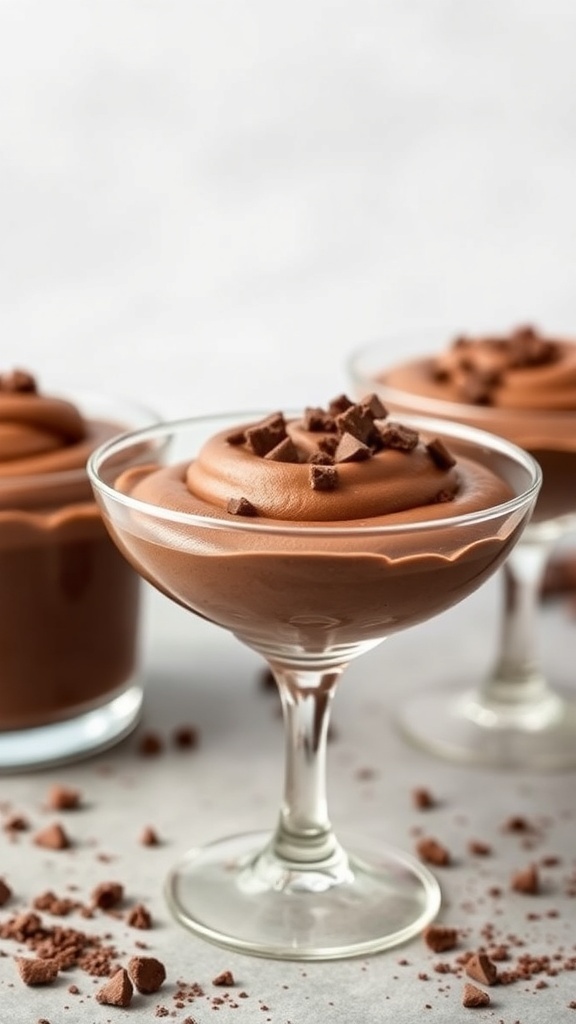
If you’re in the mood for something rich and creamy but don’t want to turn on the oven, then this no-bake chocolate mousse is perfect for you. It’s smooth, decadent, and can be whipped up in a flash. Just look at that silky texture topped with chocolate shavings! It’s the kind of dessert that makes a simple meal feel special.
This mousse has a delightful chocolate flavor that melts in your mouth. It’s a crowd-pleaser at parties and is also great for a cozy night in. Plus, it requires just a few ingredients, making it an easy choice for any home cook.
Ingredients
- 1 cup heavy cream
- 8 ounces semi-sweet chocolate, chopped
- 3 large egg whites
- 1/4 cup sugar
- 1 teaspoon vanilla extract
- Chocolate shavings for garnish
Instructions
- Melt the Chocolate: In a microwave-safe bowl, melt the chopped chocolate in the microwave in 30-second intervals, stirring in between until smooth. Let it cool slightly.
- Whip the Cream: In a large bowl, whip the heavy cream until soft peaks form. Add the vanilla extract and continue whipping until you have stiff peaks.
- Beat the Egg Whites: In another bowl, beat the egg whites with sugar until soft peaks form.
- Combine Ingredients: Gently fold the melted chocolate into the whipped cream until fully combined. Then, carefully fold in the beaten egg whites. Be gentle to maintain the fluffy texture.
- Chill: Divide the mousse into serving cups and refrigerate for at least 2 hours until set. Top with chocolate shavings before serving.
S’mores Dip with Graham Crackers
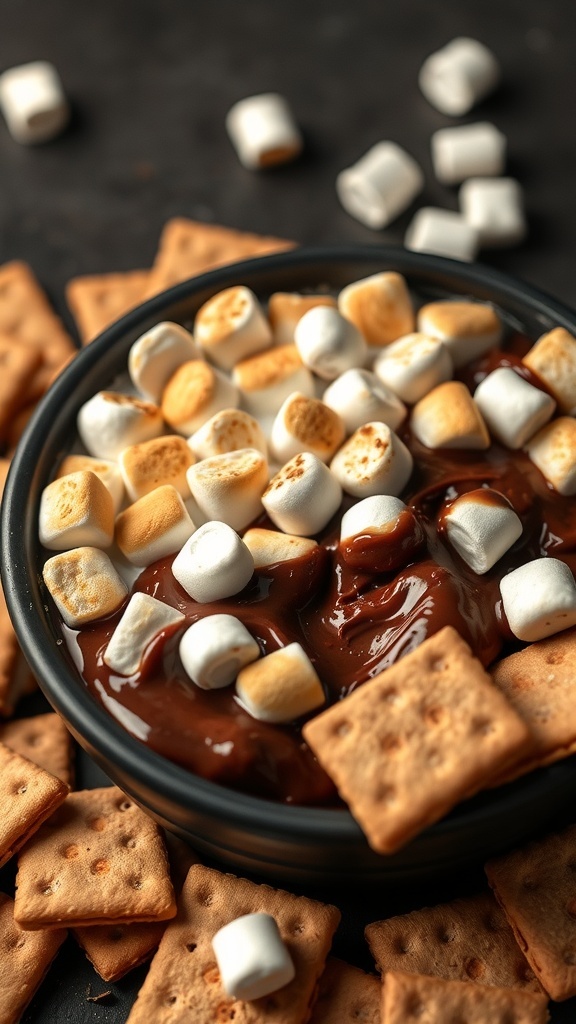
Who doesn’t love a cozy night filled with the gooey sweetness of s’mores? This s’mores dip takes that classic treat and makes it super easy and fun to share. Picture a rich chocolate base, topped with soft, melted marshmallows, ready to be scooped up with crunchy graham crackers. It’s a delightful twist perfect for gatherings or movie nights.
The combination of chocolate and marshmallow in this dip creates a warm and inviting dessert. It’s an eye-catching treat that brings back childhood memories of campfires and good times. You can even customize it with fun additions like peanut butter or flavored extracts!
Ingredients
- 1 cup chocolate chips
- 1 cup mini marshmallows
- 1 tablespoon butter
- 1/2 teaspoon vanilla extract
- 1 box of graham crackers
Instructions
- Preheat your oven to 350°F (175°C).
- In a medium oven-safe dish, melt the chocolate chips and butter together. Stir until smooth.
- Add the vanilla extract, mixing well. Spread the melted chocolate evenly across the bottom.
- Top the chocolate with mini marshmallows, covering as much area as possible.
- Bake in the oven for about 10 minutes, or until the marshmallows are golden brown.
- Let it cool slightly, then serve warm with graham crackers for dipping.
This s’mores dip is not only quick to make, but it’s also bound to be a crowd-pleaser. Enjoy the creamy chocolate and fluffy marshmallow combo with friends and family!
Apple Crisp with Oat Topping
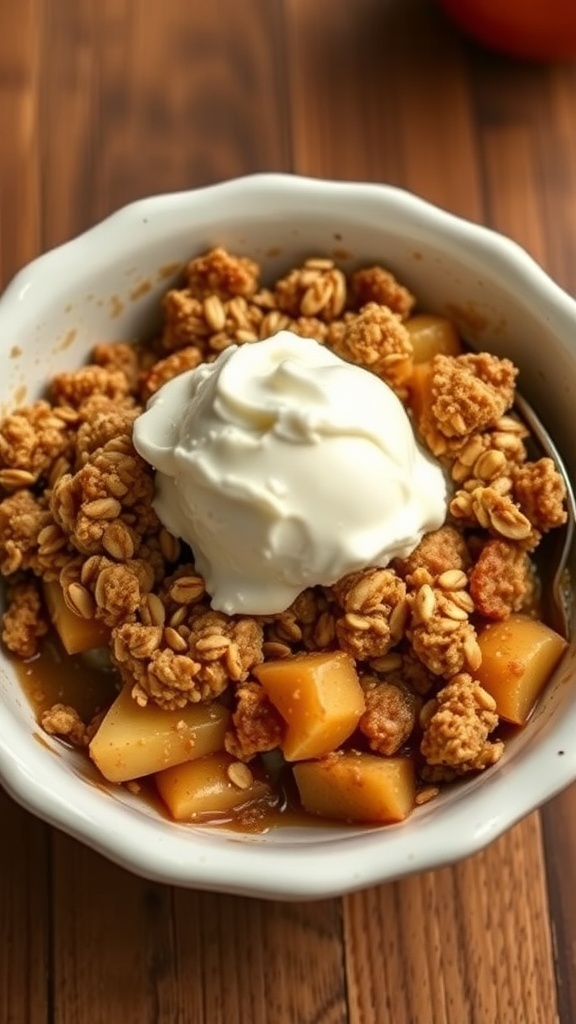
Apple crisp with oat topping is the ultimate cozy dessert. Imagine sweet, tender apples baked to perfection, topped with a crunchy oat mixture. This dessert is not just delicious; it’s easy to whip up, making it perfect for any occasion.
The image captures the essence of this delight. You can see chunks of gently baked apples peeking through a golden, crispy oat topping. A generous scoop of creamy vanilla ice cream sits proudly on top, ready to melt into the warm apples beneath. It’s a scene that surely makes your taste buds tingle!
Making this dessert is simple and rewarding. With a handful of ingredients, you can create something that feels special. Whether you are hosting friends or enjoying a quiet evening, this apple crisp will bring smiles all around.
Ingredients
- 4 cups of diced apples (about 4-5 medium apples)
- 1 cup rolled oats
- 1/2 cup brown sugar, packed
- 1/2 cup flour (all-purpose or whole wheat)
- 1 teaspoon cinnamon
- 1/2 cup unsalted butter, melted
- 1/4 teaspoon salt
Instructions
- Preheat your oven to 350°F (175°C).
- In a large bowl, toss the diced apples with cinnamon and a bit of brown sugar. Spread them evenly in a greased baking dish.
- In another bowl, combine rolled oats, flour, brown sugar, and salt. Pour in the melted butter and mix until crumbly.
- Sprinkle the oat mixture over the apples, making sure to cover them evenly.
- Bake in the preheated oven for about 30-35 minutes, or until the apples are soft and the topping is golden brown.
- Let it cool for a few minutes before serving. Enjoy warm, ideally with a scoop of vanilla ice cream!
Berry Crumble Bars
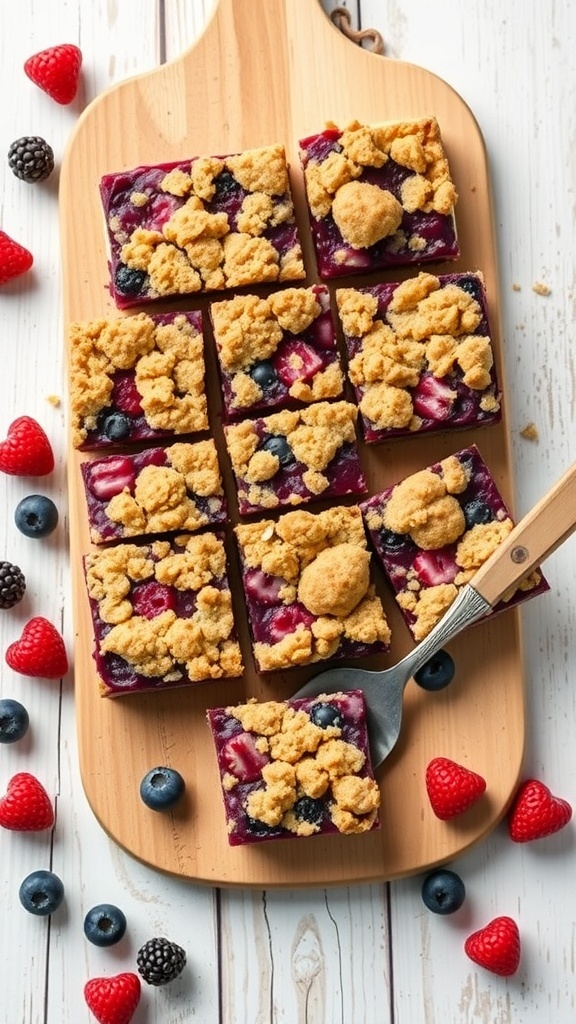
Berry crumble bars are a delightful and easy dessert that combines the sweetness of mixed berries with a buttery crumble topping. These bars are perfect for any occasion, whether it’s a casual gathering or a special celebration. The contrast between the juicy filling and the crunchy topping makes them an irresistible treat.
Imagine biting into a soft, fruity layer filled with fresh berries. The crumble on top adds a wonderful texture that perfectly complements the filling. These bars also look fantastic on a platter, with their vibrant colors and rustic appearance. They are so simple to make that you’ll want to prepare them regularly!
Ingredients
- 2 cups mixed berries (blueberries, raspberries, blackberries)
- 1/4 cup granulated sugar
- 1 tablespoon lemon juice
- 1 cup all-purpose flour
- 1/2 cup rolled oats
- 1/2 cup brown sugar
- 1/2 teaspoon baking powder
- 1/2 cup unsalted butter, melted
- 1/4 teaspoon salt
Instructions
- Preheat your oven to 350°F (175°C). Grease or line an 8×8 inch baking dish.
- In a mixing bowl, combine the mixed berries, sugar, and lemon juice. Gently toss to coat the berries. Set aside.
- In another bowl, mix the flour, rolled oats, brown sugar, baking powder, and salt. Pour in the melted butter and stir until crumbly.
- Press half of the crumble mixture into the bottom of the prepared baking dish. Spread the berry mixture evenly over the crust.
- Sprinkle the remaining crumble mixture on top of the berries.
- Bake for 30-35 minutes or until the top is golden brown and the filling is bubbly.
- Allow the bars to cool before cutting into squares. Enjoy your berry crumble bars!
Chocolate Avocado Pudding
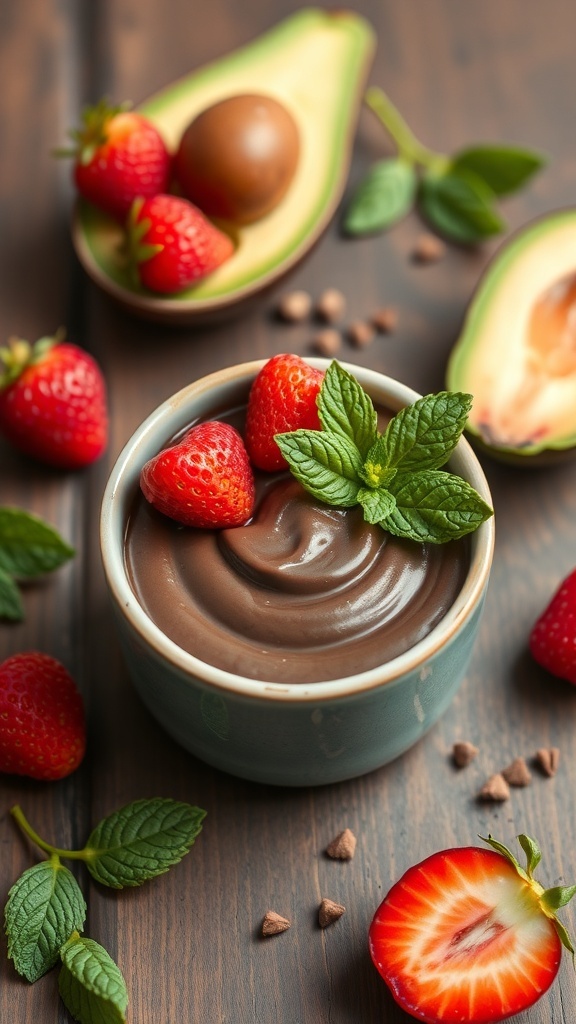
This chocolate avocado pudding is a delightful treat that’s both creamy and rich. It’s made with simple ingredients, yet it feels indulgent. The combination of ripe avocados and chocolate creates a luscious dessert that’s guilt-free. It’s perfect for satisfying that sweet tooth without the heavy calories!
In the image, you’ll see a bowl of smooth chocolate pudding topped with fresh strawberries and a sprig of mint, all beautifully arranged on a rustic wooden surface. The vibrant colors of the strawberries and the rich brown of the pudding make it visually appealing and tempting. You can almost taste the creamy richness and the sweetness of the chocolate just by looking at it!
This pudding is super easy to whip up. It’s dairy-free, thanks to the avocados, and it’s a great option for those looking to indulge in a healthy way. Let’s dive into how you can make this delicious dessert at home!
Ingredients
- 2 ripe avocados
- 1/4 cup unsweetened cocoa powder
- 1/4 cup maple syrup or honey
- 1/4 cup almond milk (or any milk of your choice)
- 1 teaspoon vanilla extract
- A pinch of salt
- Fresh strawberries and mint for garnish
Instructions
- Prepare the Avocados: Halve the ripe avocados and remove the pits. Scoop the flesh into a blender or food processor.
- Add Ingredients: To the avocado, add cocoa powder, maple syrup, almond milk, vanilla extract, and a pinch of salt.
- Blend: Blend the mixture until it’s silky smooth, scraping down the sides as necessary. You want a creamy consistency.
- Taste and Adjust: Give it a taste! You can add more cocoa powder or sweetener if you desire.
- Chill: Transfer the pudding into serving bowls, then chill in the fridge for at least 30 minutes before serving.
- Garnish: When ready to enjoy, top with fresh strawberries and mint leaves for a pop of color and flavor.
Enjoy your delicious and healthy chocolate avocado pudding!
Pineapple Upside-Down Cake

Who can resist a delicious pineapple upside-down cake? This classic dessert not only tastes amazing but also has a stunning presentation. Imagine a fluffy cake topped with caramelized pineapple slices and bright red cherries. It’s a real showstopper!
The sweet and slightly tangy flavor of the pineapples pairs perfectly with the buttery cake. This dessert brings back memories of family gatherings and celebrations. It’s easy to make, and with just a few ingredients, you can whip it up in no time.
Let’s dive into how you can create your very own pineapple upside-down cake!
Ingredients
- 1/4 cup unsalted butter
- 1 cup brown sugar, packed
- 1 can (20 oz) sliced pineapple, drained
- Maraschino cherries
- 1 1/2 cups all-purpose flour
- 1 cup granulated sugar
- 1/2 cup milk
- 1/4 cup vegetable oil
- 2 large eggs
- 2 teaspoons baking powder
- 1 teaspoon vanilla extract
- 1/4 teaspoon salt
Instructions
- Preheat your oven to 350°F (175°C).
- In a round cake pan, melt the butter in the oven. Once melted, sprinkle the brown sugar evenly over the butter.
- Arrange the pineapple slices on top of the brown sugar mixture, placing a maraschino cherry in the center of each slice.
- In a mixing bowl, beat together granulated sugar, vegetable oil, eggs, vanilla, and milk until smooth.
- In another bowl, sift together flour, baking powder, and salt. Gradually add the dry mixture to the wet ingredients, mixing until well combined.
- Pour the batter over the pineapple and cherries in the pan.
- Bake for about 40-45 minutes or until a toothpick inserted in the center comes out clean.
- Let it cool for about 10 minutes before inverting the cake onto a serving platter.
Enjoy your irresistible pineapple upside-down cake, perfect for any occasion!
Coconut Macaroons
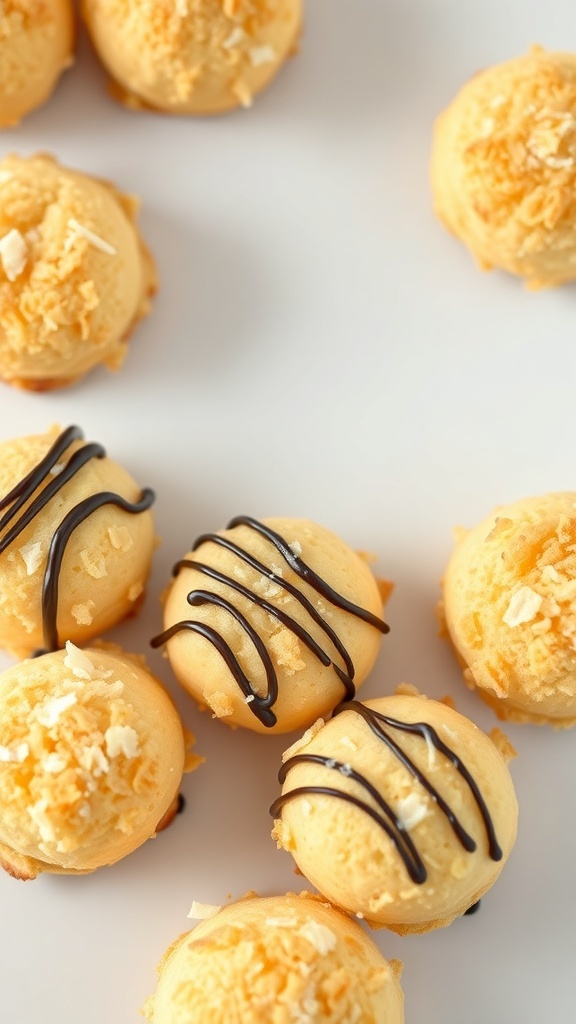
Coconut macaroons are delightful little treats that bring a taste of tropical sweetness to your dessert table. These chewy cookies are made primarily from shredded coconut, making them rich in flavor and texture. Topped with a drizzle of chocolate, they’re not just delicious but also look appetizing!
The best part about coconut macaroons is how simple they are to make. You can whip them up in no time, making them perfect for any occasion. They’re great for parties, as a snack, or just to satisfy that sweet tooth! Let’s dive into the ingredients and steps to make your own batch.
Ingredients
- 2 2/3 cups shredded coconut
- 2/3 cup sweetened condensed milk
- 1 teaspoon vanilla extract
- 1/4 teaspoon salt
- 2 large egg whites
- 1/2 cup chocolate chips (optional for drizzling)
Instructions
- Preheat the oven to 325°F (160°C). Line a baking sheet with parchment paper.
- In a mixing bowl, combine the shredded coconut, sweetened condensed milk, vanilla extract, and salt until well mixed.
- In another bowl, beat the egg whites until medium peaks form.
- Gently fold the egg whites into the coconut mixture until just combined. Be careful not to deflate the egg whites.
- Using a spoon or cookie scoop, drop rounded tablespoons of the mixture onto the prepared baking sheet, leaving some space between each.
- Bake for 10-12 minutes or until the edges are golden brown.
- Remove from the oven and let them cool completely on a wire rack.
- If desired, melt the chocolate chips in a microwave and drizzle over the cooled macaroons for an added touch!