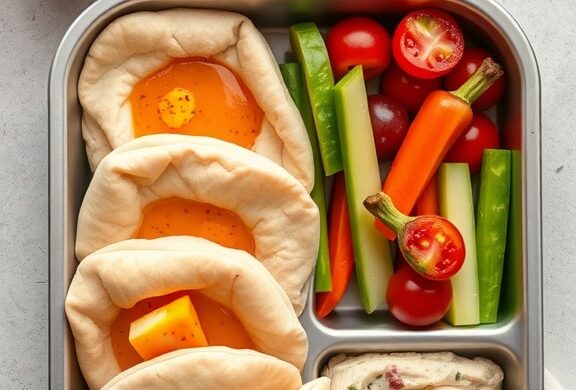
Looking for fun and tasty lunch ideas for kids? You’ve come to the right place! Whether you’re packing a quick bite for school or prepping something special for home, there’s a variety of delicious and easy options that will keep your little ones excited about lunchtime.
Let’s dive into some creative and nutritious ideas that are sure to satisfy their appetites!
Colorful Veggie Wraps
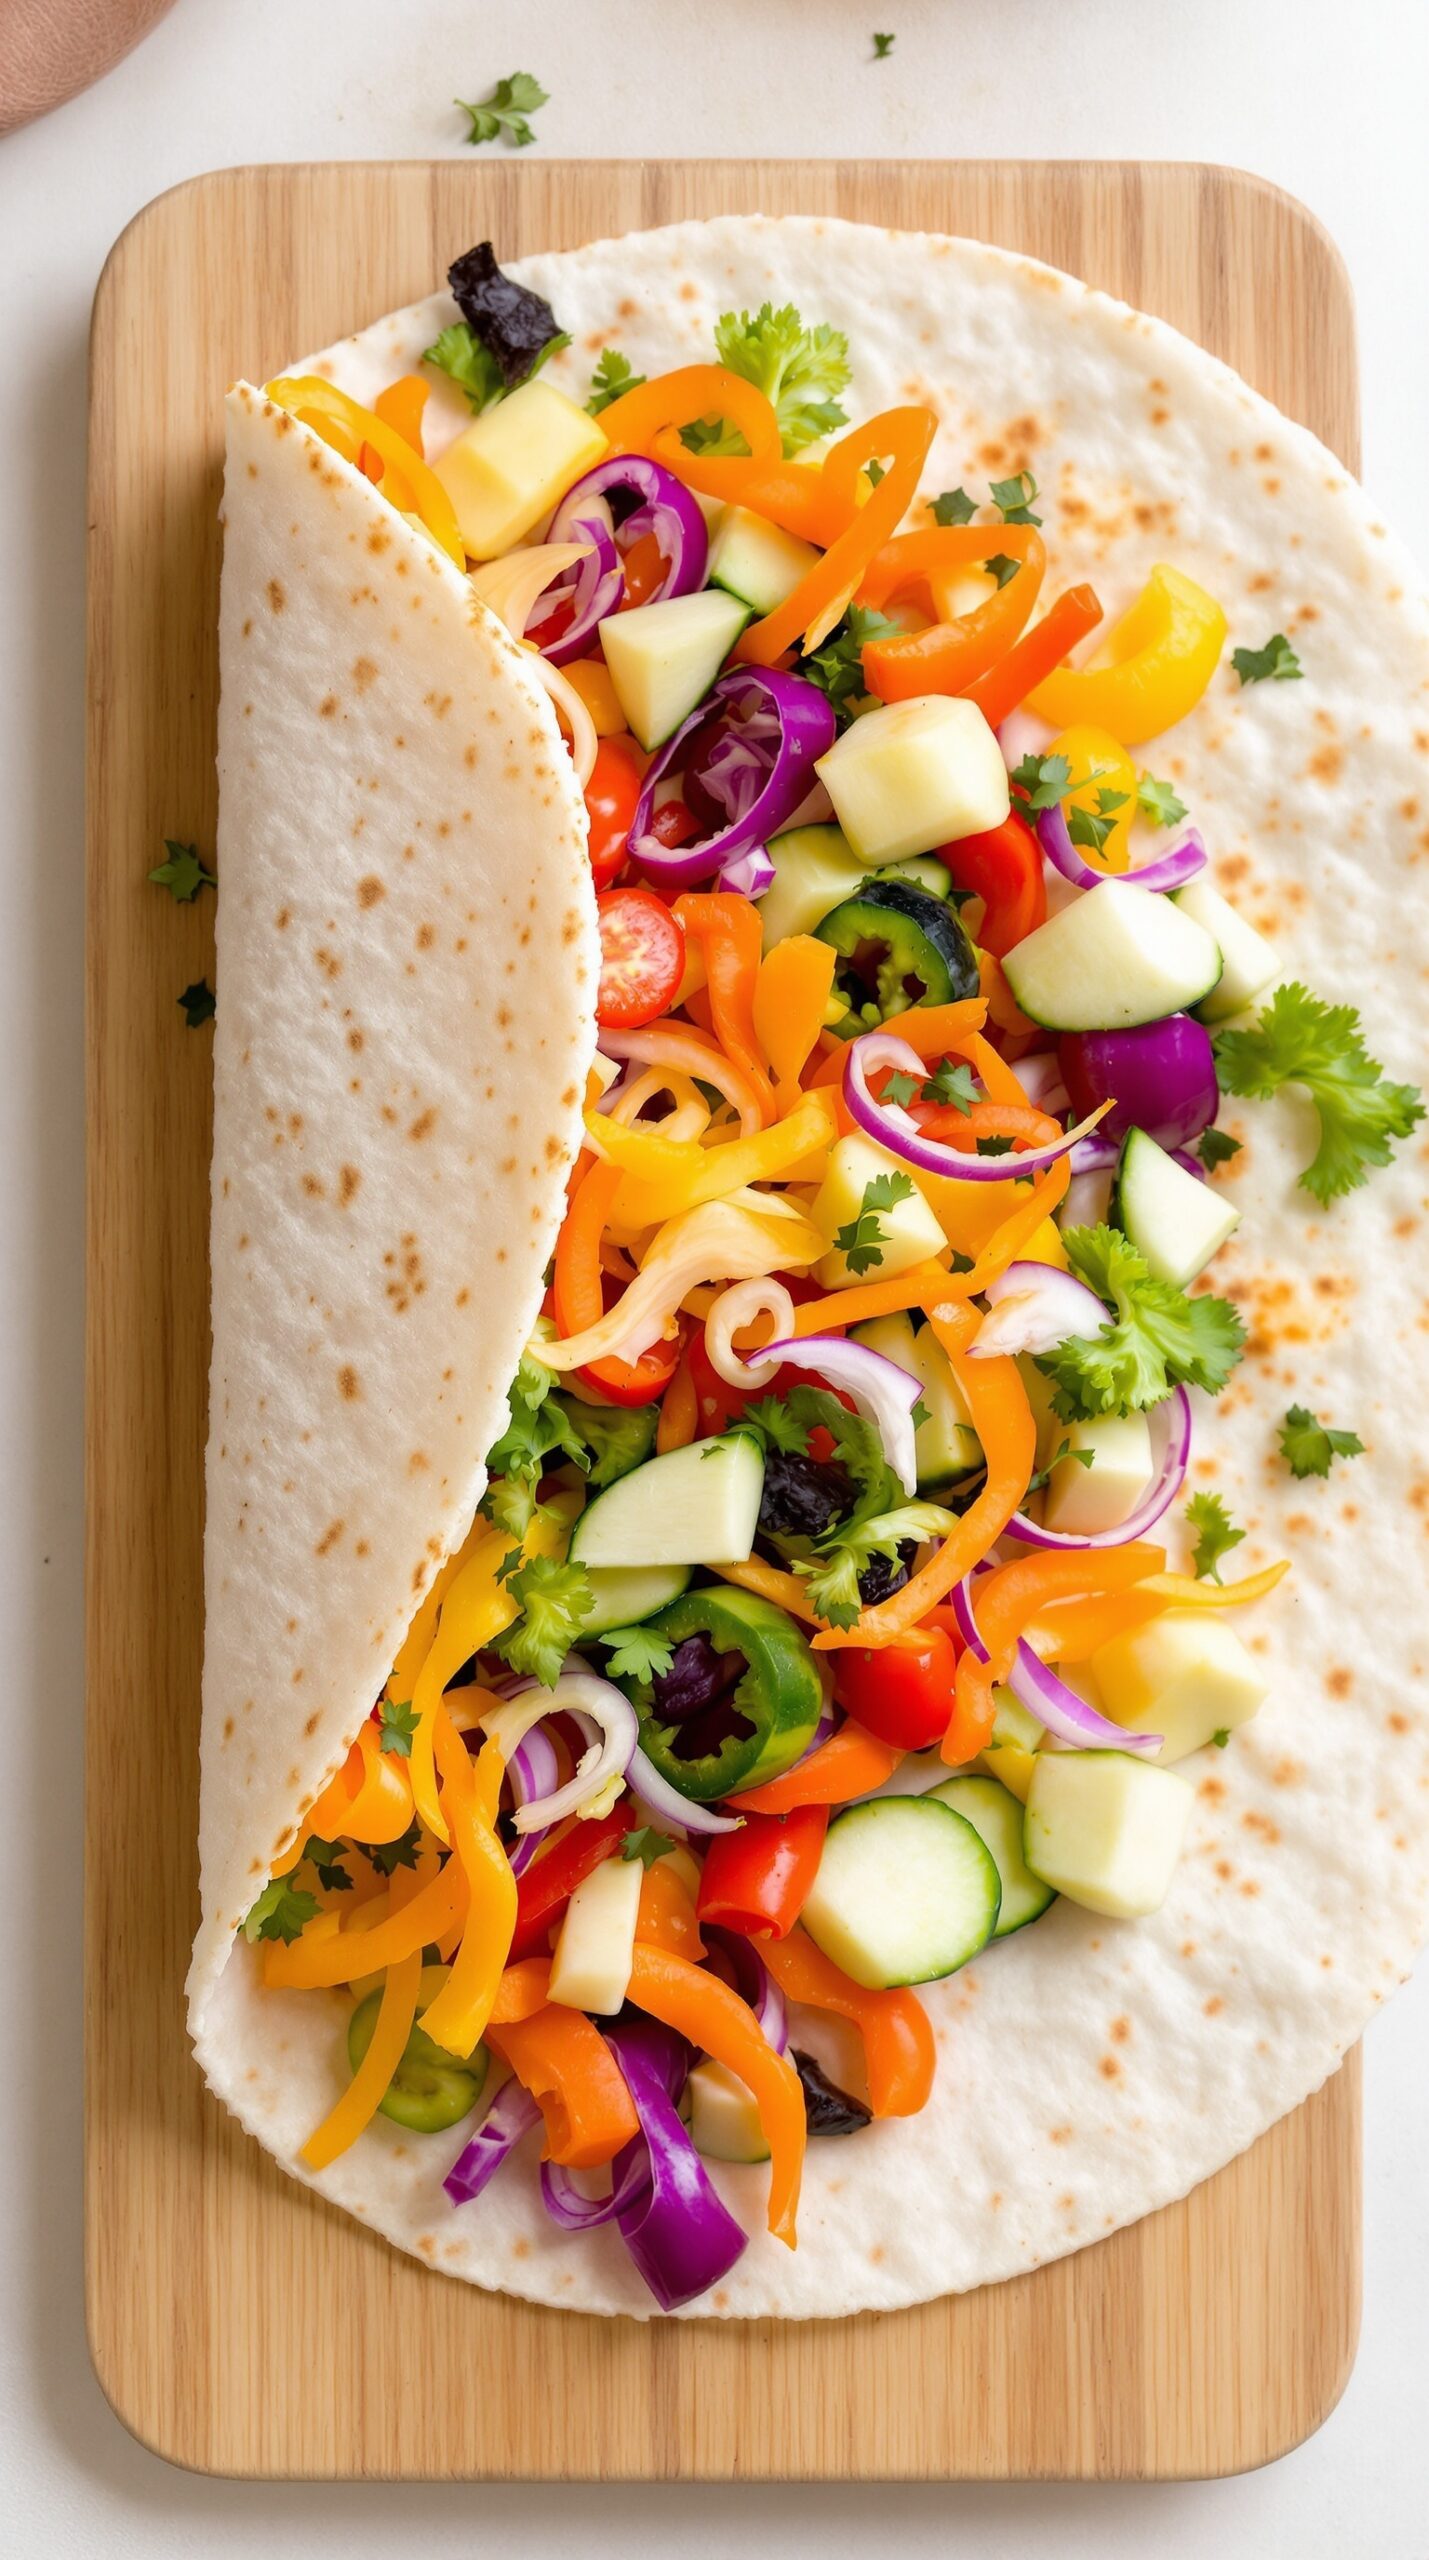
Colorful veggie wraps are a fun and healthy lunch idea that kids will love. Bursting with vibrant vegetables, these wraps are not only eye-catching but also delicious. You can customize them to suit your child’s tastes or what you have in the fridge.
Start with a soft tortilla and load it with an array of fresh vegetables such as bell peppers, cucumbers, and carrots. Adding some cheese or a tasty spread can elevate the flavor even more. These wraps are perfect for packing in lunchboxes or for a quick meal at home.
Kids can even help in assembling these wraps, making lunchtime more interactive and fun. Let them choose their favorite veggies and watch their creativity shine!
Ingredients
- 4 large tortillas
- 1 cup shredded lettuce
- 1 cup diced bell peppers (mixed colors)
- 1 cup diced cucumbers
- 1/2 cup shredded cheese (optional)
- 1/2 cup hummus or ranch dressing (for spreading)
- Fresh cilantro (for garnish)
Instructions
- Start by laying a tortilla flat on a clean surface.
- Spread a layer of hummus or ranch dressing evenly across the tortilla.
- Layer the shredded lettuce, followed by diced bell peppers and cucumbers.
- If using cheese, sprinkle it on top of the vegetables.
- Sprinkle fresh cilantro for added flavor.
- Carefully fold the sides of the tortilla inward and roll it tightly from the bottom up.
- Slice the wrap in half or into bite-sized pieces for easy handling.
- Serve immediately or wrap in foil for a lunchbox treat.
Cheesy Quesadilla Slices
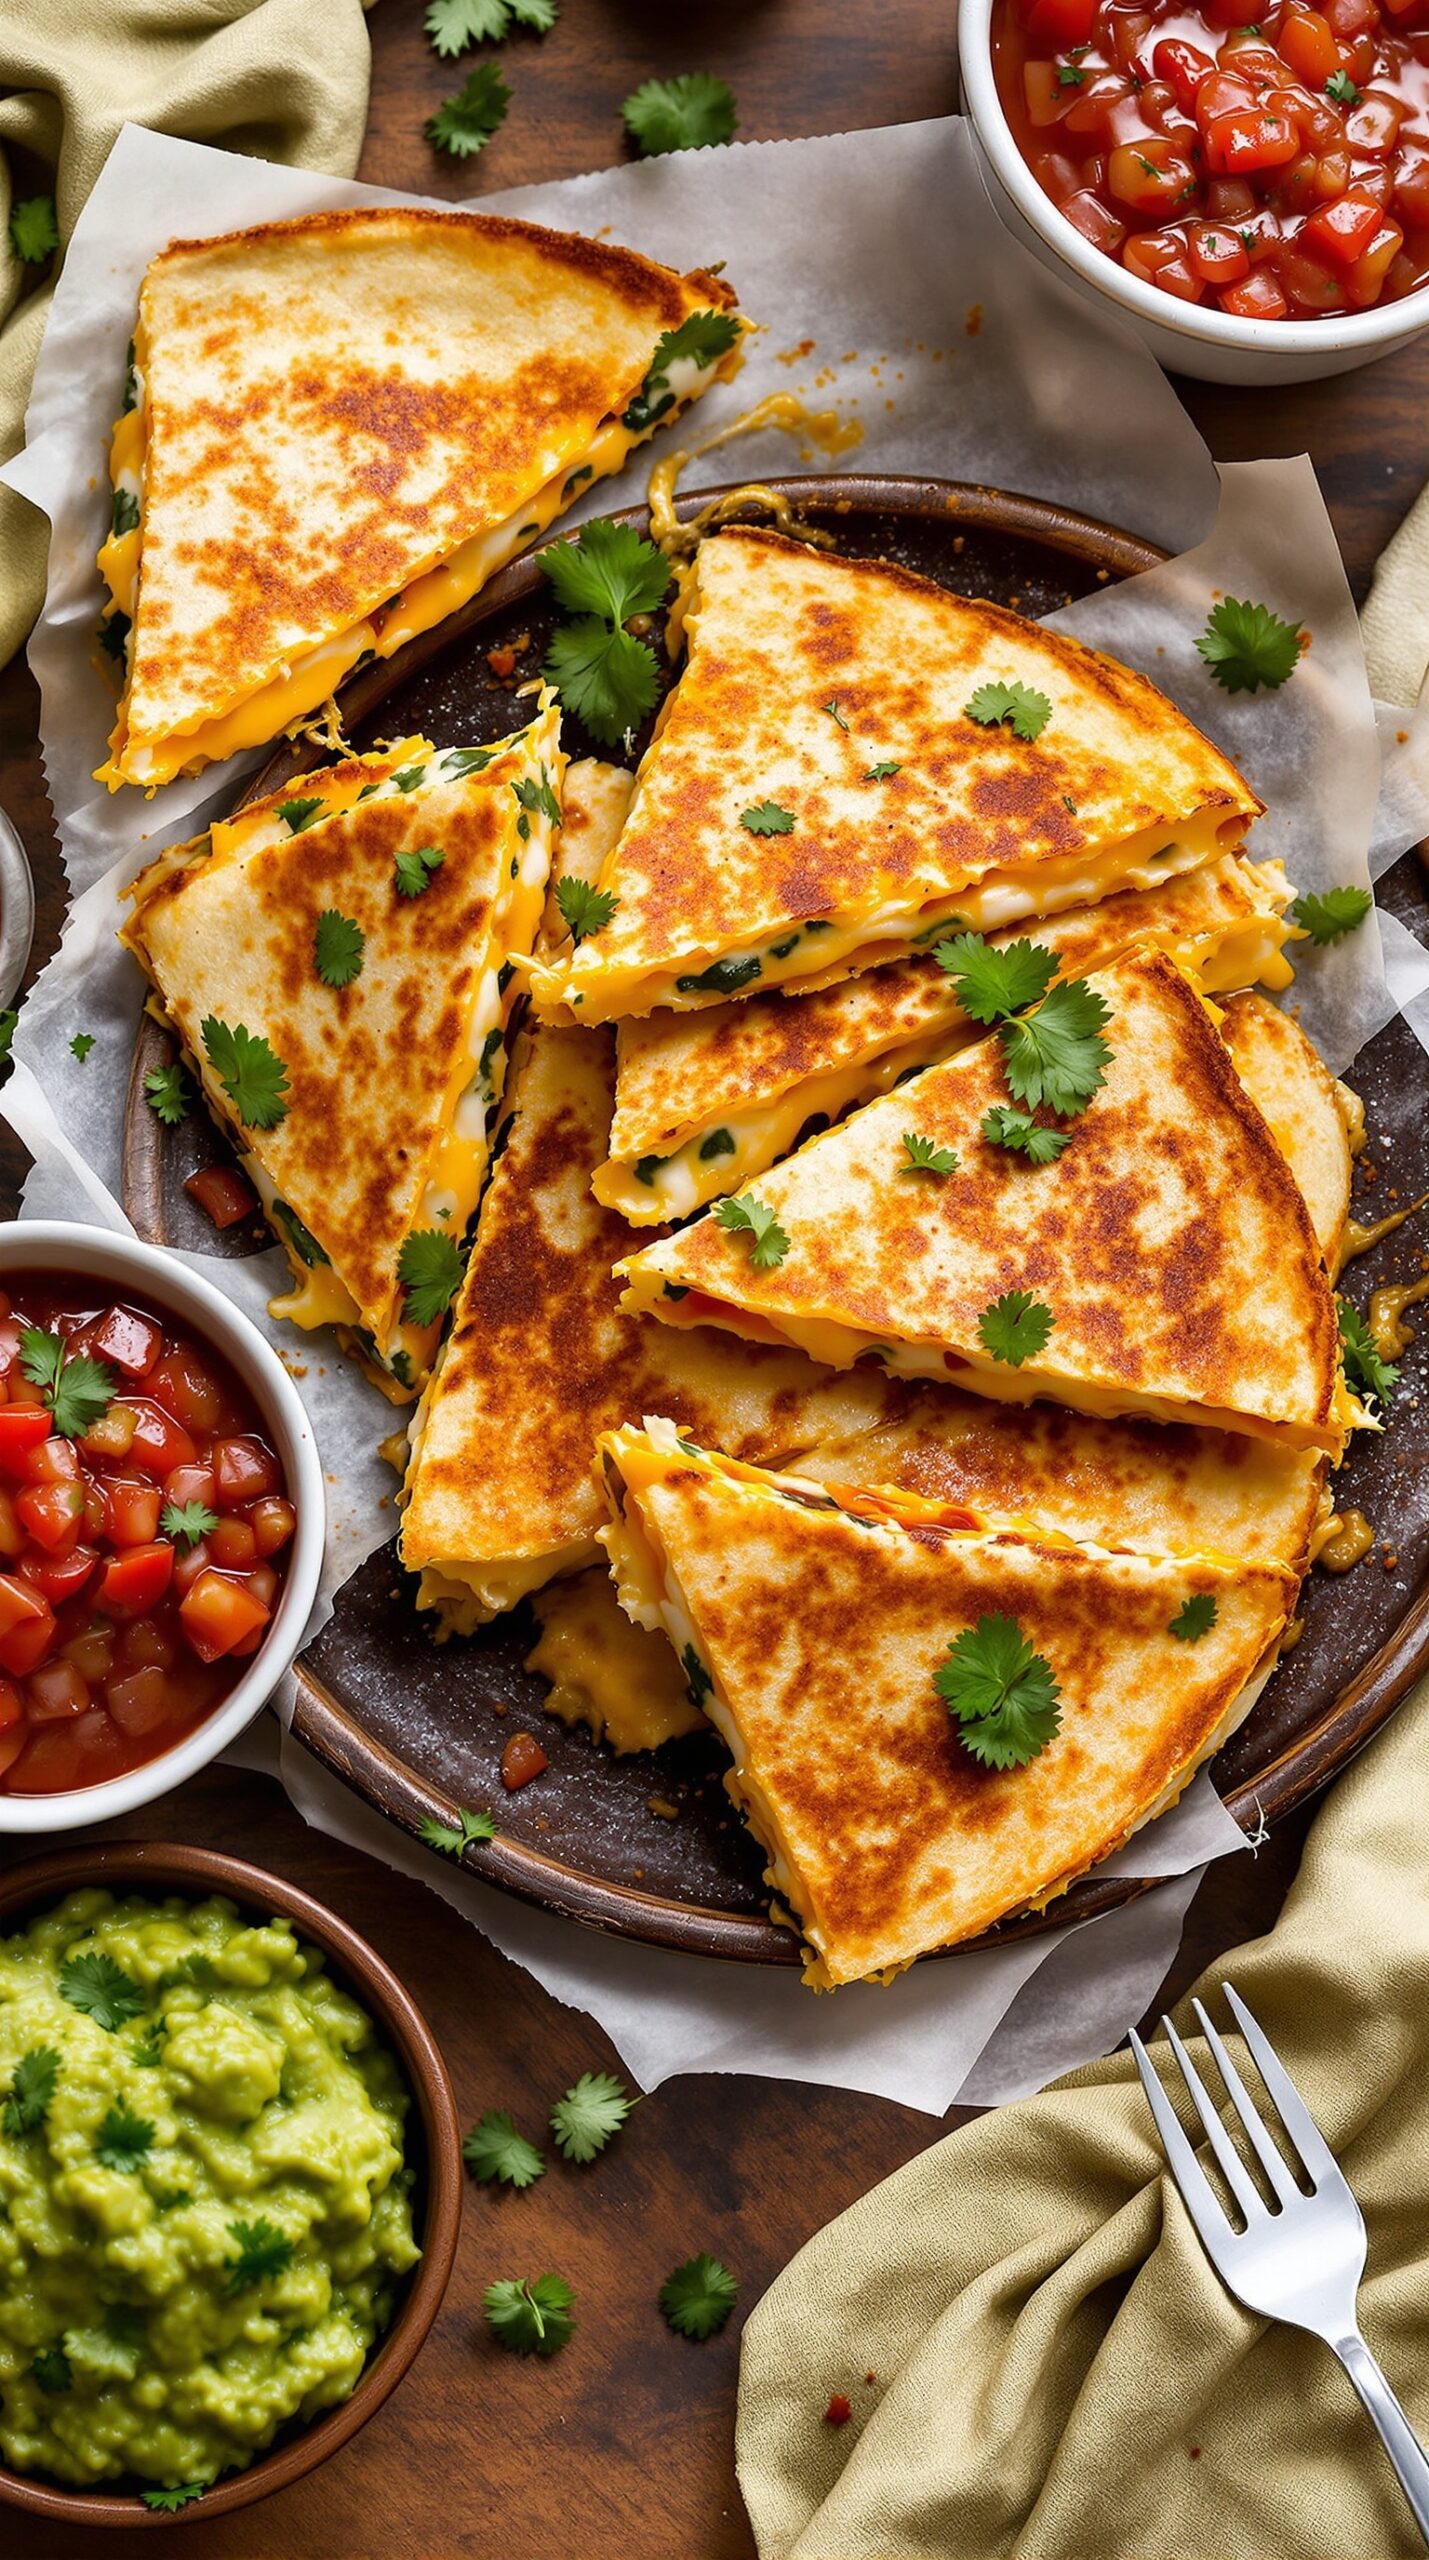
Cheesy quesadilla slices are a hit with kids, combining gooey cheese and crispy tortillas for a delightful lunch. They are also super simple to make, making them a perfect choice for busy moms and dads. All you need are some tortillas, cheese, and any extras your kids love—think veggies or meats!
The quesadillas can be cut into fun shapes or triangles, making them easy to hold and eat. Serve them with salsa or guacamole for dipping, and watch your kids enjoy every bite.
Ingredients
- 4 large flour tortillas
- 2 cups shredded cheese (cheddar, mozzarella, or your favorite blend)
- 1/2 cup cooked chicken or veggies (optional)
- 1 tablespoon olive oil or butter
- Salsa or guacamole for dipping
Instructions
- Heat a skillet over medium heat and add olive oil or butter.
- Place one tortilla in the skillet and sprinkle half of the cheese evenly on top.
- Add any additional fillings like chicken or veggies if desired, then top with the remaining cheese.
- Cover with another tortilla and cook until the bottom is golden brown, about 3-4 minutes.
- Carefully flip the quesadilla and cook the other side until golden and the cheese is melted, another 3-4 minutes.
- Remove from the skillet and let it cool for a couple of minutes. Cut into slices and serve with your favorite dips.
Egg Muffins with Spinach

Egg muffins with spinach are a fantastic lunch idea for kids, blending nutrition and fun in one easy-to-eat package. These little cups are fluffy and packed with flavor, making them perfect for a midday meal.
In the image, you can see a beautiful array of golden-brown egg muffins, each one bursting with vibrant green spinach. They look both inviting and healthy, a great option to sneak in those essential veggies without the fuss. Plus, they are super simple to prepare, which is always a win for busy parents!
Making egg muffins is not only easy but also a delightful way to get creative with various ingredients. Kids can help mix in their favorite veggies, making lunch both a fun activity and a delicious outcome.
Ingredients
- 6 large eggs
- 1 cup fresh spinach, chopped
- 1/2 cup shredded cheese (cheddar or mozzarella)
- 1/4 cup milk
- Salt and pepper to taste
- Optional: diced bell peppers, onions, or cooked ham
Instructions
- Preheat your oven to 375°F (190°C) and grease a muffin tin.
- In a large bowl, whisk together the eggs and milk until well combined.
- Add the chopped spinach, cheese, and any other optional ingredients. Season with salt and pepper.
- Pour the egg mixture into the muffin tin, filling each cup about three-quarters full.
- Bake for 18-20 minutes or until the muffins are fluffy and slightly golden on top.
- Let them cool for a few minutes before removing from the tin. Serve warm or store in the fridge for easy grab-and-go lunches!
Turkey and Cheese Roll-Ups

Turkey and cheese roll-ups are an excellent lunch idea for kids, combining healthy ingredients with a fun and easy-to-eat format. The image shows vibrant, colorful rolls that are sure to catch your child’s eye. They look deliciously inviting and are perfect for a school lunch or a quick snack at home.
This recipe is not only simple but also allows for some creative variations. You can switch up the ingredients based on what your kids love or what you have on hand. The roll-ups can include turkey slices, cheese, and even a hint of veggies, making them a nutritious option.
Plus, they are easy to pack and will keep well until lunchtime. These roll-ups can be served with a side of fruit or some crunchy veggies to round out the meal.
Ingredients
- 4 large tortillas (whole wheat or flour)
- 8 slices of turkey breast
- 4 slices of cheese (cheddar or mozzarella)
- 1/2 cup cream cheese
- 1/2 cup diced bell peppers (optional)
- Fresh herbs for garnish
Instructions
- Spread cream cheese evenly over each tortilla.
- Layer turkey slices and cheese on top of the cream cheese.
- Add the diced bell peppers if using.
- Roll the tortillas tightly and slice them into bite-sized pieces.
- Garnish with fresh herbs for a pop of color and flavor.
Enjoy these turkey and cheese roll-ups, packed with flavor and goodness. They are sure to be a hit with your kids!
Whole Grain Pasta Salad
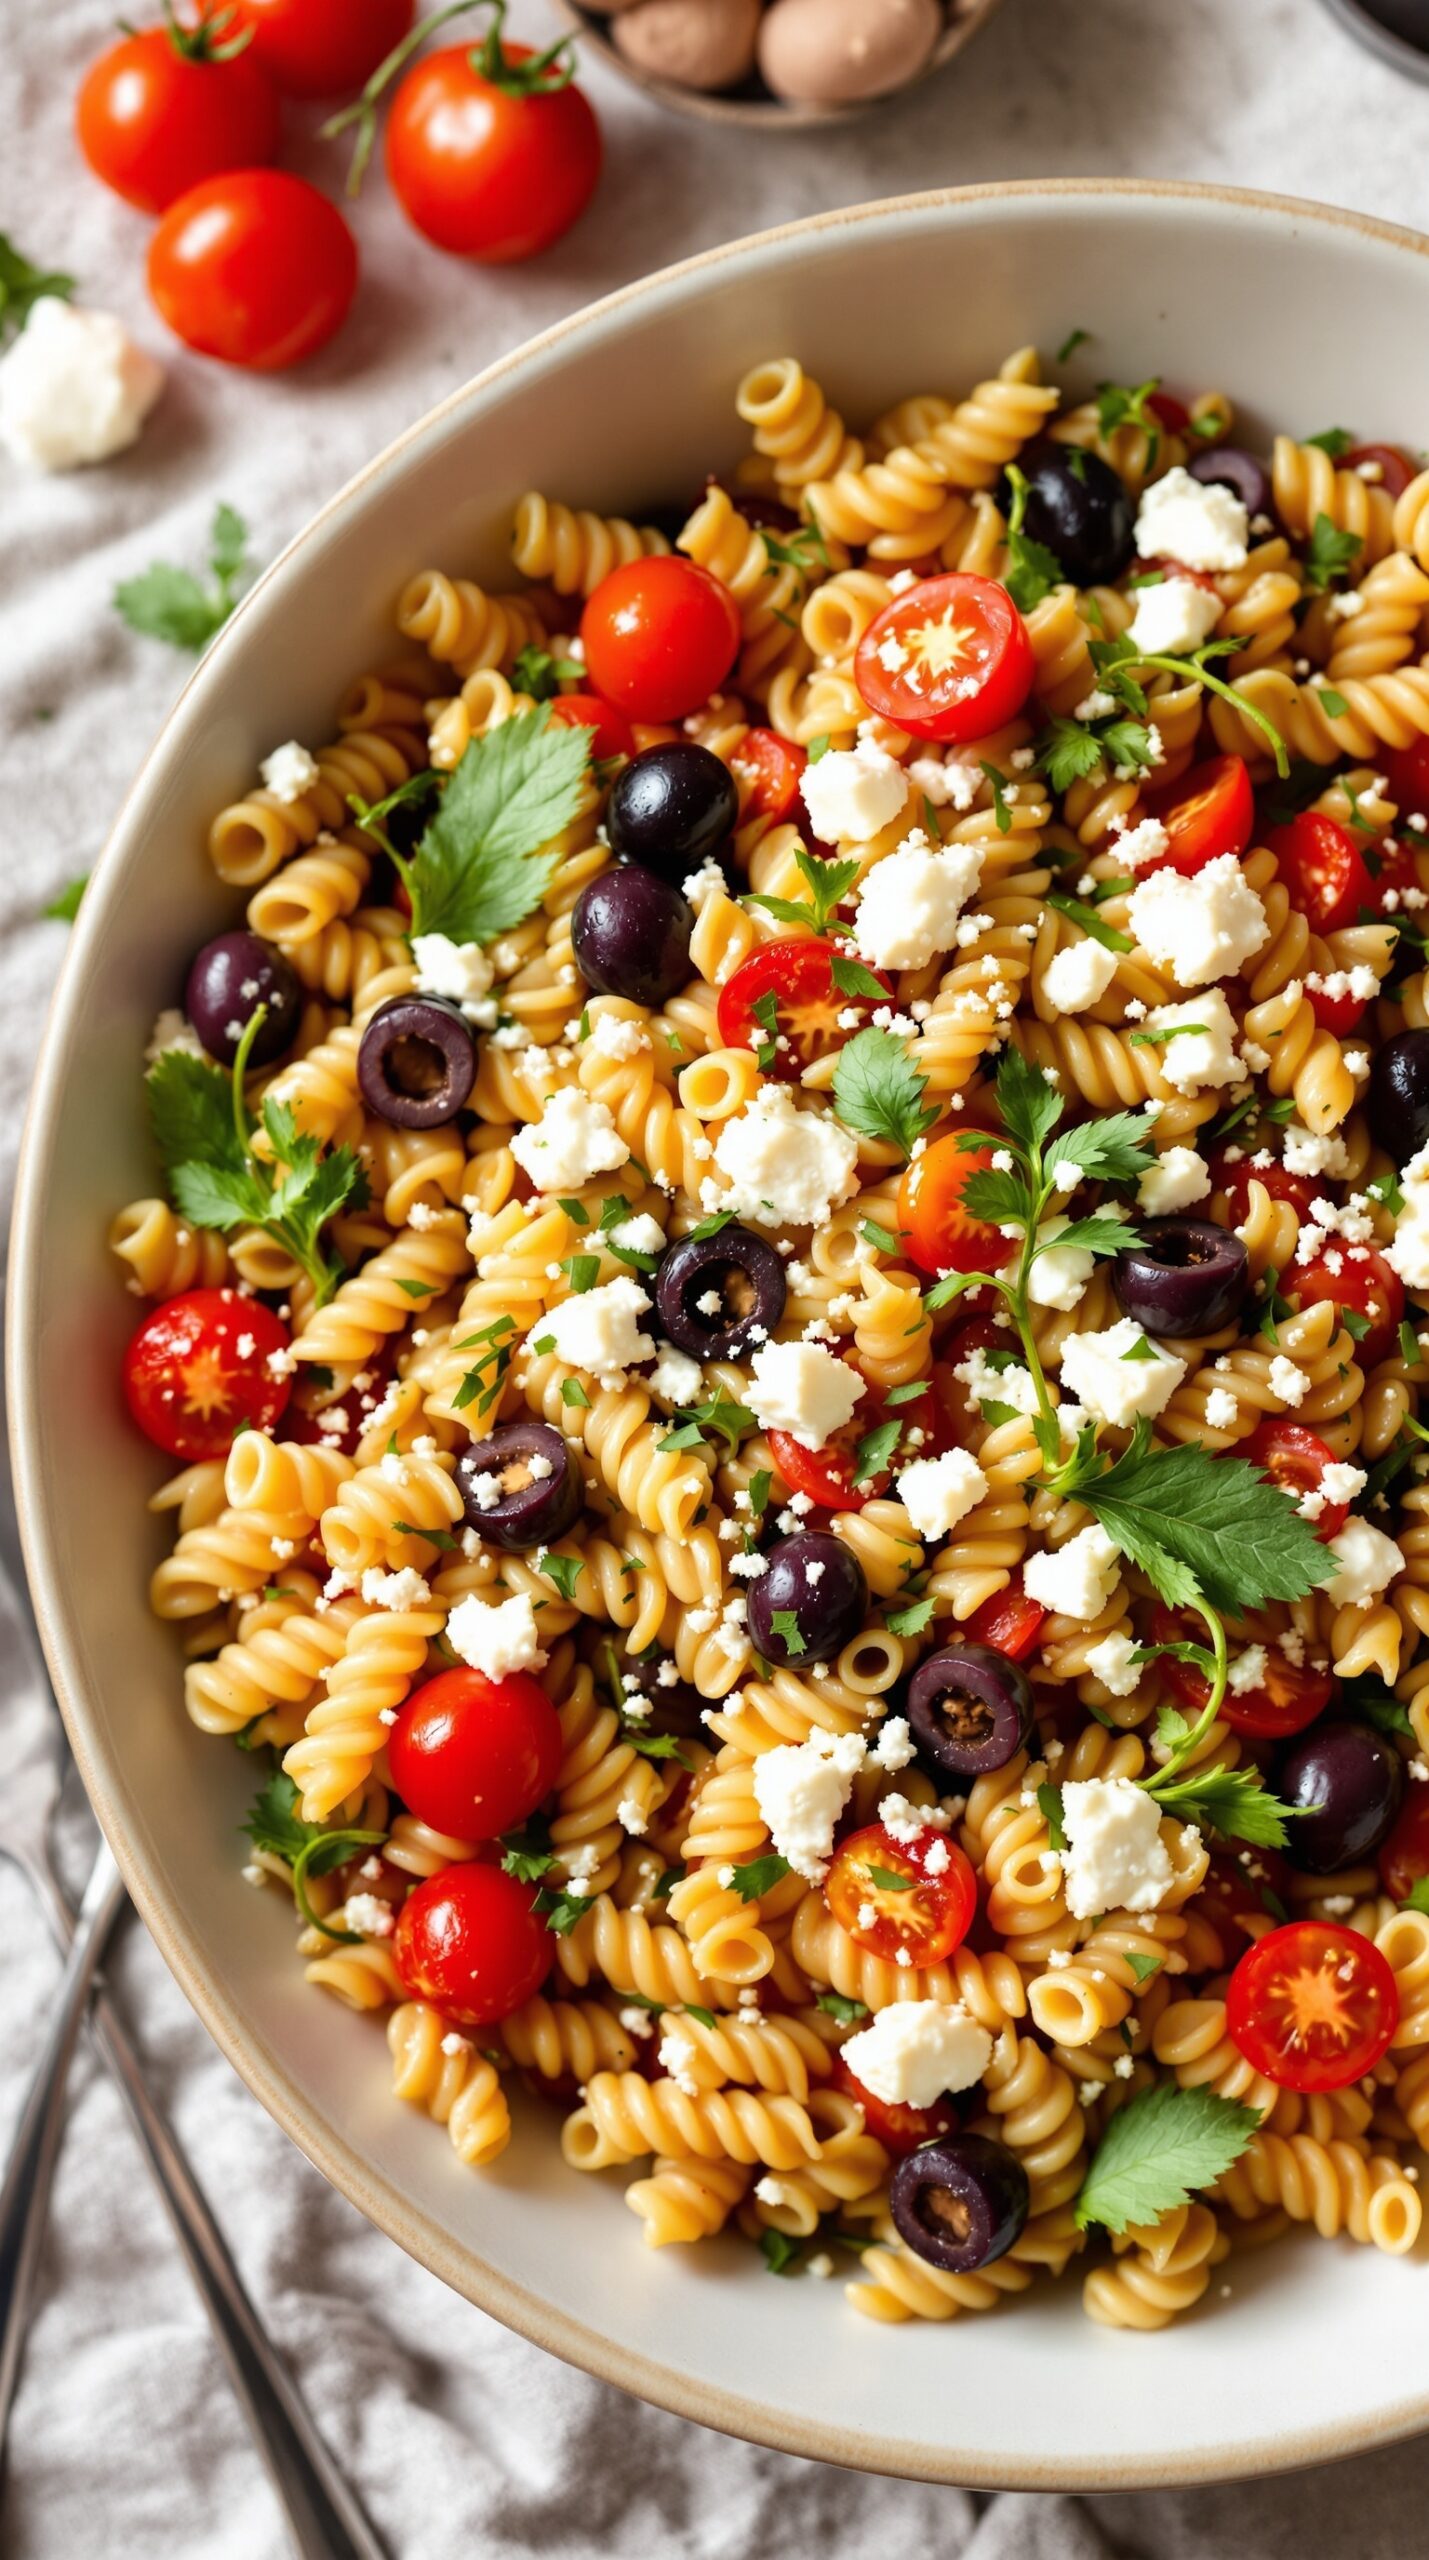
Whole grain pasta salad is a delightful and nutritious option for kids’ lunches. It’s colorful, tasty, and packed with wholesome ingredients that kids will love. You can whip it up quickly, making it perfect for those busy mornings when you need a reliable lunch idea.
This pasta salad features whole grain rotini, which is fun for little hands to eat. The fresh cherry tomatoes and black olives add vibrant colors and crunch, while the crumbled feta introduces a creamy texture. Tossed with a light dressing and fresh herbs, this salad is sure to be a hit with kids and adults alike!
Ingredients
- 8 oz whole grain rotini pasta
- 1 cup cherry tomatoes, halved
- 1/2 cup black olives, pitted and sliced
- 1/2 cup feta cheese, crumbled
- 1/4 cup fresh cilantro or parsley, chopped
- 1/4 cup olive oil
- 2 tablespoons balsamic vinegar
- Salt and pepper, to taste
Instructions
- Cook the Pasta: Bring a pot of salted water to a boil. Add the whole grain rotini and cook according to the package directions until al dente. Drain and rinse under cold water to cool.
- Toss the Ingredients: In a large mixing bowl, combine the cooled pasta, cherry tomatoes, black olives, feta cheese, and cilantro.
- Make the Dressing: In a small bowl, whisk together olive oil, balsamic vinegar, salt, and pepper.
- Combine: Pour the dressing over the pasta mixture and toss gently to coat all the ingredients evenly.
- Serve: Let the salad sit for about 10-15 minutes to allow the flavors to meld. Serve chilled or at room temperature.
This whole grain pasta salad is not only delicious but also a fun way to get kids to enjoy their veggies. It’s versatile too; feel free to add or swap in any of their favorite veggies!
Fruit and Yogurt Parfait

A Fruit and Yogurt Parfait is not just a delightful treat but also a simple way to pack in nutrition during lunchtime. Picture a colorful glass filled with layers of creamy yogurt, fresh fruit, and crunchy granola. It looks appealing and tastes amazing! This snack is perfect for kids who enjoy a little sweetness, but it’s healthy too!
The best part about a parfait is that you can customize it. Any favorite fruits or yogurt flavors can be used. You might have strawberries, blueberries, and raspberries piled high, along with a sprinkle of granola on top for that extra crunch. The fun colors make it visually inviting, ensuring the kids won’t think twice about devouring it.
This easy recipe can be made quickly in the morning for a lunchbox addition or enjoyed as a snack after school. It’s a fantastic way to introduce kids to various fruits and flavors, making lunchtime fun!
Ingredients
- 2 cups yogurt (any flavor)
- 1 cup strawberries, sliced
- 1 cup blueberries
- 1 cup raspberries
- 1 cup granola
- Honey or maple syrup (optional)
Instructions
- Start by washing all fresh fruits thoroughly. Slice the strawberries.
- In a transparent glass or bowl, layer a scoop of yogurt at the bottom.
- Next, add a layer of sliced strawberries, followed by blueberries and raspberries.
- Sprinkle some granola over the fruit layer.
- Repeat the layering process until the glass is full. Finish with a dollop of yogurt and a final layer of fruit and granola on top.
- If using, drizzle a little honey or maple syrup on top for added sweetness.
- Serve immediately or cover and refrigerate until lunchtime!
DIY Pizza Kits
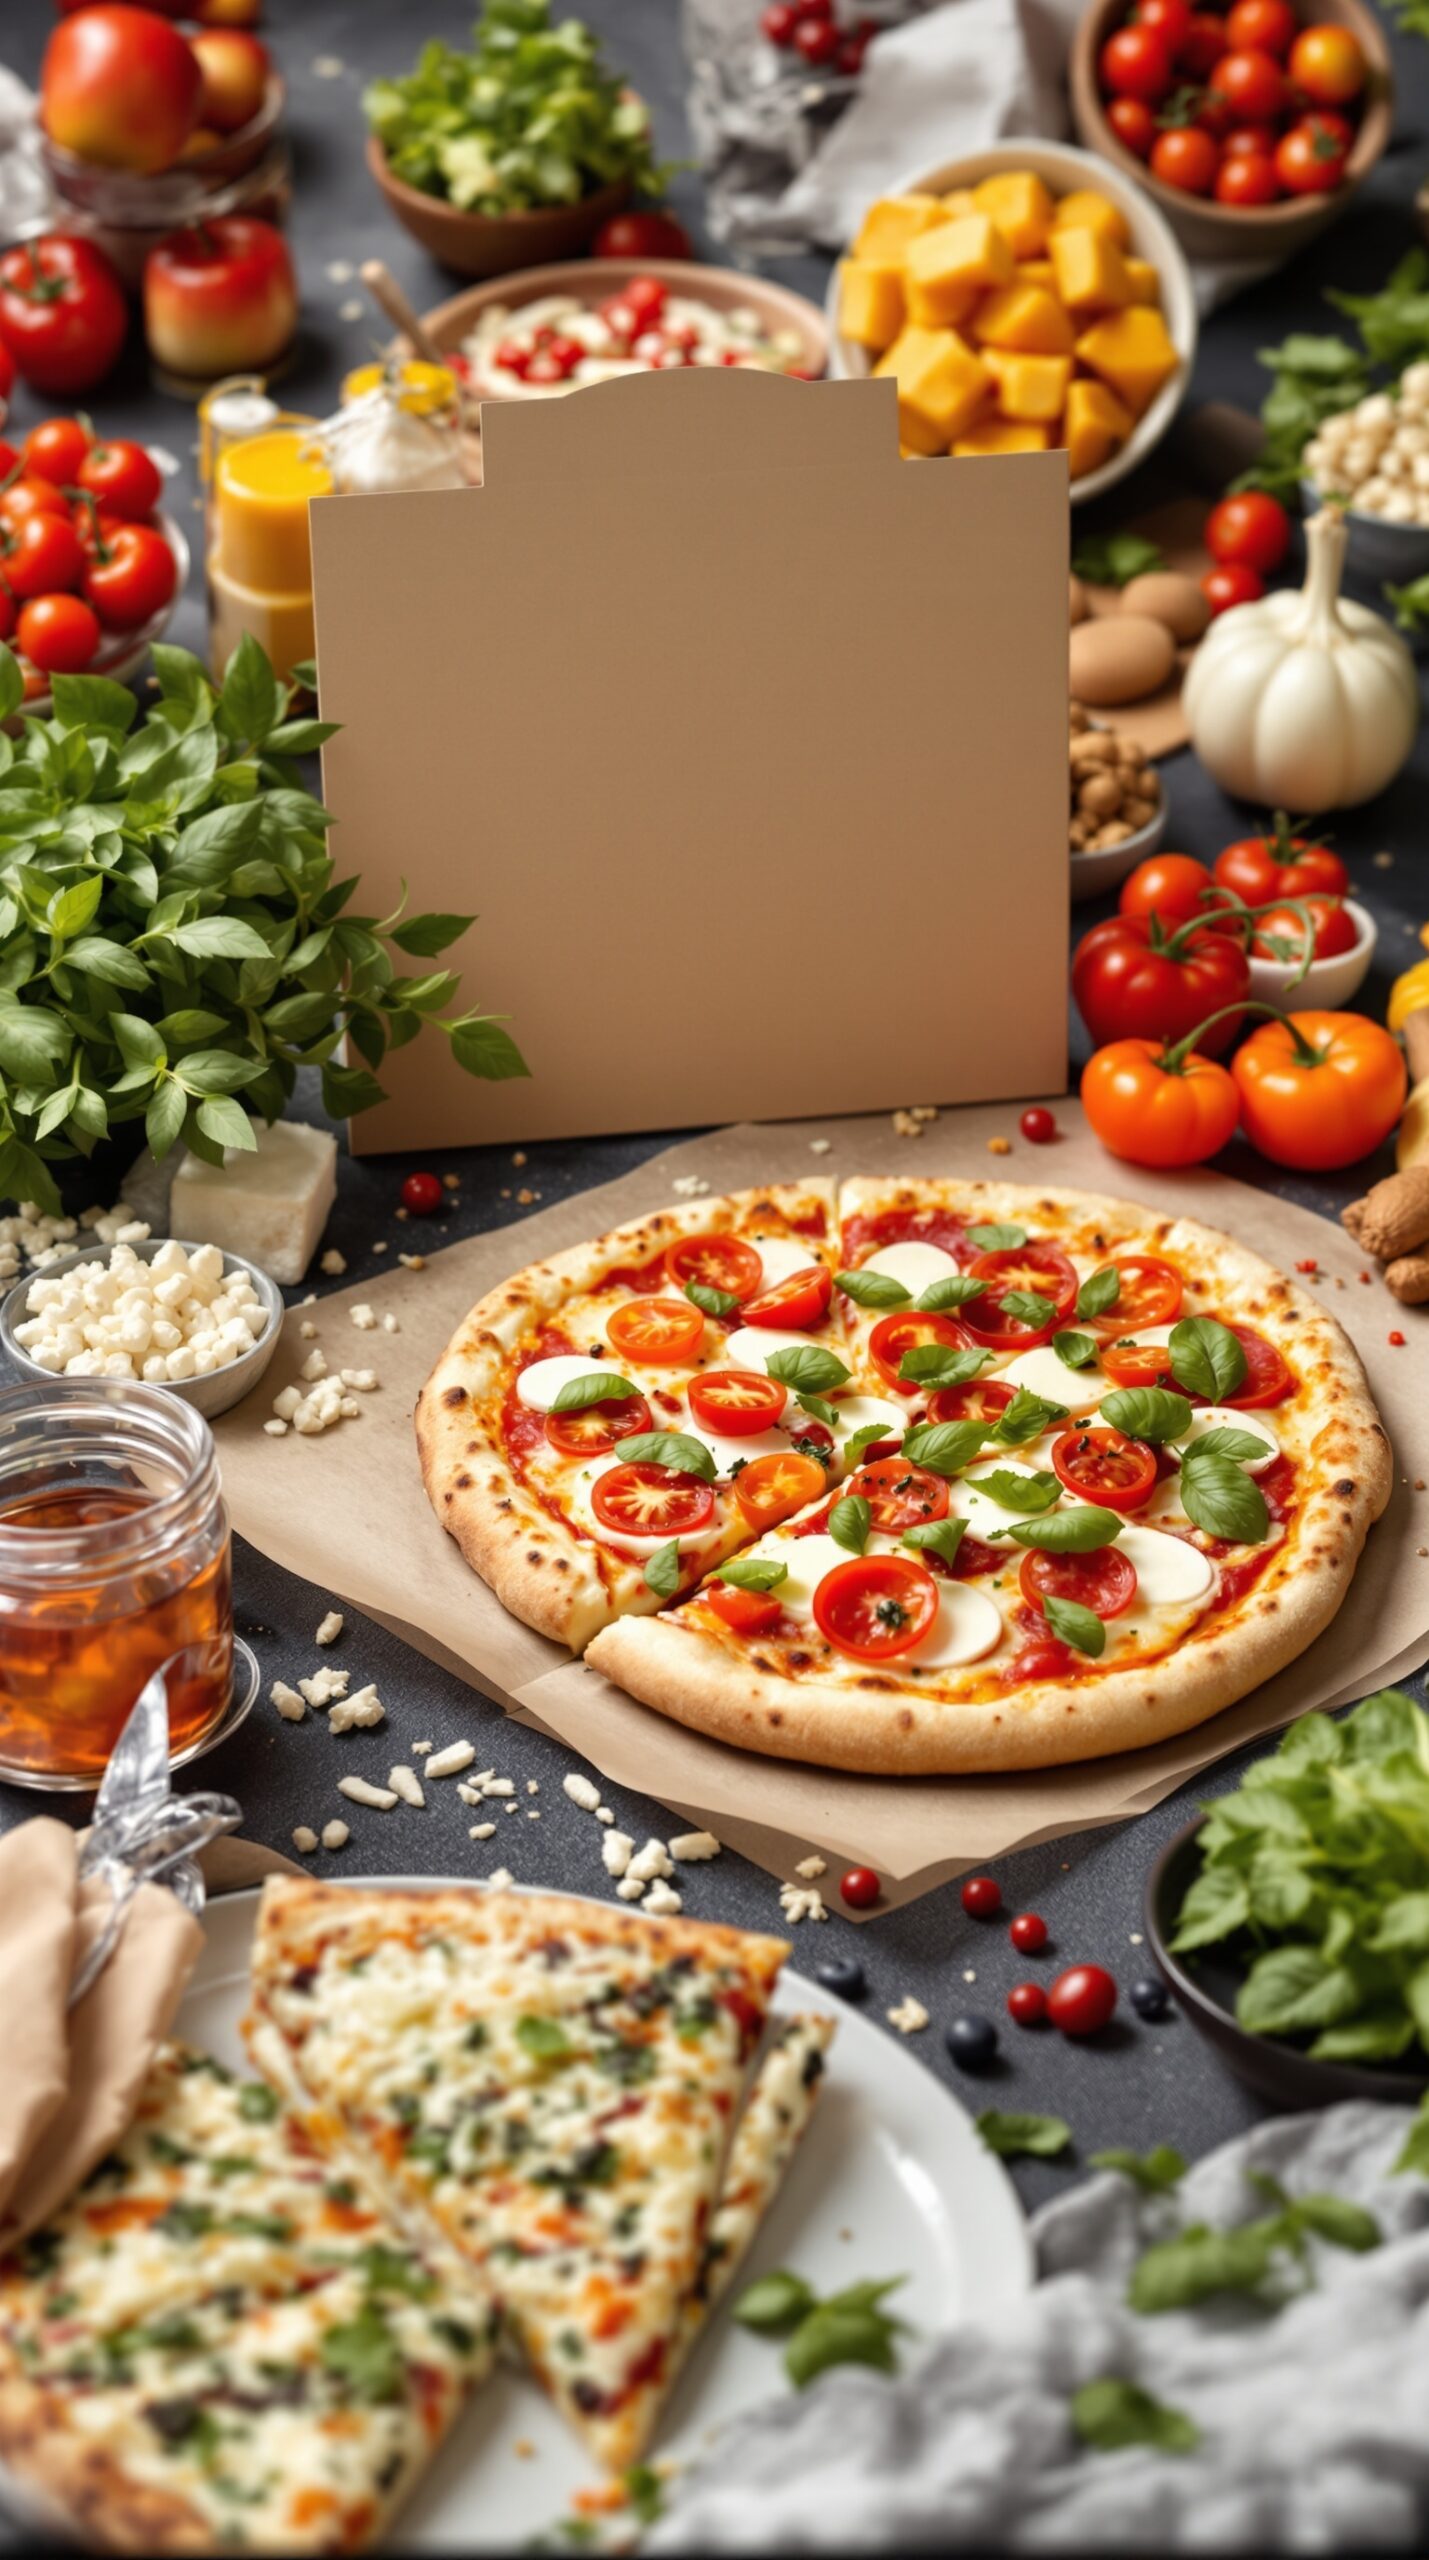
Kids love getting involved in the kitchen, and DIY pizza kits are a fantastic way to let them unleash their creativity! Imagine a colorful spread of fresh ingredients: vibrant tomatoes, creamy mozzarella, and fragrant basil, all ready for little hands to assemble. It’s not just fun; it’s also a great opportunity for kids to learn about food and healthy eating.
Setting up your DIY pizza station is easy. Gather all your toppings and a few different sauces. Think outside the box with options like pesto or BBQ sauce alongside the classic tomato base. Don’t forget to include some unique toppings like pineapple, mushrooms, or even various cheeses. This way, every child can customize their pizza just the way they like it.
The best part? Everyone gets a personal pizza, making lunch both fun and interactive. You can also sneak in some lessons about portion sizes and balancing flavors without them even realizing it!
To create the perfect DIY pizza kit at home, you’ll need a few basic ingredients and a simple recipe to guide the kids. Here’s how to make it happen!
Ingredients
- 1 pre-made pizza dough (store-bought or homemade)
- 1 cup pizza sauce
- 1 1/2 cups shredded mozzarella cheese
- 1 cup assorted toppings (pepperoni, bell peppers, olives, etc.)
- Fresh basil leaves for garnish
Instructions
- Preheat your oven to 475°F (245°C).
- Roll out the pizza dough on a floured surface until it’s about 12 inches in diameter.
- Transfer the rolled-out dough onto a baking sheet lined with parchment paper or a pizza stone.
- Spread pizza sauce evenly over the dough, leaving a small border for the crust.
- Sprinkle shredded mozzarella cheese generously over the sauce.
- Let the kids add their favorite toppings on top of the cheese.
- Bake in the oven for 12-15 minutes until the crust is golden brown and the cheese is bubbly.
- Once baked, garnish with fresh basil leaves and let cool slightly before slicing and serving.
Peanut Butter Banana Sushi
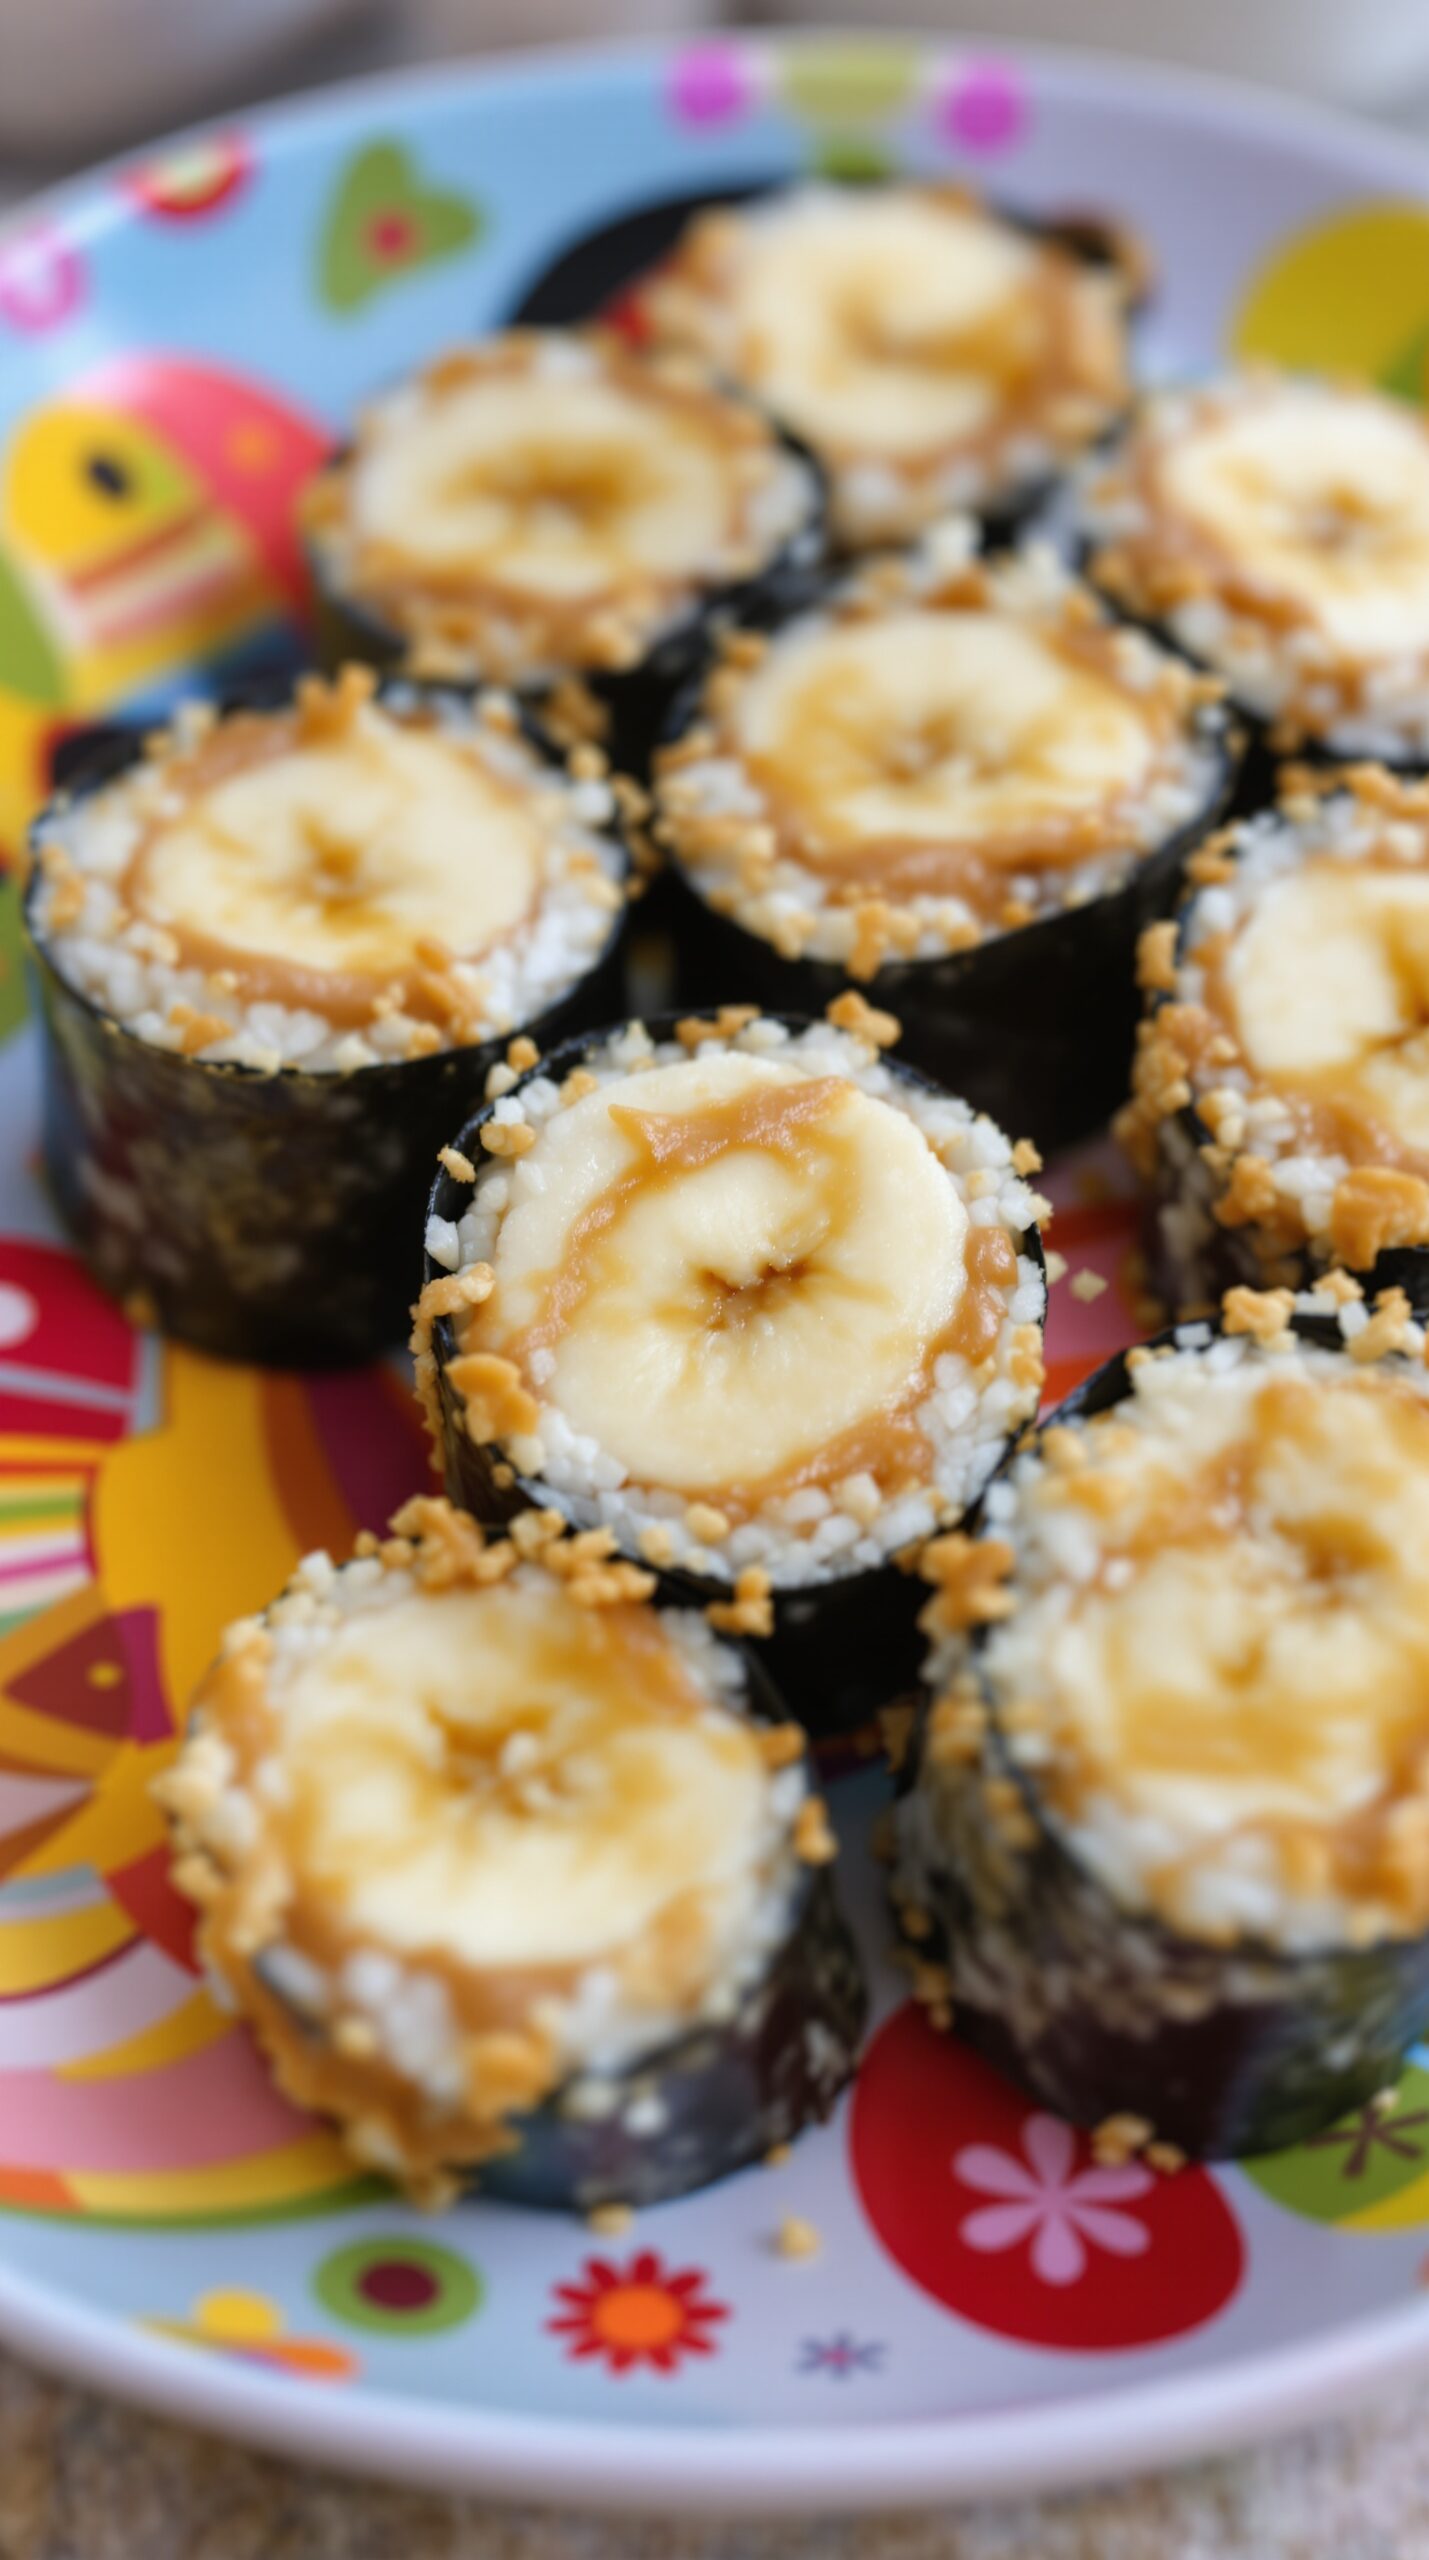
Peanut Butter Banana Sushi is a fun and healthy lunch option that kids love. It’s not really sushi, but it sure looks like it! This creative dish combines the sweetness of bananas with the rich flavor of peanut butter, all wrapped up in a thin layer of rice and nori. Your kids will enjoy a delightful twist on traditional sushi, making lunchtime exciting and nutritious.
The playful presentation makes it great for kids who might be picky eaters. Watching them delight in their colorful sushi-like rolls can be quite the entertaining experience! Plus, it’s easy to make together, which can turn lunchtime into a fun family activity.
Ingredients
- 2 large bananas
- 1/4 cup peanut butter
- 1 cup sushi rice, cooked and cooled
- 2 sheets of nori (seaweed)
- 1/4 cup crushed peanuts (optional)
Instructions
- Prepare the Sushi Rice: Start by cooking sushi rice according to package instructions. Once done, let it cool.
- Spread the Peanut Butter: Lay a sheet of nori on a clean surface. Spread a thin layer of peanut butter on top of the nori.
- Add Rice: Place a layer of sushi rice over the peanut butter, pressing gently to stick.
- Place the Banana: Place a peeled banana near the edge of the nori and roll tightly like sushi.
- Slice and Serve: Once rolled, use a sharp knife to slice into bite-sized pieces. If desired, roll the pieces in crushed peanuts for added crunch.
Veggie Sushi Rolls
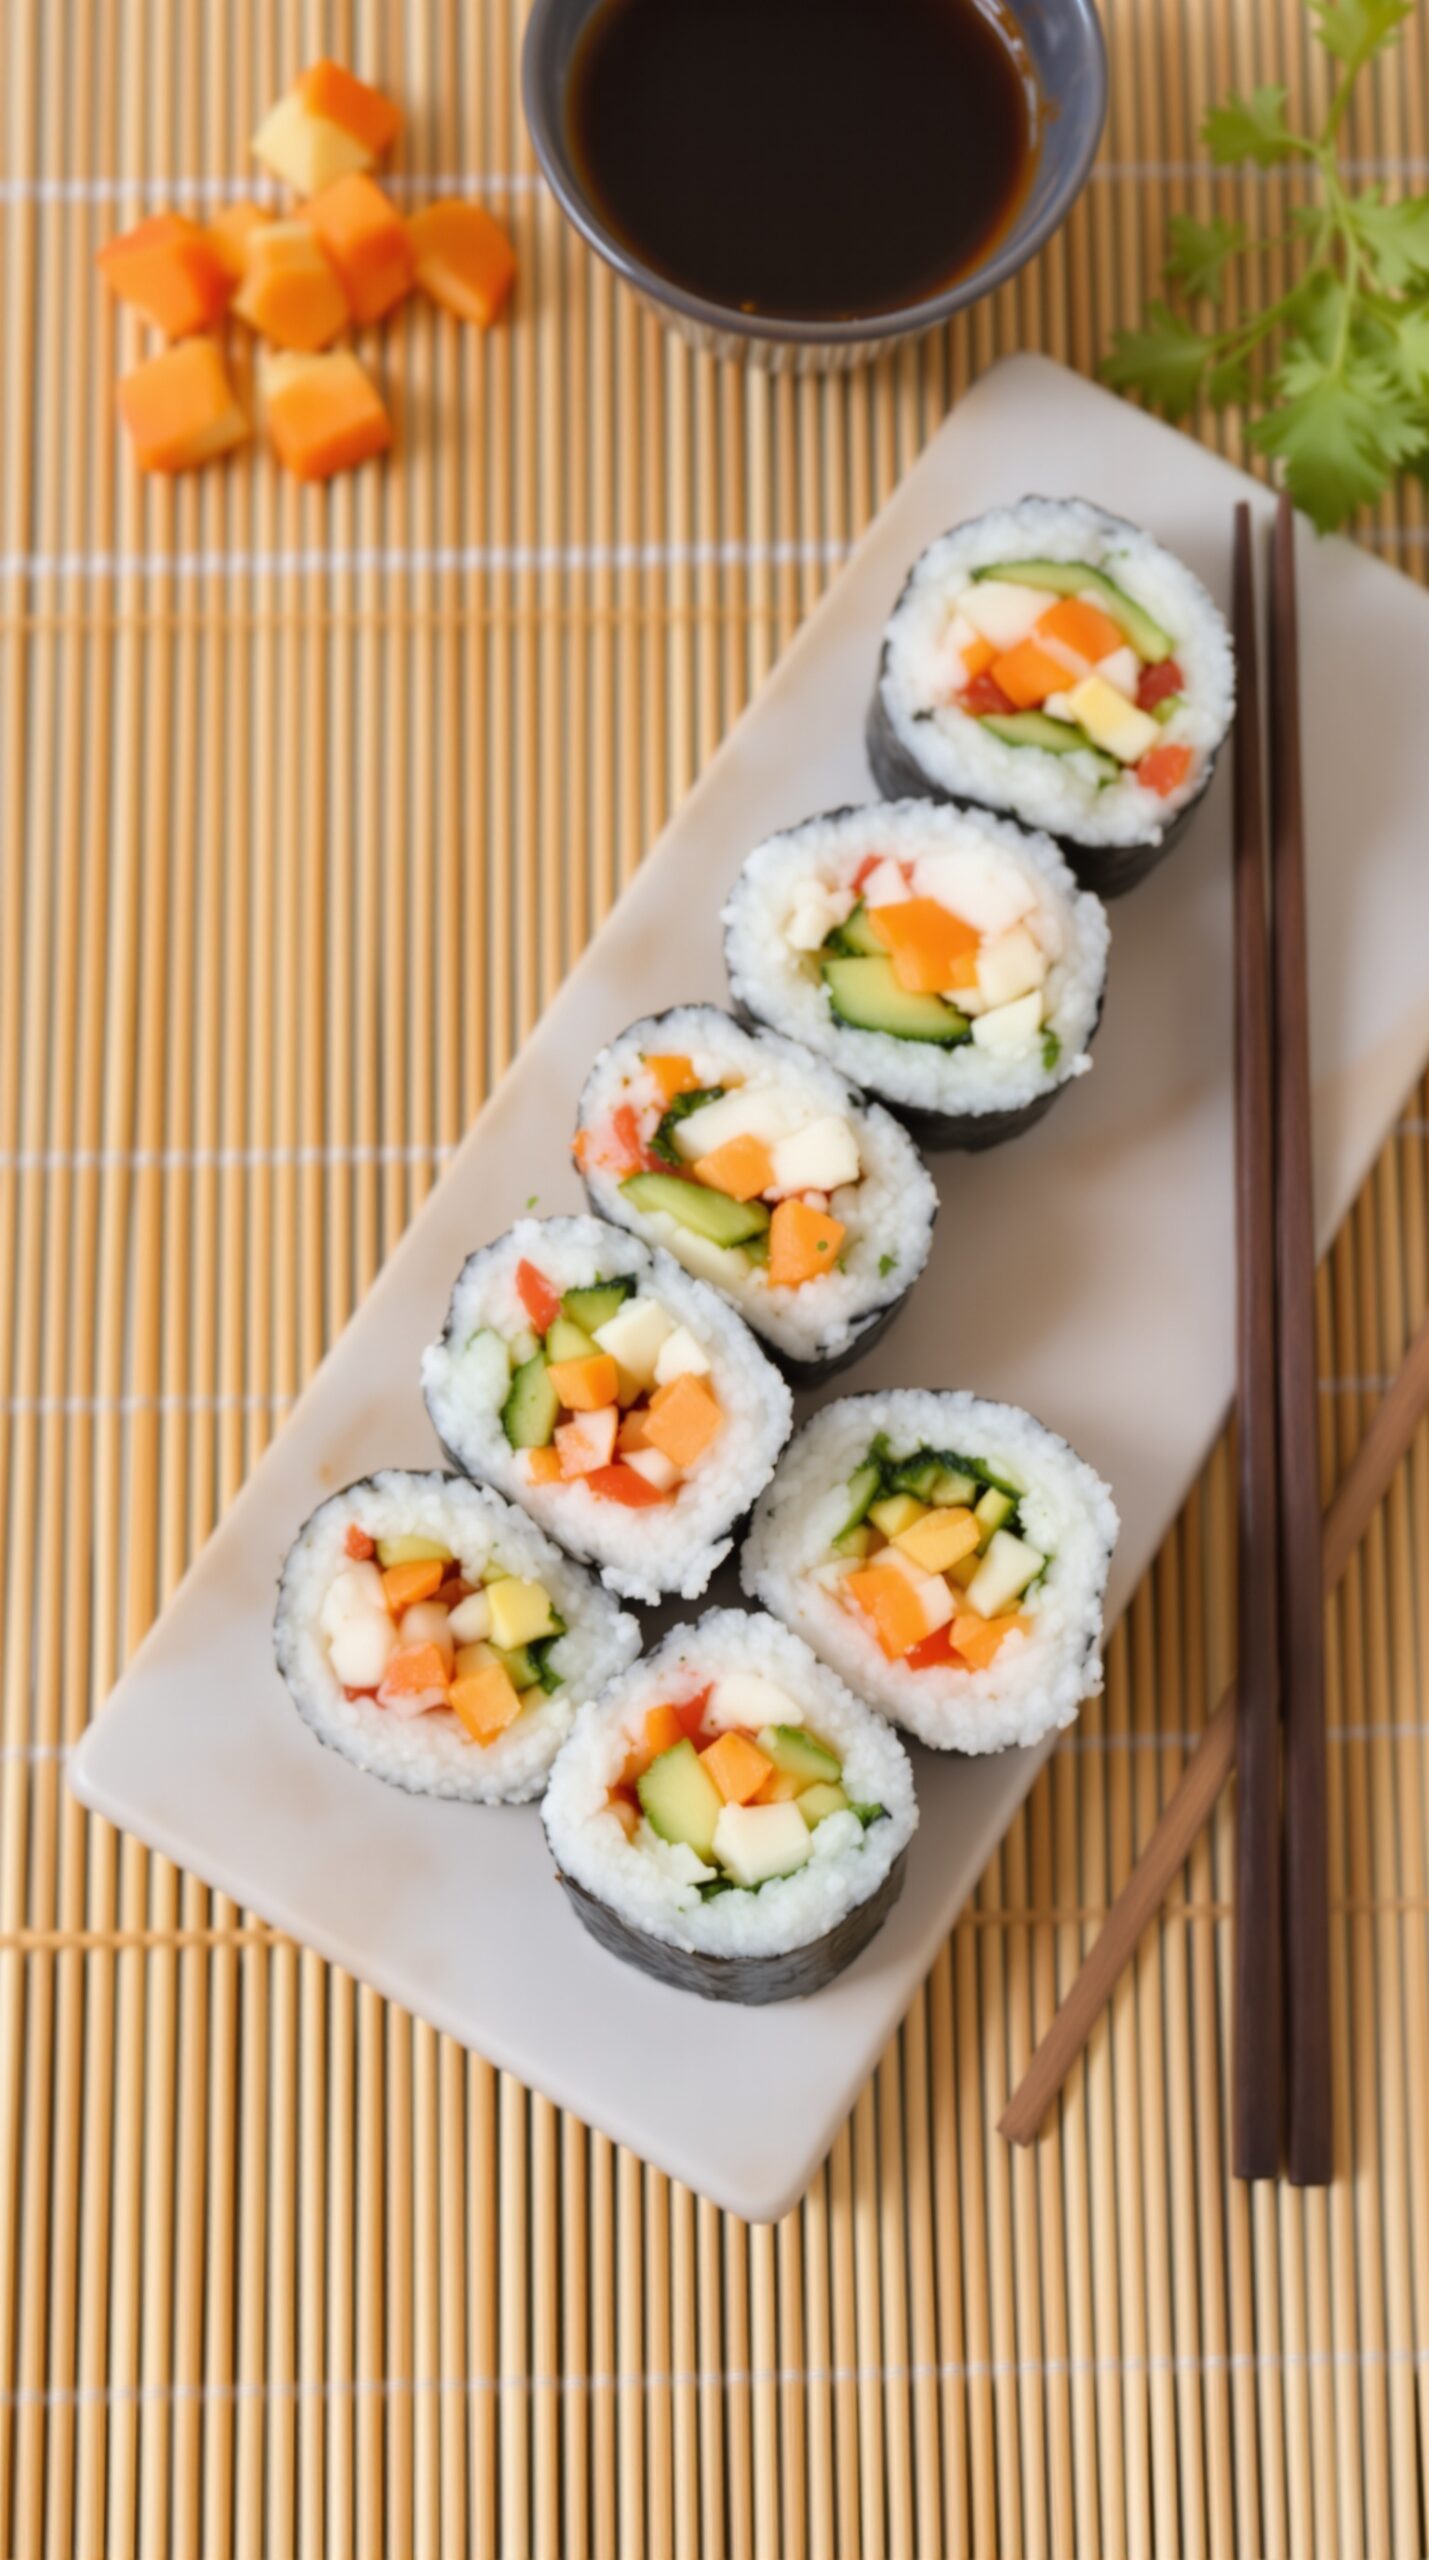
Veggie sushi rolls are a fun, colorful, and healthy lunch idea for kids. They are not only visually appealing but also packed with nutrients. Using fresh vegetables makes them a crunchy treat that kids will love. Plus, they can get involved in the kitchen, making it a fun family activity!
To make veggie sushi rolls, you can use a variety of vegetables. Common fillings include cucumbers, carrots, bell peppers, and avocado. These ingredients are rolled in sushi rice and wrapped in nori seaweed, making a delicious and portable lunch option.
Kids can personalize their sushi with their favorite veggies, making it a great way to encourage them to try new foods. Serve the rolls with a side of soy sauce for dipping, and you’ve got a hit on your hands!
Ingredients
- 1 cup sushi rice
- 1 1/4 cups water
- 4 sheets of nori seaweed
- 1/2 cucumber, julienned
- 1 carrot, peeled and julienned
- 1/2 bell pepper, thinly sliced
- 1 avocado, sliced
- Sesame seeds (optional)
- Soy sauce for dipping
Instructions
- Cook the Rice: Rinse sushi rice under cold water until the water runs clear. Combine rice and water in a rice cooker and cook according to the manufacturer’s instructions. Once done, let it cool slightly.
- Prep the Veggies: While the rice is cooking, prepare your vegetables by cutting them into thin strips.
- Assemble the Rolls: Place a sheet of nori on a bamboo sushi mat. Wet your hands to prevent sticking, then spread a thin layer of rice over the nori, leaving a small border at the top. Lay your vegetable strips in a line across the center of the rice.
- Roll It Up: Starting from the bottom, lift the mat and roll it away from you, pressing gently but firmly to keep the roll tight. Continue rolling until you reach the edge of the nori. Moisten the edge with a little water to seal the roll.
- Slice and Serve: Use a sharp knife to slice the roll into bite-sized pieces. Arrange them on a plate, sprinkle with sesame seeds, and serve with soy sauce.
Homemade Chicken Nuggets

Kids love chicken nuggets, and homemade ones are even better! You can control the ingredients, making them not only delicious but also healthier. Plus, they’re super easy to make, whether you’re cooking for a big family or just a few little ones. This particular batch is golden brown, crisp on the outside, and tender on the inside. Pair them with some fresh veggies and your favorite dipping sauce for a fun meal!
To make these chicken nuggets, you need just a few simple ingredients. Start with some fresh chicken breast, which you’ll cube for easy cooking. You will also need flour, eggs, and breadcrumbs for that perfect crispy coating! The nuggets can be baked or fried based on your preference.
Setting up your cooking station is a breeze. Make sure to dredge those chicken pieces in flour first, dip them in eggs, and then coat with breadcrumbs. This triple-layering gives the nuggets their fantastic crunch!
When your nuggets are ready, serve them with ketchup or any of your kids’ favorite dipping sauces. They also go great alongside fresh veggie sticks and a bit of cheese. It’s the perfect, wholesome lunch idea!